Does anyone have html code/css that would control the left or right margin for text on a widget on a custom page allowing you to have an image to the left or right of a box as shown in my mock up below?I don’t have extensive html/css skills but can cut and paste code into an HTML widget and I do know how to add custom styles to the configure branding and look area.
Best answer by Anders
Here's one way to do it:
<!DOCTYPE html>
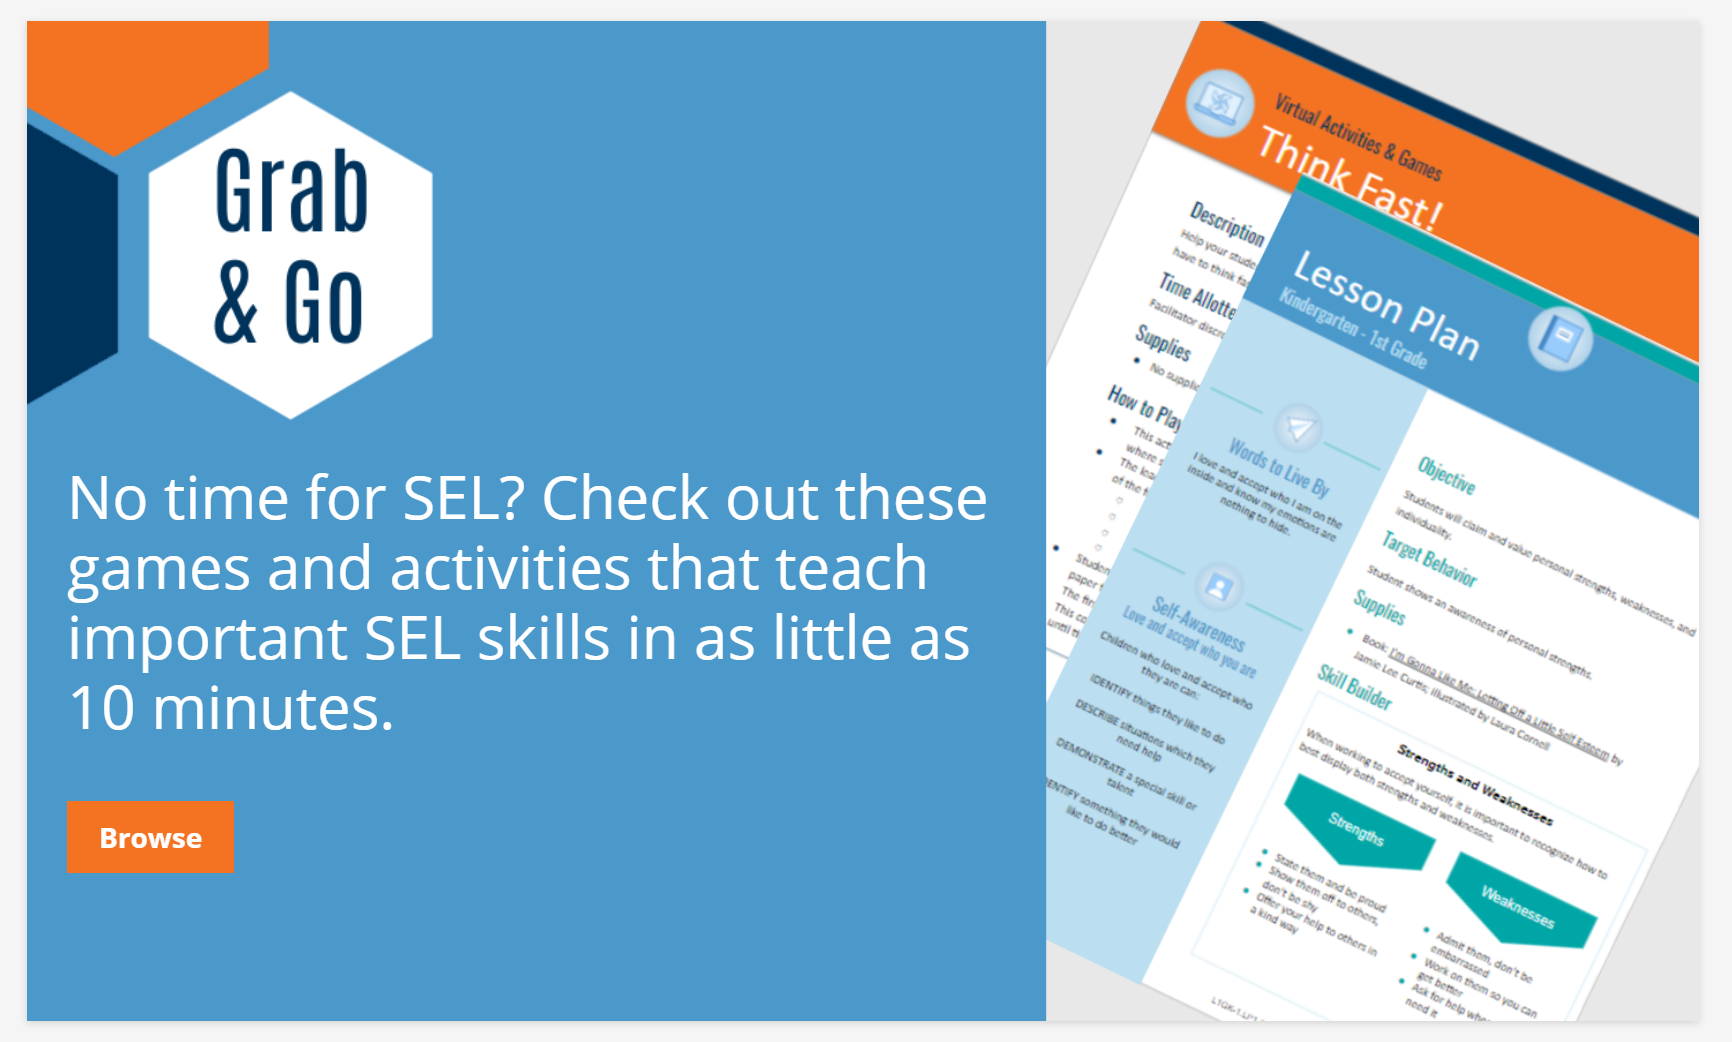
<!-- First well make a division with the background color we want. We'll make it 100% wide, so the entire widget. --> <div style="width: 100%; min-height: 500px; background-color: #4b98cb; "> <!-- We put the left image in its own division. We use float: left to allow text to flow on the left of this image. --> <div id="image" style="float: right; height: 500px;"> <img src="You need to put your own image file here" style="height: 100%;" /> </div> <!-- Now we make a division for the right side. --> <div> <!-- We start with the corner image. I've manually set the height to 200px, becaused that looked OK --> <img style="height: 200px; width: auto;" src="You need to put your own image file here" /> <!-- Here is a division for the text. It has a 20px margin. --> <div id="text" style="margin: 20px; "> <p style="font-size: 40px; color: white;"> No time for SEL? Check out these games and activities that teach important SEL skills in as little as 10 minutes. </p> <!-- The button is really just a link, but with fancy formatting. --> <a style=" padding: 8px 16px; margin: 20px 20px 20px 0; line-height: 20px; font-size: 14px; font-weight: 700; color: #ffffff; background: #f37322; text-decoration: none; display: inline-block;" href="" > Browse </a> </div>
</div> </div>
I had to manually set the widget height to the same as the image (500px).
This might look different for you, depending on any custom styles set in Docebo. But here is what it looks like for me:
I know it isn’t an answer to your question as I’m not that great with HTML / CSS and hopefully someone else can help you with that… however!
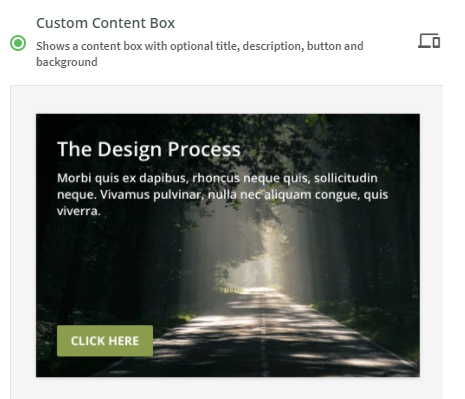
Isn’t the mockup you attached just a Custom Content Box widget with a fancy graphic for a background? (perhaps the text is also a part of the image) Even if it isn’t then I absolutely see the possibility of recreating something similar with it and it should be fairly easy I hope it helps - image of the custom content box widget below:
Isn’t the mockup you attached just a Custom Content Box widget with a fancy graphic for a background? (perhaps the text is also a part of the image) Even if it isn’t then I absolutely see the possibility of recreating something similar with it and it should be fairly easy I hope it helps - image of the custom content box widget below:
@abartunek Thanks for the response. So yes, you could have text as part of the background image and use the custom content box. But, there are two issues that I am having with that as an option. 1) Even with the highest resolution image, the text still looks a little fuzzy and I can’t figure out how to make it better. 2) the text on the image of course is not responsive so it can get really wonky with your screen size. I am thinking HTML/CSS would help with the first problem and maybe help a little with the second problem????
Sorry Cindy, I myself can’t help with that. For such stuff, we use some support from our IT department; however, I have one more recommendation that you might find useful.
Recently, we’ve started using a Comslider tool. It allows you to create cool, interactive and animated slideshows. I’m not sure if this is something that would be useful to you, but in our case, it works magic. It’s very easy and intuitive. You create it on their website and then just put it in Docebo using the code it generates.
It that doesn’t solve your issue, I hope somebody else will be able to answer you :)
I have worked quite a bit with HTML on Docebo and although it seems to accept certain HTML tags, once rendered some tags just don’t ‘stick’. That said, it never hurts to try but please do test, test, test to make sure you get the results you want. You might also try this tool to create code (Visual Studio Code https://code.visualstudio.com/) and check out this basic site if you have a certain comfort level with HTML coding (https://www.w3schools.com/html/default.asp).
to more directly answer your question, i haven't had any luck finding the specific tag that would add padding to the left/right margins. You might try working with a TABLE (centered) or by adding some borders...these tags seem to work ok.
@lrnlab Thanks so much. I have been trying to teach myself HTML and CSS. I understand the basics but when it comes to practical application I fail miserably . I too have had the problem with the HTML “sticking” once you paste it into the widget but I haven’t tried using TABLE tag, so I’ll give that a go. I was hoping @andreabiraghi could give me some tips!?! If some of you are interested in checking out how to step up your page design, I really like the courses and content in Docebo U that Andrea has done. Here’s a link to one of his courses.
@Cindy McElhinney link doesn't work for me...what’s the course name? What i was told by support regarding HTML in Docebo is that although some places appear to work (while you're creating the code or editing it) once it’s published or previewed, the code Docebo doesn't support is not displayed or stripped out completely. I opted to keep things simple for now.
@Cindy McElhinney link doesn't work for me...what’s the course name? What i was told by support regarding HTML in Docebo is that although some places appear to work (while you're creating the code or editing it) once it’s published or previewed, the code Docebo doesn't support is not displayed or stripped out completely. I opted to keep things simple for now.
@lrnlab Sorry the link isn’t working. Here’s the link: https://university.docebo.com/share/asset/view/69 again. The course is titled Take Your Platform Design to the Next Level. Yes, keeping it simple is best. Sometimes I have a hard time with being constrained by what you can do “out of the box.” Unfortunately my skill set doesn’t let me go off with wild abandon. That’s probably a good thing
@Cindy McElhinney that worked, thanks...from what i can see (and downloaded) it looks to be pretty comprehensive...if you need help with any of the suggestions made or would like to try them out I can certainly help you out.
@lrnlab Great. Thanks. Yes, I played around with the HTML and CSS from the course and was able to get the custom widgets working in my sandbox. These certainly open up the possibilities of what you can do on a page for sure.
<!-- First well make a division with the background color we want. We'll make it 100% wide, so the entire widget. --> <div style="width: 100%; min-height: 500px; background-color: #4b98cb; "> <!-- We put the left image in its own division. We use float: left to allow text to flow on the left of this image. --> <div id="image" style="float: right; height: 500px;"> <img src="You need to put your own image file here" style="height: 100%;" /> </div> <!-- Now we make a division for the right side. --> <div> <!-- We start with the corner image. I've manually set the height to 200px, becaused that looked OK --> <img style="height: 200px; width: auto;" src="You need to put your own image file here" /> <!-- Here is a division for the text. It has a 20px margin. --> <div id="text" style="margin: 20px; "> <p style="font-size: 40px; color: white;"> No time for SEL? Check out these games and activities that teach important SEL skills in as little as 10 minutes. </p> <!-- The button is really just a link, but with fancy formatting. --> <a style=" padding: 8px 16px; margin: 20px 20px 20px 0; line-height: 20px; font-size: 14px; font-weight: 700; color: #ffffff; background: #f37322; text-decoration: none; display: inline-block;" href="" > Browse </a> </div>
</div> </div>
I had to manually set the widget height to the same as the image (500px).
This might look different for you, depending on any custom styles set in Docebo. But here is what it looks like for me:
Hey @Anders can you share the code so we can copy it? Thanks!
The code is included in my post. You might need to click something to see it.
Thanks Anders, I managed to figure it out with just the text portion which is mostly what I was looking for...your code looks great though...did you do that yourself or do you have someone who codes for you?
The button is something we already have in our custom styles in Docebo (just changed the color and tweaked some details). The rest I wrote just to see if I could solve the puzzle. 😄
@Anders lol, I do the same here..some bits from others’ coding and some from internet, etc. Have found though that not al HTML code inout into the LMS works (even if the preview says it does)...had the experience with the Privacy Policy and T&C...although you can add tags to colour fonts and create tables, etc. once published, Docebo strips these out. Asked support about this and they said that Docebo technically only supports HTML code available via their WYSIWYGs (a bit disappointing)...that said the HTML widget does seem to allow to bypass those rules, thankfully.