

Presenting a targeted version of Docebo Learn to different audiences can be extremely beneficial.
For example, you may want new hires to only see certain menus and learning plans so that they can focus on their assigned work. After a new hire has completed their onboarding learning plan, you may want to grant them access to a different menu with content that’s more relevant for employees who are already onboarded.
In this guide, we’ll walk you through how to build a “sequential” experience for your learners in Docebo Learn using the above example.
Prerequisite Knowledge
Before diving in, we recommend thorough knowledge on the following topics:
-
Creating and Managing Pages & Menus
-
Docebo University Courses
-
Docebo Help Articles
-
-
Creating and Managing Courses & Learning Plans
-
Docebo University Courses
-
Docebo Help Articles
-
Now let’s jump in...
Prerequisite Steps
We’ll assume that you’ve already completed the following steps in your platform:
-
Created all pages (including the home pages) that will make up each group’s menu
-
Created two menus with appropriate pages:
-
New Hire Menu
-
Onboarded Employee Menu
-
-
Created a learning plan, course, or set of courses that all new hires must complete before transitioning to the onboarded employee experience.
Creating Your Groups
We first need to create two groups that we’ll use to set the visibility of our menus:
-
New Hire Onboarding automatic group – sorted by User Additional Field conditions
-
Onboarded Employee automatic group – sorted by Enrollment Status Based conditions
-
Create the New Hire Onboarding Group - where users will land when they are first hired
-
Navigate to Admin Menu > Groups
-
Select + New Group in the top right
-
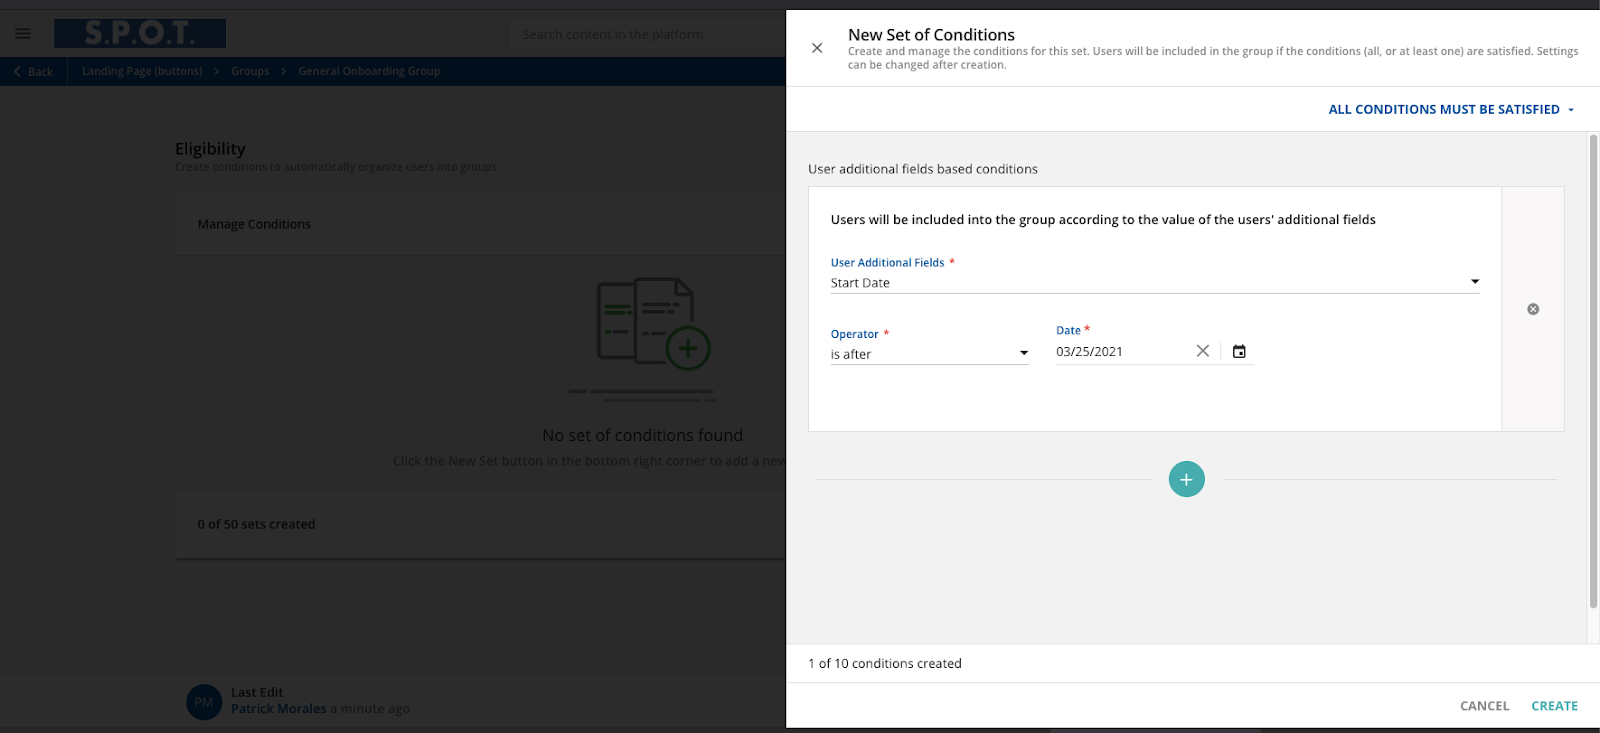
Select New Set under Manage Conditions in the Eligibility section of the group
-
Select User additional fields based conditions
-
Select your Date User Additional Field (Start Date)
-
Select is after for the Operator
-
Select your desired Date
-
Select Create
-
Select Save Changes
-
Please note: in this example, we’ll be creating an automatic group but it is not a requirement. We’ll be using a date additional field that we’ve titled “Start Date” targeting all new hires with a start date after a certain date.
-
Create an Enrollment Rule that will enroll any users in the New Hire Onboarding Group into their initial learning plan (or courses). For additional details, check out the KB article on Enrollment Rules.
-
Create the Onboarded Employee Group
-
Repeat the steps from Step 1, utilizing Start Date” as ourUser additional field condition” but select Before instead of Afteras the operator
-
Use the same date as our New Hire Onboarding Group.
-
Add an additional Enrollment Status Based Condition”
-
Target the last course in your onboarding learning plan or the course(s) required for all new hires
-
Select Completed for Enrollment Status for all courses and learning plans
-
Assigning Menus to Groups
With both groups created, it’s time to assign visibility to the New Hire and Onboarded Employee menus.
-
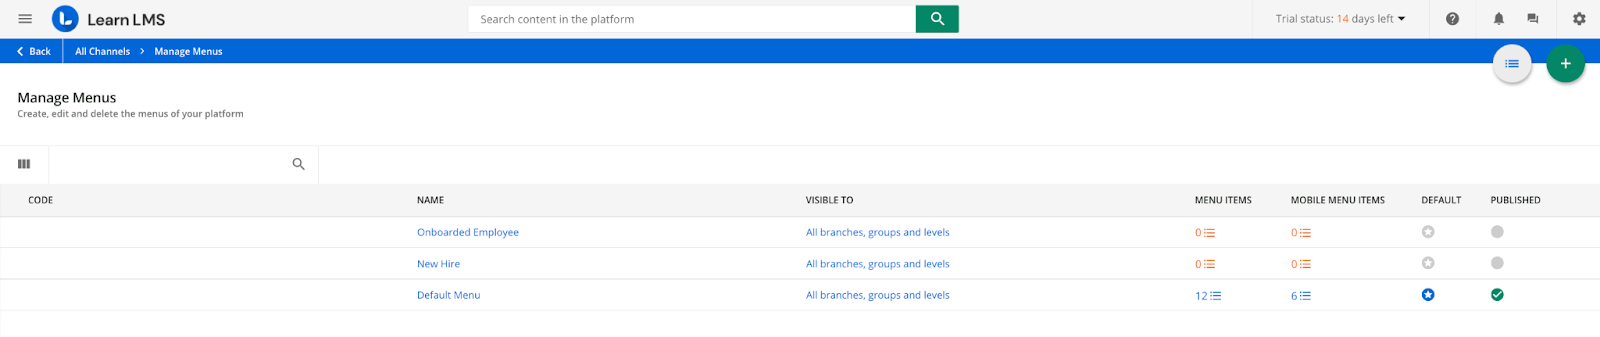
Navigate to Admin Menu > Manage Menus
-
Select the New Hire menu
-
Expand the Visibility section of the Menu Settings
-
Type or Select the New Hire group
-
Ensure your Menu is Published
-
Select Save Changes
-
Repeat these steps for your Onboarded Employee menu, selecting the Onboarded Employee group in the final step
Organizing Your Menus Appropriately
Remember - The order of the Menus on the Manage Menus page determines which menu will display for a learner who meets the criteria for multiple menus. By default, the first menu that a user is eligible to see in the menu hierarchy will be the menu that displays for that user.
Navigate to Admin Menu > Manage Menus ensure that the New Hire Onboarding Menu is lower in the list of your Menus than the Onboarded Employee Menu.
Phew! Let’s take a second to recap what we’ve accomplished together:
-
We’ve built a New Hire Onboarding group that adds users by the Start Date additional field. We’ve built an Onboarded Employee group that adds all existing and onboarded employees
-
We’ve assigned menus to each group that show relevant pages
-
We’ve organized the order of our menus to ensure that the correct menus display for our learners at all times.
Additional Considerations:
-
If users need to complete more than one course to complete their onboarding (regardless of whether or not these courses are in a learning plan), the best practice is to add all of the courses as individual Enrollment Status Based Conditions and ensure that the logic for the conditions is set to All Conditions Must Be Satisfied. Each condition set can contain up to 10 conditions, and each automatic group can contain up to 50 condition sets, so you may need to use multiple condition sets if you require learners to complete more than 10 courses.
-
Users may need to log out and log back into the platform or clear their cache in order to see the updated experience after completing all criteria to be added to a new group. We recommend sending learners a notification upon completion of their required courses or learning plans that informs them their experience will be changing in the platform that includes instructions on how to navigate the new experience.
Demonstration of the Experience
Share Your Experience!
We’d love to hear about your experience with this process or similar process. Please share below ⬇️⬇️

