And I have a similar challenge, but don’t quite get how to fix it.
I want to have an image widget next to a custom content widget. It’s just there to look pretty. I’ve tried using different sizes, but the widget just stays huge which then distorts the image.
What else can I do to control the height on the image on the left to be closer to the height on the custom content box?
Best answer by Adam Ballhaussen
Hey @lhubbard, @lrnlab and @Bfarkas have both shared some great recommendations for ways to solve your challenge.
I’d like to throw one more recommendation into the mix. It’s a best practice I’ve always used.
Use Custom Content Box Widgets for Images instead of Image Widgets
As @nick.tosto pointed out in his answer in the Background Image Size for Widget the Image widget and Custom Content Box widget have fundamentally different properties when it comes to sizing:
Custom content box widgets use the background-size:cover; property by default and the height will be dependent upon the content you add to the widget
Image widgets use the background-size:contain; property by default and should always show the entire image
There’s one other main difference between Custom Content Box widgets and Image widgets that @lrnlab pointed out: you can force the minimum height of a Custom Content Box widget.
As a result, Custom Content Box widgets give you greater control over the exact height of your widgets than Image widgets without using CSS. I recommend adjusting the dimensions of the image file on the left so that it’s shorter, uploading the image as a Custom Content Box widget, hiding the title, subtitle, and button, and then setting an identical minimum height for the two Custom Content Box widgets that should now appear side-by-side.
You can use the information and tips in the following post to determine the correct dimensions for the new image:
Here are the steps to use a Custom Content Box widget to display an image with a minimum height:
From the Page Composer, select Add New Widget wherever you’d like to add the widget
Select Custom Content Box
Select Next Module
Set Background Options to Image
Upload your image file
Turn off the toggles for Show Content Title and Show Content Subtitle
Turn off the toggle for Show Button
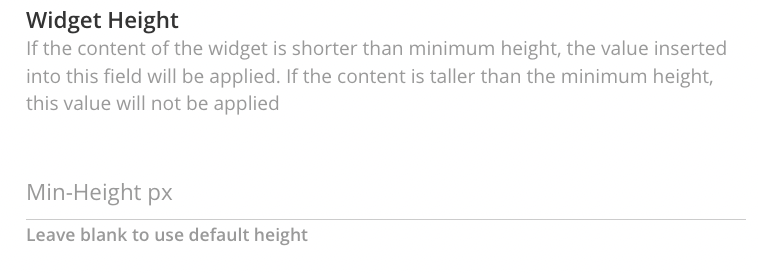
Set your desired Widget Height
I was able to achieve the following result by adjusting the image you used to 444px W x 200px H and forcing a minimum height for both Custom Content Box widgets to 200px.
I’ve attached two options for the image with updated dimensions to this post if you’d like to repurpose them.
If you had a case where you really wanted to adjust the image, although don’t really reccomend this, you could use CSS to do it, in the below the img within the widget of the specific ID has its height adjusted which adjusts the whole widget height. Important to remember widget ids can change when you make changes like number of columns or certain other actions. Also remember, because of different screen sizes it prob will not be pixel perfect, so you can always design for that. Just a matter of looking up the widget ID of the image widget on the page and adjust the number below.
Hey @lhubbard, @lrnlab and @Bfarkas have both shared some great recommendations for ways to solve your challenge.
I’d like to throw one more recommendation into the mix. It’s a best practice I’ve always used.
Use Custom Content Box Widgets for Images instead of Image Widgets
As @nick.tosto pointed out in his answer in the Background Image Size for Widget the Image widget and Custom Content Box widget have fundamentally different properties when it comes to sizing:
Custom content box widgets use the background-size:cover; property by default and the height will be dependent upon the content you add to the widget
Image widgets use the background-size:contain; property by default and should always show the entire image
There’s one other main difference between Custom Content Box widgets and Image widgets that @lrnlab pointed out: you can force the minimum height of a Custom Content Box widget.
As a result, Custom Content Box widgets give you greater control over the exact height of your widgets than Image widgets without using CSS. I recommend adjusting the dimensions of the image file on the left so that it’s shorter, uploading the image as a Custom Content Box widget, hiding the title, subtitle, and button, and then setting an identical minimum height for the two Custom Content Box widgets that should now appear side-by-side.
You can use the information and tips in the following post to determine the correct dimensions for the new image:
Here are the steps to use a Custom Content Box widget to display an image with a minimum height:
From the Page Composer, select Add New Widget wherever you’d like to add the widget
Select Custom Content Box
Select Next Module
Set Background Options to Image
Upload your image file
Turn off the toggles for Show Content Title and Show Content Subtitle
Turn off the toggle for Show Button
Set your desired Widget Height
I was able to achieve the following result by adjusting the image you used to 444px W x 200px H and forcing a minimum height for both Custom Content Box widgets to 200px.
I’ve attached two options for the image with updated dimensions to this post if you’d like to repurpose them.
It’s funny, this is actually what I typically do in this scenario, but skipped over in my mind. The only thing I like to remind folks is that it is Minimum height, not height. So what I see a lot of is people design to their one screen size without realizing that it will/can be quite different elsewhere so it is a balance act still for all options.
@Bfarkas that’s a great callout. At the end of the day, the height and dimensions of your actual image file is an important factor to consider when designing pages and using images in widgets.
I love the CSS tip! It’s another way to achieve the same outcome and gives you the flexibility to work in % and not just pixels.