
This is a companion to the guide for “Building a Milestone Ladder” using the gamification app. If you’d like to learn more about that strategy please review the link below.
.

🎯 Guide: Implementing the Milestone Ladder in a Docebo HTML Widget
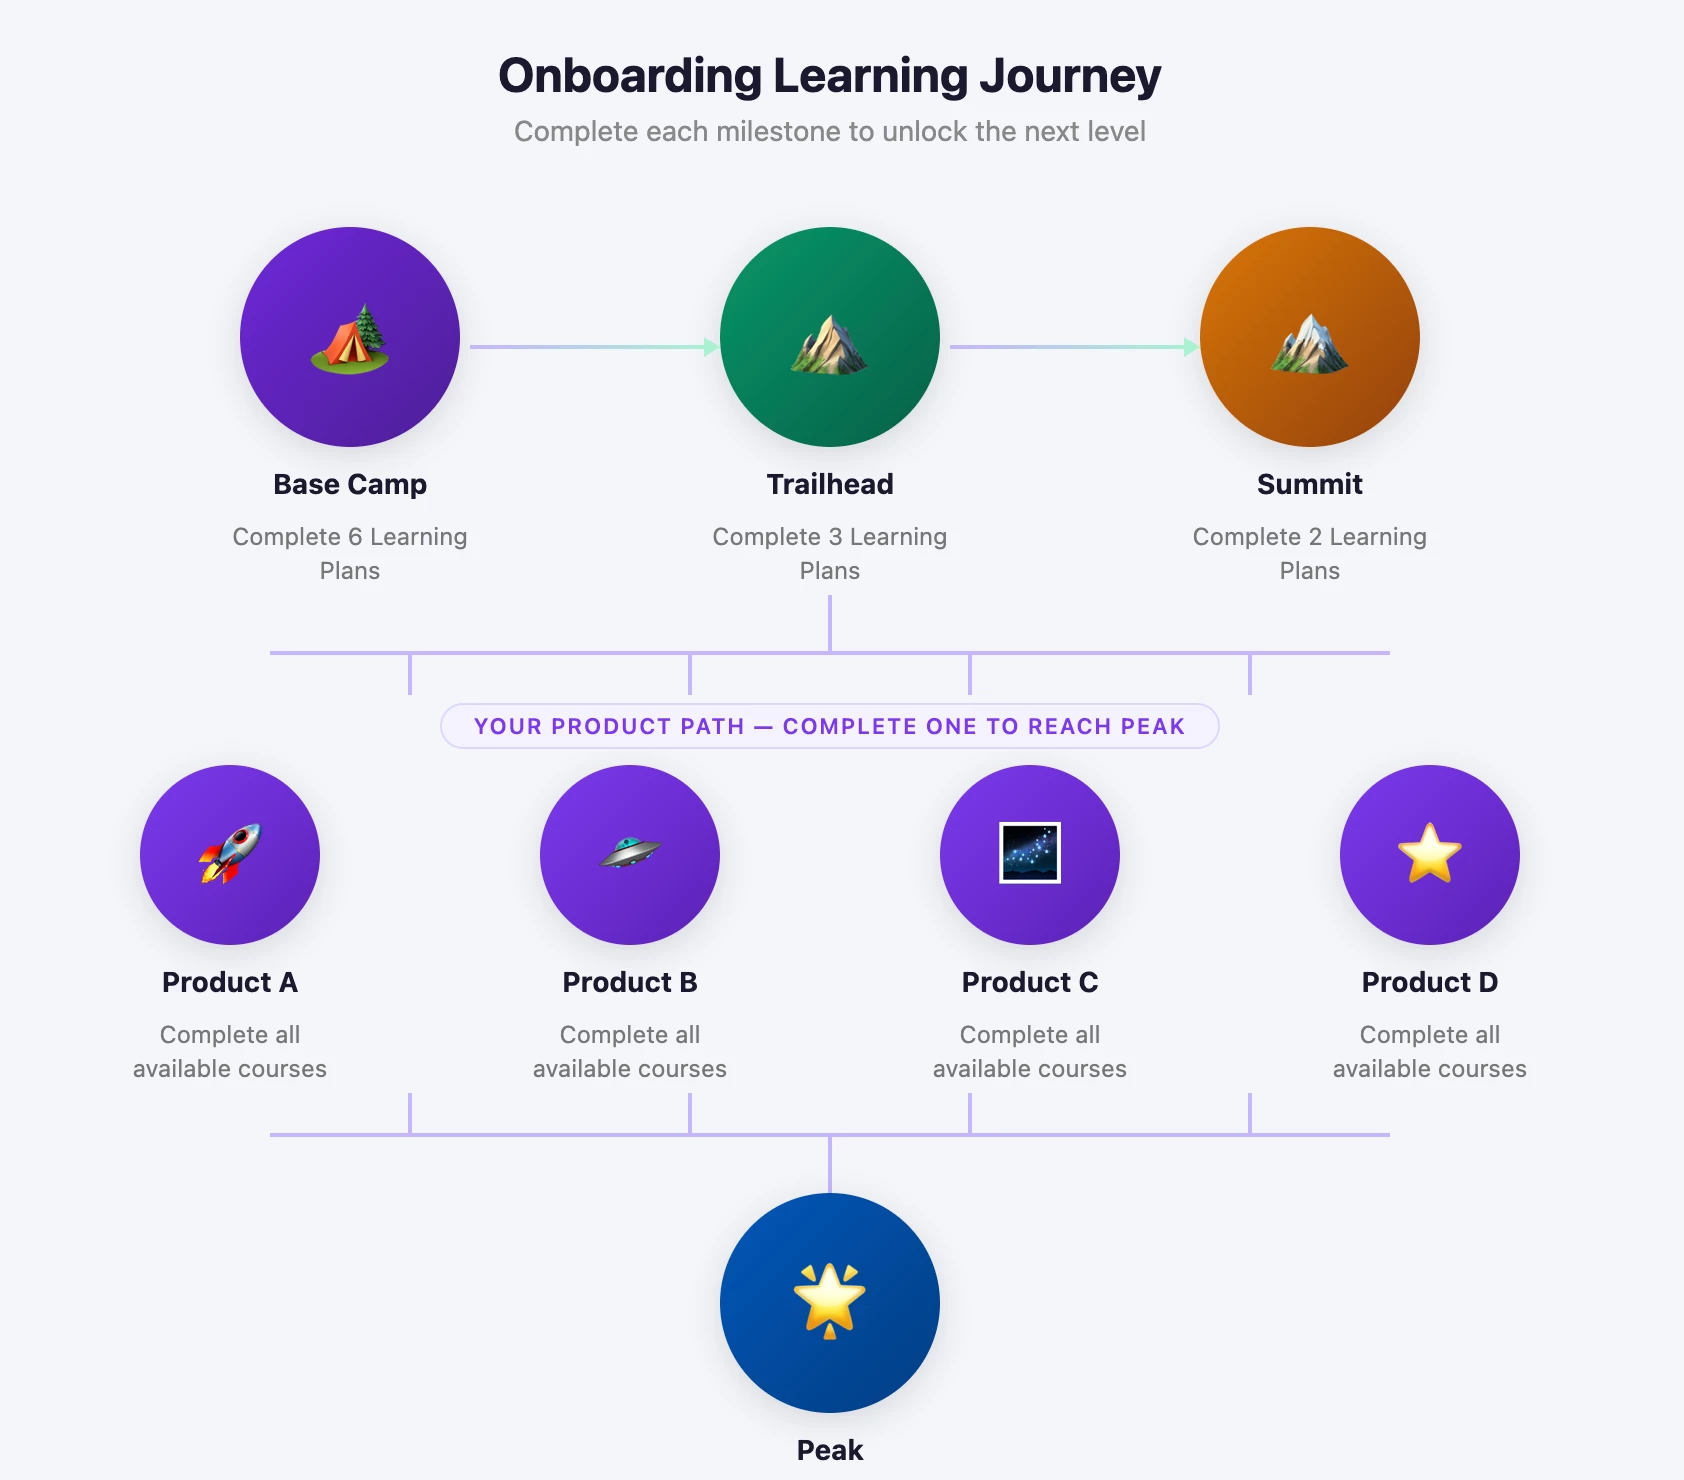
This guide shows you how to add a visual milestone ladder to your Docebo platform using an HTML widget and custom CSS.
The component creates a simple, structured way to display learner progress using badge images, milestone names, and completion thresholds. It’s designed to make learning paths easier to understand at a glance and reinforce a sense of progression.
You’ll learn how to:
- Add the required CSS to your platform
- Insert the milestone ladder into a page using an HTML widget
- Embed a supporting tutorial
- Safely update images and text without changing code
This is a reusable component that can be implemented quickly and updated easily by non-technical admins.
Part 1: Add the CSS to the platform
Before adding the milestone ladder to a page, you’ll need to add the CSS to your platform so the component displays correctly.
Docebo allows you to apply custom styling through the platform’s branding settings.
How to Add Custom CSS
- Go to the Admin Menu
- Select Branding and Look & Feel
- Navigate to the Custom CSS section
- Paste the CSS below into the editor
- Save your changes
CSS
/*Gamification Milestone Ladder Start*/
/*Gamification Milestone Ladder Start*/
/*Gamification Milestone Ladder Start*/


/* MAIN CONTAINER
Controls overall layout of the milestone ladder
- Sets max width
- Uses grid for horizontal layout
- Adjusts spacing between badges */

.badge-journey-grid-m3v8q1 {
  max-width: 1390px; /* Max width of the entire component */
  margin: 0 auto; /* Centers the component */
  display: grid;
  grid-template-columns: repeat(5, minmax(160px, 1fr)); /* 5 badges per row (desktop) */
  gap: 24px; /* Space between badge cards */
  align-items: start;
}

/* BOX MODEL RESET (SCOPED)
Ensures padding and borders behave consistently inside this component only*/

.badge-journey-grid-m3v8q1 *,
.badge-journey-grid-m3v8q1 *::before,
.badge-journey-grid-m3v8q1 *::after {
  box-sizing: border-box;
}

/* BADGE CARD
Wrapper for each milestone (image + text)
Controls alignment and spacing inside each card*/

.badge-card-m3v8q1 {
  display: flex;
  flex-direction: column; /* Stack image, name, and text vertically */
  align-items: center; /* Center content horizontally */
  text-align: center;
  padding: 12px 10px; /* Inner spacing for each card */
}

/* IMAGE CONTAINER
Controls size and shape of badge image
- Forces circular shape
- Crops image if needed */

.badge-image-wrap-m3v8q1 {
  width: 100px; /* Badge size */
  height: 100px;
  margin-bottom: 14px; /* Space below image */
  border-radius: 50%; /* Makes circle */
  overflow: hidden; /* Crops image to circle */
  flex-shrink: 0;
}

/* BADGE IMAGE
Ensures image fills container and stays circular */

.badge-image-m3v8q1 {
  display: block;
  width: 100%;
  height: 100%;
  object-fit: cover; /* Prevents distortion */
  border-radius: 50%;
}

/* BADGE NAME (TITLE)
Main label for each milestone */
.badge-name-m3v8q1 {
  font-size: 16px;
  font-weight: 700;
  line-height: 1.3;
  color: #1d2a39;
  margin-bottom: 6px;
  font-family: Arial, Helvetica, sans-serif;
}

/* BADGE THRESHOLD (SUBTEXT)

Describes requirement (e.g., "Complete 5 courses")*/
.badge-threshold-m3v8q1 {
  font-size: 14px;
  line-height: 1.4;
  color: #5b6573;
  font-family: Arial, Helvetica, sans-serif;
  font-weight: bold;
}

/* RESPONSIVE BEHAVIOR

Adjusts number of columns based on screen size:
- Desktop: 5 columns
- Tablet: 3 columns
- Small tablet: 2 columns
- Mobile: 1 column */


/* Tablet */
@media (max-width: 1100px) {
  .badge-journey-grid-m3v8q1 {
    grid-template-columns: repeat(3, minmax(160px, 1fr));
  }
}

/* Small tablet */
@media (max-width: 700px) {
  .badge-journey-grid-m3v8q1 {
    grid-template-columns: repeat(2, minmax(160px, 1fr));
  }
}

/* Mobile */
@media (max-width: 480px) {
  .badge-journey-grid-m3v8q1 {
    grid-template-columns: 1fr;
  }
}


/*Gamification Milestone Ladder End*/
/*Gamification Milestone Ladder End*/
/*Gamification Milestone Ladder End*/
Step 2: Add the HTML to a Docebo Page
To display the milestone ladder on a page:
- Create a row
Within your Docebo page, add a new row.
This component works best in a full-width row layout. - Add an HTML widget
Insert an HTML Custom Widget into that row. - Paste the HTML into the widget
Copy the milestone ladder HTML and paste it into the widget editor. - Save
Save the widget and publish the page.
Once the page is saved, the milestone ladder will render using the platform-level CSS added earlier.
Here is a sample structure you can use:
<div class="badge-journey-grid-m3v8q1">
  <div class="badge-card-m3v8q1">
    <div class="badge-image-wrap-m3v8q1">
      <img class="badge-image-m3v8q1" src="IMAGE_URL_1" alt="First Step badge">
    </div>
    <div class="badge-name-m3v8q1">First Step</div>
    <div class="badge-threshold-m3v8q1">Complete 1 course</div>
  </div>

  <div class="badge-card-m3v8q1">
    <div class="badge-image-wrap-m3v8q1">
      <img class="badge-image-m3v8q1" src="IMAGE_URL_2" alt="Explorer badge">
    </div>
    <div class="badge-name-m3v8q1">Explorer</div>
    <div class="badge-threshold-m3v8q1">Complete 3 courses</div>
  </div>

  <div class="badge-card-m3v8q1">
    <div class="badge-image-wrap-m3v8q1">
      <img class="badge-image-m3v8q1" src="IMAGE_URL_3" alt="Participant badge">
    </div>
    <div class="badge-name-m3v8q1">Participant</div>
    <div class="badge-threshold-m3v8q1">Complete 5 courses</div>
  </div>

  <div class="badge-card-m3v8q1">
    <div class="badge-image-wrap-m3v8q1">
      <img class="badge-image-m3v8q1" src="IMAGE_URL_4" alt="Committed Learner badge">
    </div>
    <div class="badge-name-m3v8q1">Committed Learner</div>
    <div class="badge-threshold-m3v8q1">Complete 10 courses</div>
  </div>

  <div class="badge-card-m3v8q1">
    <div class="badge-image-wrap-m3v8q1">
      <img class="badge-image-m3v8q1" src="IMAGE_URL_5" alt="Power User badge">
    </div>
    <div class="badge-name-m3v8q1">Power User</div>
    <div class="badge-threshold-m3v8q1">Complete 15 courses</div>
  </div>
</div>
Part 4: Customizing for your platform.
To customize this component, admins only need to replace:
-
image URLs
-
badge names
-
milestone text
You do not need to change class names or layout structure.
Please use the prompt below.
🤖 LLM Prompt for Non-Technical Updates
Use this prompt in ChatGPT, Gemini or Claude if to customize this widget and make it your own.
Update the HTML milestone ladder component below without changing the CSS class names or overall structure.

Replace only:
- the image URLs
- the badge names
- the milestone / threshold text
- the alt text so it matches each badge

Keep the code valid HTML.
Do not rewrite the layout.
Do not remove any wrapper divs or class names.
Return the full updated HTML only.

New content:

Badge 1
Image URL: [PASTE IMAGE URL]
Badge Name: [PASTE BADGE NAME]
Threshold Text: [PASTE THRESHOLD TEXT]

Badge 2
Image URL: [PASTE IMAGE URL]
Badge Name: [PASTE BADGE NAME]
Threshold Text: [PASTE THRESHOLD TEXT]

Badge 3
Image URL: [PASTE IMAGE URL]
Badge Name: [PASTE BADGE NAME]
Threshold Text: [PASTE THRESHOLD TEXT]

Badge 4
Image URL: [PASTE IMAGE URL]
Badge Name: [PASTE BADGE NAME]
Threshold Text: [PASTE THRESHOLD TEXT]

Badge 5
Image URL: [PASTE IMAGE URL]
Badge Name: [PASTE BADGE NAME]
Threshold Text: [PASTE THRESHOLD TEXT]

HTML to update:
[PASTE EXISTING HTML HERE]
Optional Simpler Prompt
If you want something even easier for admins:
Please update this HTML milestone ladder. Only replace the badge image URLs, badge names, threshold text, and matching alt text. Do not change any class names, div structure, or layout. Return full HTML only.

Badge 1: [name] | [threshold] | [image URL]
Badge 2: [name] | [threshold] | [image URL]
Badge 3: [name] | [threshold] | [image URL]
Badge 4: [name] | [threshold] | [image URL]
Badge 5: [name] | [threshold] | [image URL]

HTML:
[PASTE HTML]
🏞 Hosting Images in Docebo
You. might be wondering “How do I create an image URL or how can I host the images in Docebo?”
This community discussion will show you how you can add images through the WYSWG editor and grab a URL from that workflow.