This post is meant to be an attempt at helping folks implement a slider type of widget with images that cycle through in an endless loop. No interaction. Down the road, I will offer one that has some manual selection to it. That is why this is titled as option 1.
There has indeed been a number of postings referencing Comslider as a great resource for this sort of thing. I have not used it personally but I would venture a guess that it is much nicer and simpler than what I am about to offer here but this is free - so I guess you get what you pay for - LOL. At any rate - I figure that for some folks - Comslider may not be an option. If that is the case - you have one here.
This is a CSS and HTML option - no JavaScript. This would still require some work on your part to tweak it for your number of images and to put in your image URLs - etc. I will try to help with that part as best I can.
Here is a quick look at the one I built as a sample. Sorry it is a little small and blurry but I had to get it under the 5MB limit to post it in this thread. You get the idea though. My example cycles through four images continuously for about 5 seconds each. (I reduced time for the gif).

As with other things like this - there are two parts. The CSS for the Branding and Look section and the HTML for your widget.
In this case - I went with a full sized row for the widget.
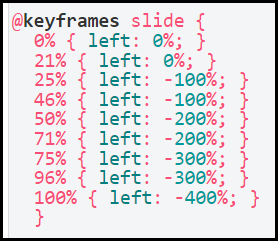
Take a look at the @keyframes block at the top.
This will need adjusting if you change the number of images.
I calculated this out so each image had the same amount of percentage and percentage spacing in-between. This way the transition between images stays smooth at the same speed.
Also - I end the transition to the last image (same as first) right at 100% so that it can restart the animation at 0% with the first image for the same amount of time. That is one trick for the loop. The other trick is in the HTML. (see below)
What we are doing is actually sliding all the images off in a big line which is why the transitions are in increments of 100% so if you add more images or remove some - you’ll have to adjust to keep it smooth.
There are two other spots you’ll need to tweak if you change the number of images. See the comments for more on those.
/** This is the timing of the animated images. **/
/** These will need to be adjusted if you change the total number. **/
@keyframes slide {
0% { left: 0%; }
21% { left: 0%; }
25% { left: -100%; }
46% { left: -100%; }
50% { left: -200%; }
71% { left: -200%; }
75% { left: -300%; }
96% { left: -300%; }
100% { left: -400%; }
}
/** This block helps use the whole widget and keeps out scroll bars. **/
#bannerSlider {
width: 100%;
overflow: hidden;
}
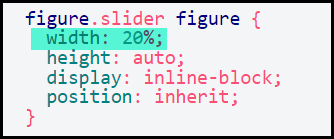
/** This block has a key value for the width. **/
/** Pay close attention to this value. **/
/** It needs to correspond with the number of images you have. **/
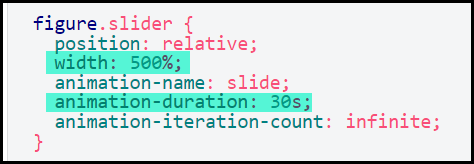
figure.slider {
position: relative;
width: 500%;
animation-name: slide;
animation-duration: 30s;
animation-iteration-count: infinite;
}
/** This block has a key value for the width. **/
/** Pay close attention to this value. **/
/** It should represent a fraction of the whole for each image. **/
/** Ex. 5 images - each image is 20 % **/
figure.slider figure {
width: 20%;
height: auto;
display: inline-block;
position: inherit;
}
/** This block refers to each image. **/
figure.slider img {
width: 100%;
height: auto;
}
/** This block formats the label caption at the bottom **/
/** You could tweak the colors and font as desired **/
figure.slider figure figcaption {
position: absolute;
bottom: 0;
background: rgba(0,0,0,0.4);
color: #ffffff;
width: 100%;
font-size: 32px;
padding: 10px;
}
Here is the HTML for the widget. I swapped out the specific details
The other trick to making this loop work - notice that there are five images but the first one and the fifth one are the same. So in a four image set - you are working with “5” images.
<div id="bannerSlider">
	<figure class="slider">
		<figure>
			<img src="https://path/to/your/image1.jpg" alt="" />
			<figcaption>Image 1 Caption</figcaption>
		</figure>
		<figure>
			<img src="https://path/to/your/image2.jpg" alt="" />
			<figcaption>Image 2 Caption</figcaption>
		</figure>
		<figure>
			<img src="https://path/to/your/image3.jpg" alt="" />
			<figcaption>Image 3 Caption</figcaption>
		</figure>
		<figure>
			<img src="https://path/to/your/image4.jpg" alt="" />
			<figcaption>Image 4 Caption</figcaption>
		</figure>
		<figure>
			<img src="https://path/to/your/image1.jpg" alt="" />
			<figcaption>Image 1 Caption</figcaption>
		</figure>
	</figure>
</div>
Hope this helps someone out today!