

This guide is the fourth in a series of new guides brought to you by
Brian Farkas will be speaking at DU @ Inspire on Monday, October 17th! Learn more about Inspire 2022 here.
Up until this point, we have discussed some ways to leverage tools, applications, and the API to go and get the information we need. This is a great start but is typically reactive. What happens if you want to know when something happens? You might say, “Well, with some of my automation tools I can schedule a process to happen hourly, and that is close enough to real time to work.” This is true—however, it is a balance of needs and resources. This technique is called polling and often uses extra resources since most of the checks will be empty. I like to think of it like receiving mail. If you were to go to the post office every day and waited in line to see if you have mail, that would be polling, and most days you would have nothing except less time in your day. In contrast, the mail person delivering the mail to your house when there is something to bring, is a webhook.
Guide Table of Contents
What is a Webhook?
A webhook is an automated message sent from an application when an event happens. It contains a message (called a payload) and is sent to a special dedicated URL waiting for the message. This dedicated URL typically lives in a second application and allows that application to accept the message, then send its own message back to the first application letting it know it was successful or not. This method of communication is very efficient and light between two applications.
Places You Can Use Webhooks
A lot of communication apps and automation apps leverage webhooks. The following are common platforms that will allow you to send a webhook to them from Docebo:
-
Docebo Connect / Workato: Accepts a webhook as a trigger to then work through complex workflows.
-
Microsoft Teams: Accepts webhooks to post to a channel within a Team.
-
Slack: Accepts webhooks to post to a Slack channel.
-
Power Automate / Azure Logic Apps: Accepts webhooks as a trigger to then work through complex workflows.
-
Zapier: Accepts webhooks to start an app and move the date into other applications, manipulate it, and more.
-
IFTTT: Accepts webhooks to trigger recipes and carry out more actions.
-
Tray.io: Accepts webhooks as a trigger to then work through complex workflows.
There are many other applications that offer webhook abilities. This is a list of commonly used ones that I have seen in use or for a use case that has come up within the community.
Working with Webhooks in Docebo
Docebo offers Webhooks as an additional app that needs to be activated. There is great documentation in Docebo's Knowledge Base that covers all the details on how to work within the Webhooks app. I strongly encourage you to become familiar with the following support articles if you plan to use any webhooks:
-
Creating and managing: This gives step by step directions on how to set up and configure webhooks.
-
Webhook Events: This is a great reference of the available events you can select to trigger a webhook. It also details what is sent in each message, which comes in handy and is often needed to setup applications to accept the webhook.
A couple items to keep in mind about webhooks in Docebo:
-
There is a limit of 10 active webhooks per platform, so plan carefully.
-
While events do trigger webhooks, they can be delayed to help with system performance, so it is best to not use them for instantaneous actions.
Examples
Now that we understand what a webhook is, let’s look at how we might use it in Docebo. I’ve picked a couple simple scenarios that can demonstrate how using a webhook or two might help you stay on top of some administrative tasks.
To start the first demonstration, I will be using the free tier of Pipedream. This will let us build the application to accept the Docebo webhook with only a few clicks. It’s a great way to understand the full process and even build some simple workflows for yourself.
If you want to follow along, you can create a free account at https://pipedream.com.
Example 1 – Know When a New Branch is Created
Branches are great for organizing your users, and Docebo gives great ways to make new ones—many of them automated. I have chatted with several groups who also do this, with new branches generated from central IT groups sending new user information. Our branches are organized by our offices, and there are often some adjustments to certain tools or assignments when a new branch is created, so it is good to know when they are. There are human based procedures to let us know before changes happen, but this is often forgotten and results in support tickets from these users seeing strange behaviors. Fortunately, there is a webhook for the creation of branches, so let’s set it up to send an email when it happens.
Note: As mentioned previously, I will be using Pipedream to setup and demonstrate this. You can follow along if you wish, but the core concept can be applied using many tools.
-
Log in to your Pipedream account.
-
On the ‘Workflows’ tab, select the ‘New’ button.
-
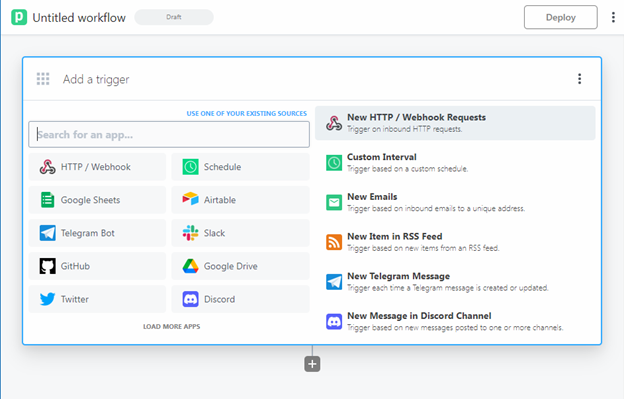
Select ‘New HTTP / Webhook Requests’.
-
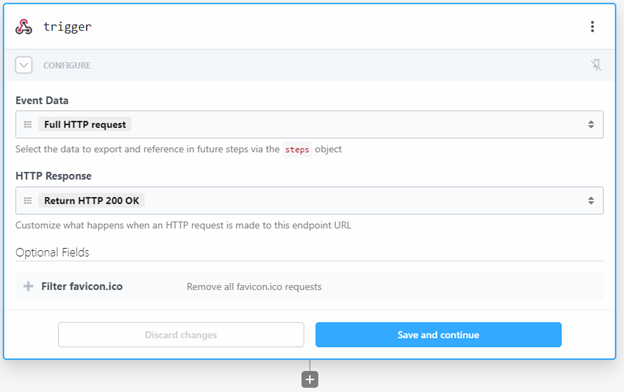
Leave the trigger alone as is and select ‘Save and continue’.
-
Copy the URL that is generated, you will need it in later steps.
Note: Leave the Pipedream window open as we will be coming back to it.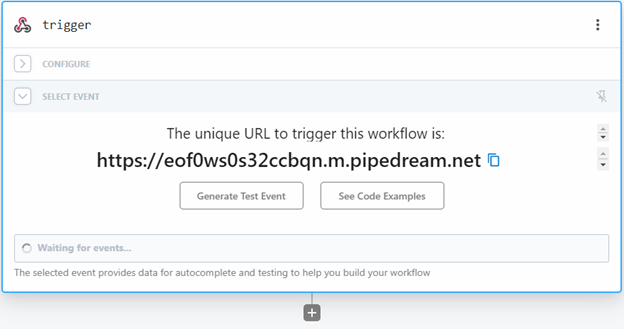
-
Log in to your Docebo instance.
-
Select the admin menu gear in the top tight.
-
Look for and select ‘Manage’ under ‘Webhooks’ on the menu.
Note: If you do not see it, make sure you are logged in as a super admin and that the app is activated.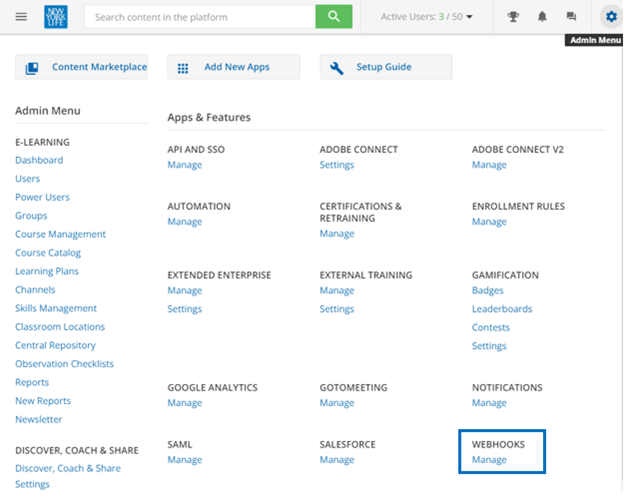
-
Select the green ‘+’ icon in the top right.
-
Fill in the fields:
-
Endpoint Info: Give it a unique and descriptive name so that all admins will understand what it is when looking at the list.
-
Payload URL: Paste the unique URL that Pipedream generated.
-
Events: Select ‘Branch has been created’.
Tip: You can select up to 8 events for one webhook. This can help alert you when different event types happen—for instance, if we wanted to know if a branch was deleted as well.
-
Basic auth: If the application you are sending webhooks to allows for it, turn this on and configure the username and password. We will leave this off for this demo.
-
Group Payloads: If you have chosen an event that can occur often and in quick succession, it may be useful to group the payloads. Think of it like getting a summary email of forum posts instead of an email for each one. We will leave this off for the demo.

-
-
Select ‘Save Changes’.
-
Select the circle in the Status column to turn it on.
That’s it—your webhook has been configured. Go ahead and create a new branch. If you look at your Pipedream window in a few moments, you should see one new event come in. Success!

Go ahead and use the dropdown to select the event, and it will load in a new results area. Look at the tree that is shown and open the ‘body’ part of the result.
Here we see that an event, ‘branch.created’, was fired. It also shows there is a payload. Go ahead and open that part of the tree.

Here we see the new branch Docebo id, the id of the parent branch, the branch code, and the branch name.
So now you may ask, how was this useful? Docebo told this webpage something happened, which is fun, but I still don’t know it happened. That is because, although we configured the webhook before, we did not tell Pipedream to do anything with it yet. Let’s do that:
-
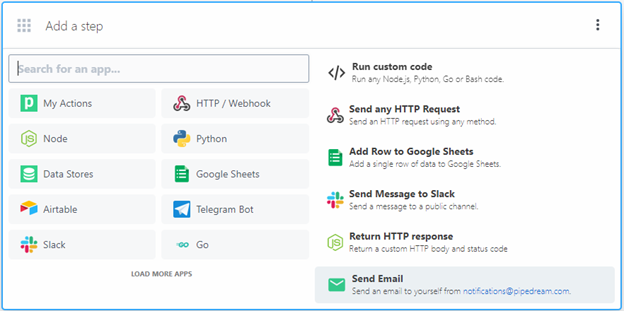
In the Pipedream window, select the ‘+’ under the trigger box to add an action.
-
You can connect and do a lot from here—create a Google Sheets log of the branch, post it to Slack or Teams or Discord, etc. We are going to keep things simple for this example and select ‘Send Email’.
-
Enter a subject. I am going to put ‘Alert: New Branch was Created - <Name of the Branch>’. You can use the drop down to navigate the result tree to insert data from it as a variable that will insert the information, in this case:
{{steps.trigger.event.body.payload.name}} -
In the text field, write a message and add the details of the new branch. Here’s an example:
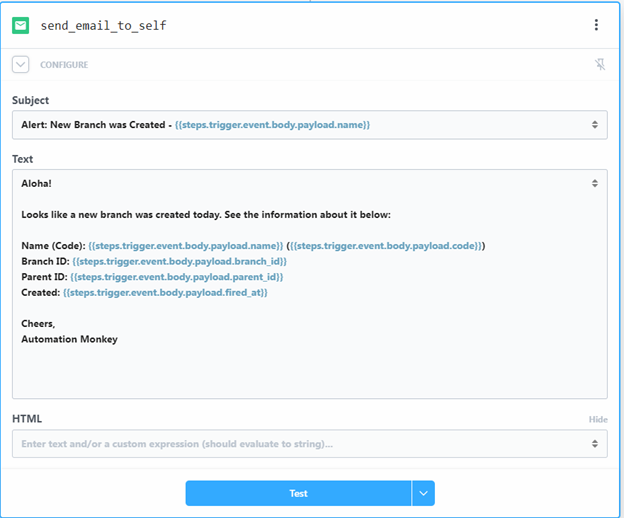
-
Select the ‘Test’ button to see what it looks like:
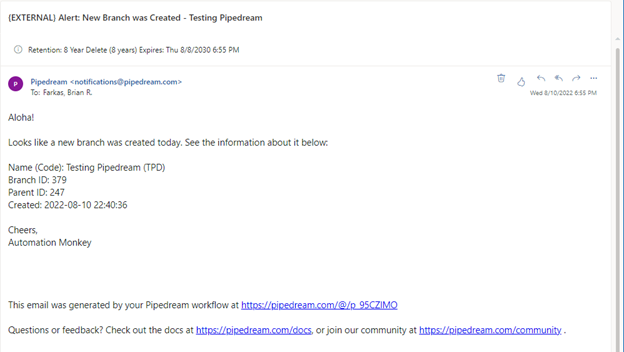
-
If you are ready for this to work as is, select the ‘Deploy’ button. This will make the workflow live and anytime a new branch is created, you will receive an email. Cool, right?
Example 2 – Update a New User with Information
Ok, let’s move up a level. It is great to know that something happened that has administrative ramifications, but what about an action from the platform that triggers another action within the platform? For example, many groups use their identity management system to handle the creation of users. This is great for many things, but sometimes not all data is available or able to be updated this way.
In this example, all users are generated with the default time zone of Eastern USA, but the users are spread out across 6 time zones. This information is simply not available to be passed on create. Instead, we will create a webhook for when a user is created, check a listing of time zones based on offices (branches), and assign the proper time zone to the user so that they have no confusion from the start.
Note: I will be using Power Automate for this one in order to handle the user update in Docebo. The process/concepts can be applied to other automation systems that can use the Docebo API.
-
Configure a new webhook within Docebo using the ‘User has been created’ event.
-
Log in to https://portal.office.com.
-
Make sure your custom connector has the following action available, or update it to include it:
-
PUT - /manage/v1/user/{UserID}
-
GET - /manage/v1/user/{UserID}
Tip: If you want more details on how to do this, check the second article in this series on Tools. -
-
Create a new automated flow.
-
Give it a unique and descriptive name.
-
Select ‘When a HTTP request is received’ as the trigger.
Note: This allows us to generate a URL to use for the webhook. -
-
In the trigger, in the ‘Request Body’ JSON Schema, put the following in:
Note: You can use the webhook documentation to generate this using the ‘Use a sample payload to generate schema’, or use a generated payload to do so. I know the below works, so I’m supplying it here. What this does is allow us to insert data from the trigger payload from Docebo throughout the process.
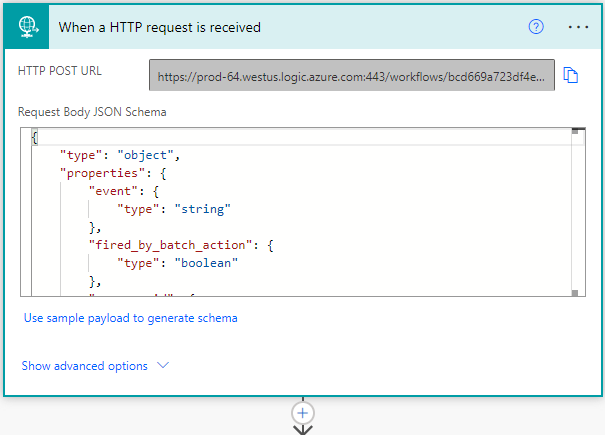
{

    "type": "object",

    "properties": {

        "event": {

            "type": "string"

        },

        "fired_by_batch_action": {

            "type": "boolean"

        },

        "message_id": {

            "type": "string"

        },

        "payload": {

            "type": "object",

            "properties": {

                "fired_at": {

                    "type": "string"

                },

                "user_id": {

                    "type": "integer"

                },

                "username": {

                    "type": "string"

                },

                "email": {

                    "type": "string"

                },

                "creation_date": {

                    "type": "string"

                },

                "level": {

                    "type": "string"

                },

                "firstname": {

                    "type": "string"

                },

                "lastname": {

                    "type": "string"

                },

                "expiration_date": {},

                "provisioned": {},

                "extra_data": {

                    "type": "object",

                    "properties": {

                        "additional_fields": {

                            "type": "object",

                            "properties": {

                                "language": {

                                    "type": "string"

                                },

                                "list": {

                                    "type": "array",

                                    "items": {

                                        "type": "object",

                                        "properties": {

                                            "id": {

                                                "type": "integer"

                                            },

                                            "name": {

                                                "type": "string"

                                            },

                                            "value": {

                                                "type": "string"

                                            }

                                        },

                                        "required": [

                                            "id",

                                            "name",

                                            "value"

                                        ]

                                    }

                                }

                            }

                        }

                    }

                }

            }

        }

    }

}-
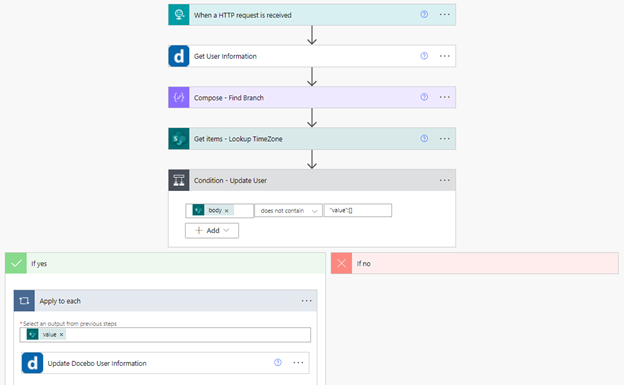
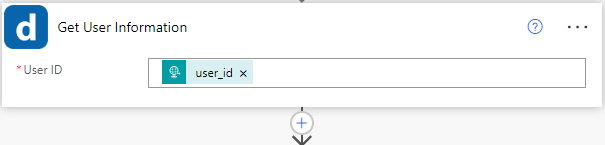
Now we need to identify and isolate the Branch code. This is not provided by the webhook unfortunately. Create a new item, the ‘Get User Information’ from your Docebo custom connector. Insert the ‘user_id’ dynamic content into the user ID field.
-
The branch is returned in an array of Branches, so we can do a little trick to isolate the actual branch the user is in. Add a new item, ‘Compose’. In the Input field, put the formula:
outputs('Get_User_Information')?['body/data/branches']?[0]?['id']
This gets the branches dynamic content, then selects the ‘id’ field value and ignores the others in the branches section.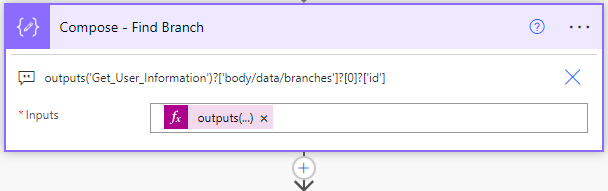
-
Now, we have a SharePoint table acting as a place to look up information about our locations, including their time zones and the branch codes they correspond to:
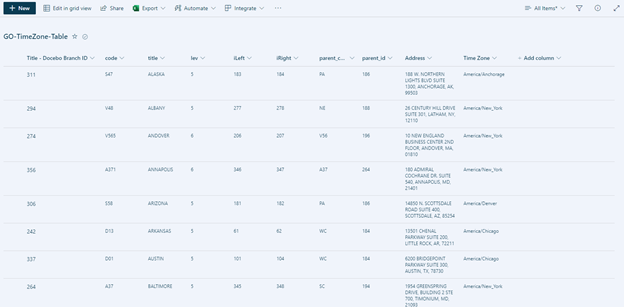
I can use this to find which time zone the user should have. Add a new item ‘Get Items – SharePoint’. In the Filter Query put the following:
Title eq '@{outputs('Compose_-_Find_Branch')}'
This will filter the SharePoint list for the item where the branch code matches the value in the Title column (our branch column).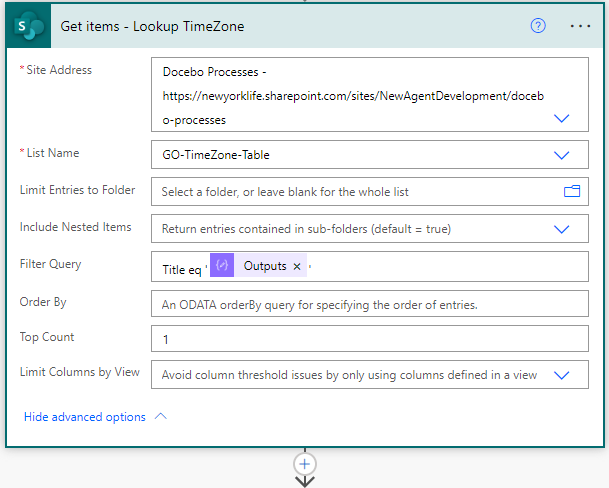
-
When doing a SharePoint filter, it is important to check to see if any actual value has returned, otherwise things will error later. This is done by inserting a simple condition item. Make sure the body of the ‘Get Items’ does not contain: “value”:[]

-
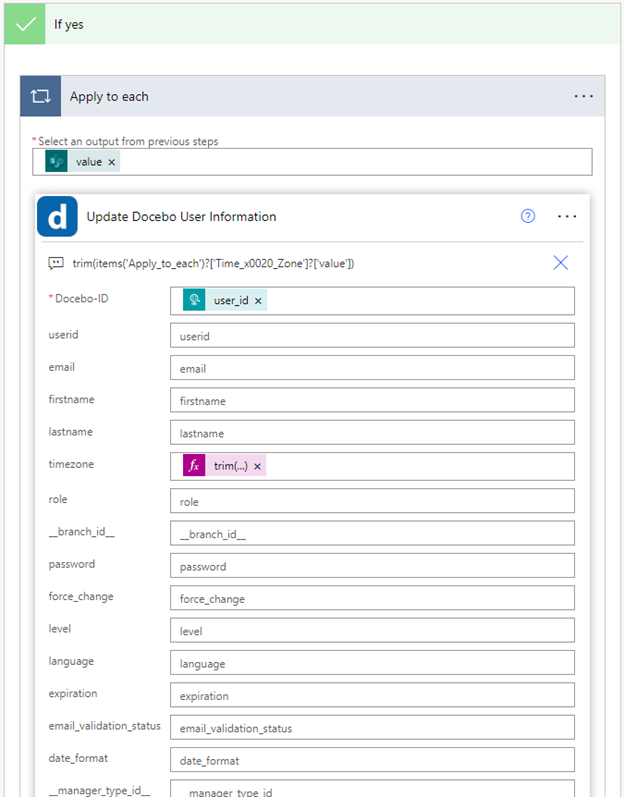
In the ‘Yes’ branch of the condition, add an item ‘Update Docebo User information’ from your Docebo custom connector. Put the following information in:
-
Docebo-ID: The ‘user_id’ from the trigger.
-
Time Zone: The ‘Time Zone’ value returned from the SharePoint item.
-
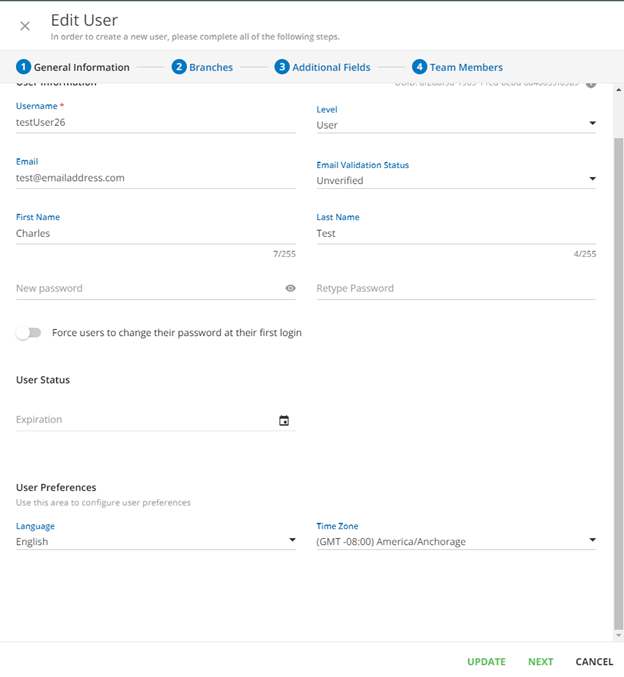
That’s it. Now when a new user is created with the default time zone...
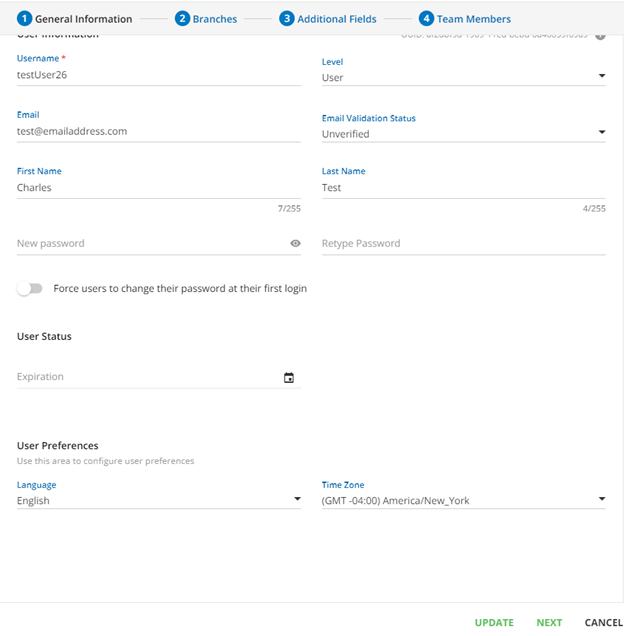
...the webhook will trigger this flow, the user’s branch will be found, and the right time zone will be found on the SharePoint list. The proper time zone will then update the user instantly. The whole thing takes a matter of seconds:
This was one simple example for updating the user, but have seen others update the generic avatar image to a default image, update additional fields, etc. There are many possibilities for webhook usage. Once you get familiar with the core concept of how to use webhooks, you can build a lot of open doors through what seemed like brick walls.
What’s Next?
I am excited for the next stop in the series! We are going big. For those of you who have had the great pleasure of scheduling large numbers of classroom type sessions and events, you know how tedious and time consuming it can be. Using some of the tools I have talked about so far—Power Automate, Custom API Connector, SharePoint, and a simple CSV file—I am going to walk you through how I simplified this process for an internal group that needed to schedule 150 of these sessions a month. I hope by sharing, others are inspired to think about what they could do using automation tools like Docebo Connect, Tray.io, or Power Automate.
Guide Series:
The Art of Being Lazy: Leveraging the API to Take Care of Repetitive Tasks & Fill Feature Gaps
Getting Started: Building Out Your Toolbox [Part 1] and [Part 2]
Reports: Sending, modifying, and more!
Bulk Scheduling ILT Sessions with a CSV File
Tag, You’re It!: Tracking and Managing Content Tags
Let Others Do It: The Power of Forms in a Workflow
And We're Back: How to Let Users have a Form as a Wizard Scheduling Tool
You Built It, They Came, Now What?: Scheduling ILT Wizard Bonus Activities

