

This guide is the ninth in a series of new guides brought to you by
Last time we learned how to embed a Qualtrics form in a custom Docebo page and use the form submission to create a VILT Session and Event. The goal was to make a simplified wizard to let any user quickly and easily schedule an event without needing to be an administrative master. That is great, and it does help solve many issues, but I consider the previous setup just a starting point. Once you have built the beginning of the setup, it opens the door to a lot of other potential processes. In this article, we will be looking at a few examples of these features that are extensions of the basic scheduling wizard.
Now, since some of these can be combined together or setup differently dependent on how you want to proceed, I will be talking through the theory of each process and elements used to create each and not necessarily every step in detail as previously. View this article as an inspiration of what you could do.
Alright, lets turn this wizard up a notch!

Guide Table of Contents
Manage Enrollments
In our particular case, our branch structure is based on our office structure. Unfortunately, we can’t have Sessions inherit this, and this caused issues. For example, Session setups an office in southern Florida were seeing users from an office in Alaska enroll. The training managers were not familiar with these users, and the managers of southern Florida could not see the users from Alaska or mark their attendance. This would result in managers sending assistance requests to support, asking other managers to mark their users, or users showing up to training only to be told they cannot attend. All scenarios were wasting time, resources, and causing frustration.
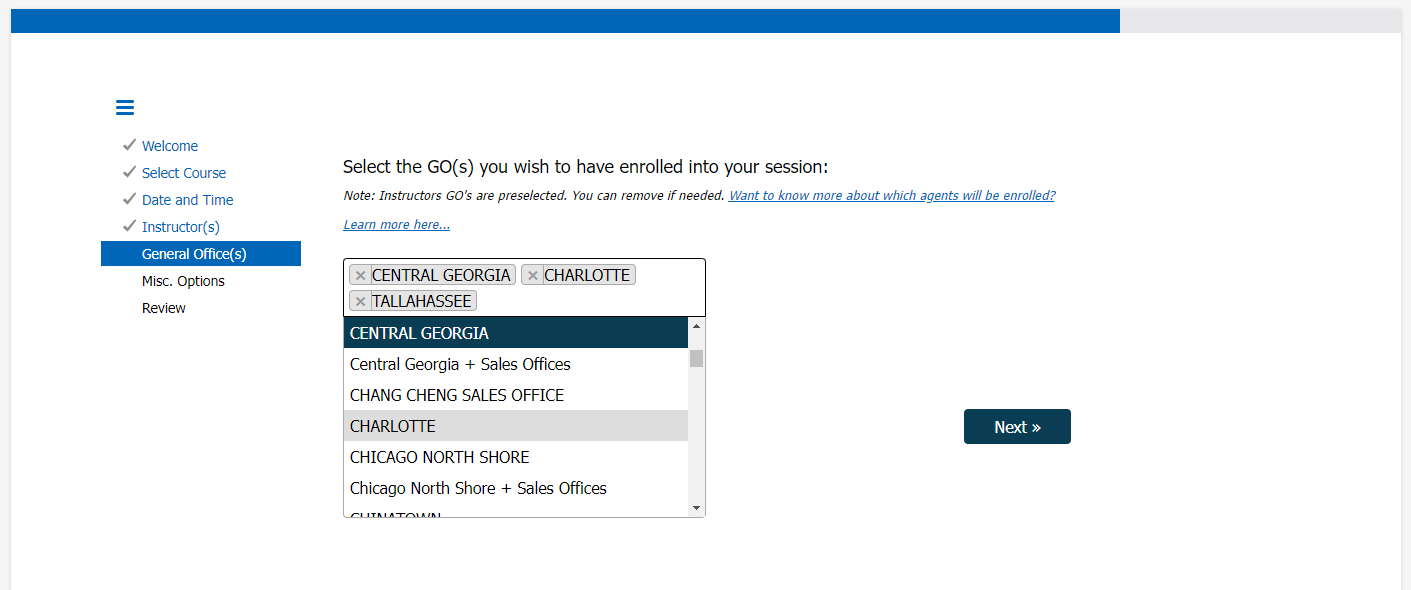
With this in mind, and with the wizard in place, we could have Sessions scheduled and close self-enrollments. The manager scheduling the Session could decide which branches (GOs in our case) to include, and then let us manage the enrollment:
The courses being managed by the scheduling tool are courses that are auto-assigned by Learning Plan to users as they proceed through the curriculum. Due to this we can make a few assumptions to let us manage the enrollments. We can assume that if the course is assigned to a user but has not yet been completed, they still need to take the course and as such can be enrolled into the Session.
Note: We actually do a multi-step process to decide who to enroll, you can view a document we use to train managers on how to understand it here.
The major change to Session creation from the previous article is this: When using the custom connector in Power Automate to actually create the Session, you want to fill in the field ‘Enrollment Deadline’ with a date that has already passed. In our case, this is a simple formula:
addDays(utcNow(),-2,'yyyy-MM-dd')
This gets the current day/time, subtracts 2 days so it is definitely in the past, and formats the date into the proper format, i.e. 2022-10-22:
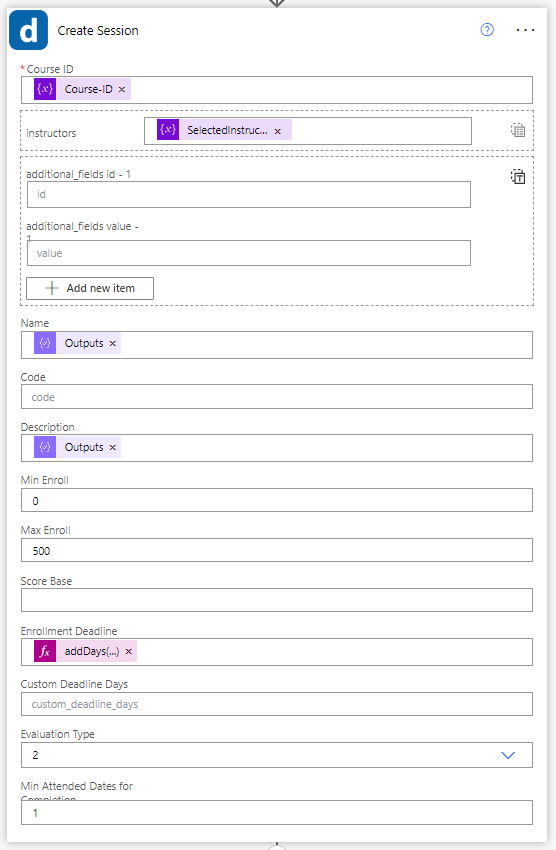
The advantage to using this method over max enrollments or other options is that the managers can still enroll a user if they need to.
How to Know When to Enroll
When we first started thinking about managing the enrollments, the idea was to simply run the enrollment when the Session was scheduled. This sounds good on a paper but leaves a lot of flexibility to be desired. It forces managers to wait until close to the event to schedule, against how a lot of them like to work, and can miss users since they may have gotten the course assigned to them after the Session was scheduled.
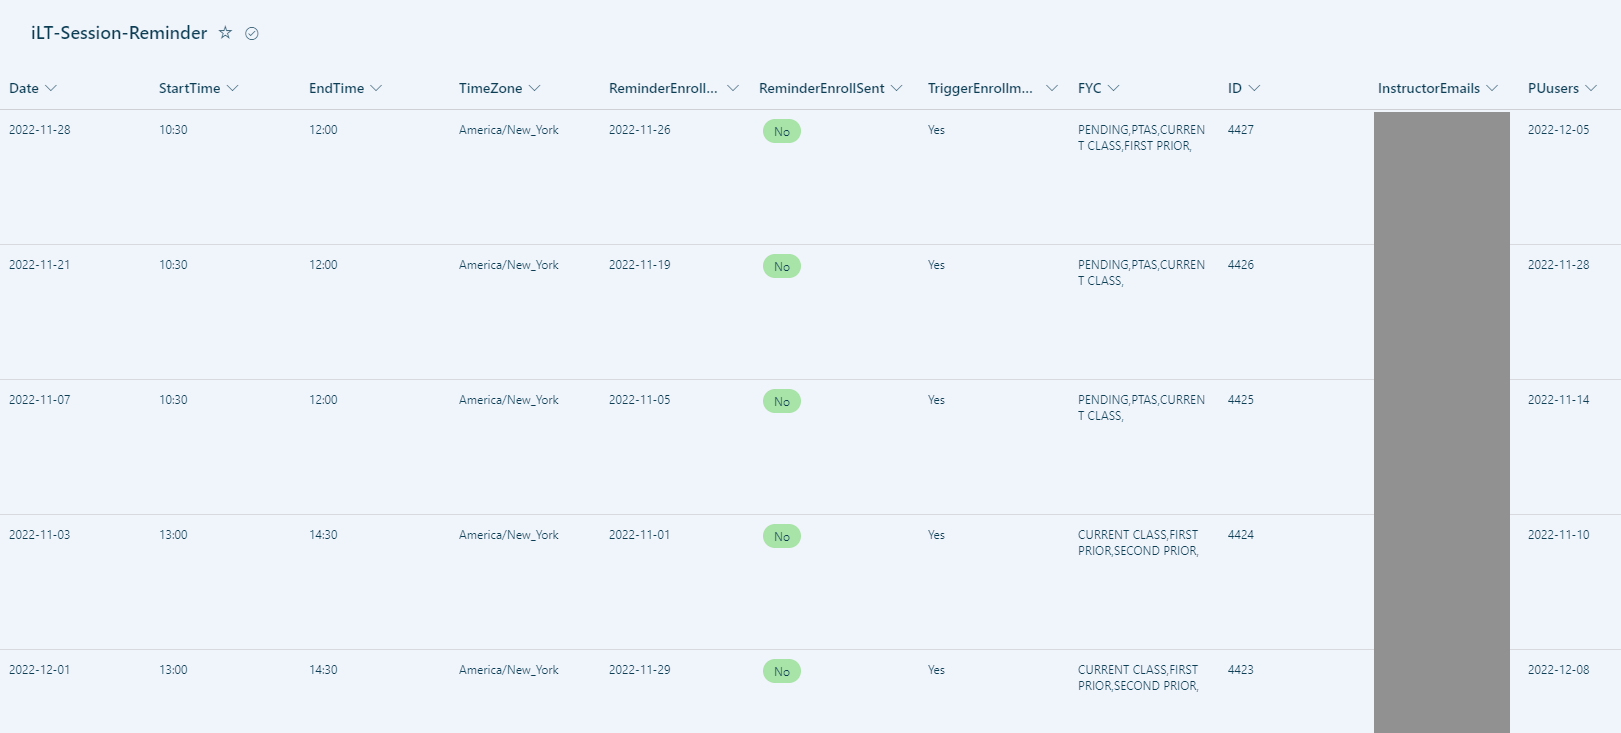
To get around this, we can employ the SharePoint list that was created last time to manage the Sessions. If you remember from last time, it was optional, but I mentioned it would be useful here. Since every event has a unique line item on that list, we can simply build a few new columns:
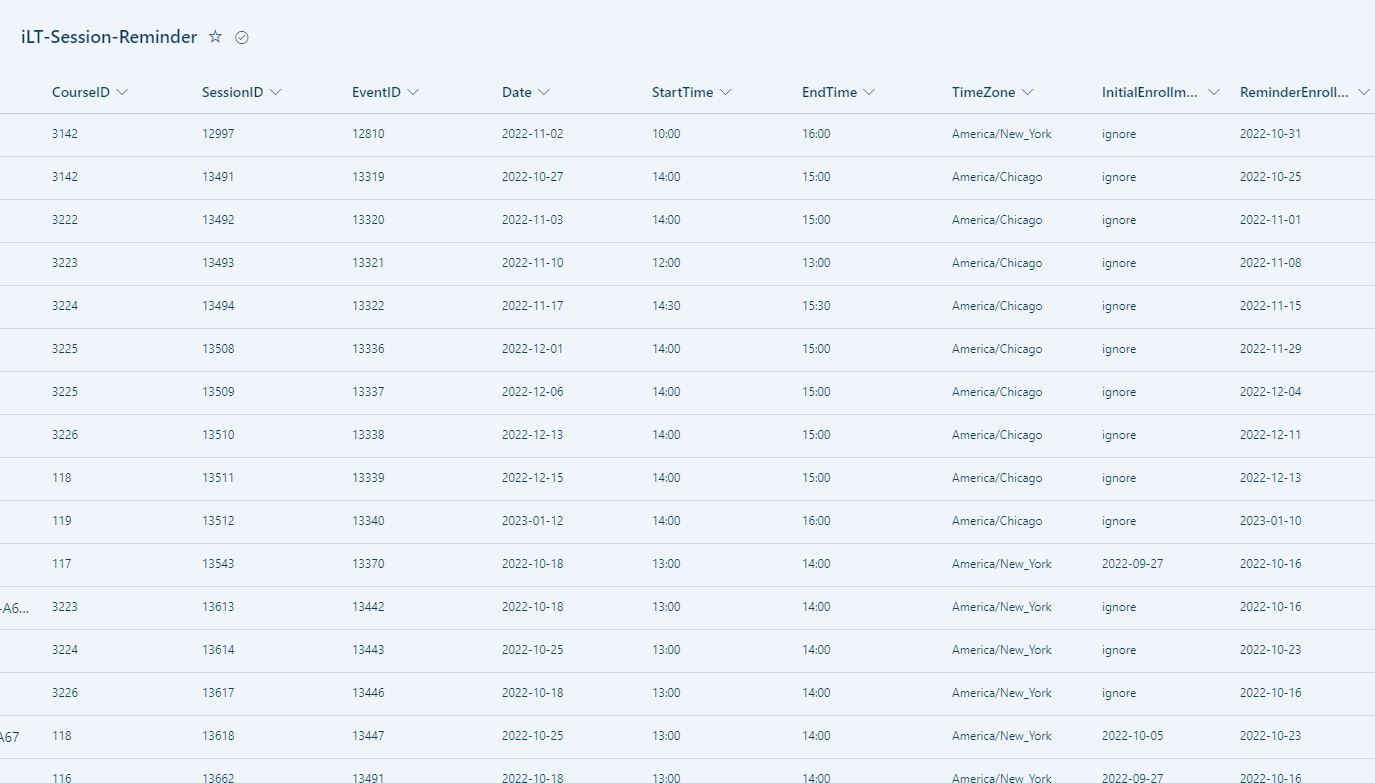
In the above image, the two columns added were:
-
InitialEnrollmentDate: This is set to ‘ignore’ if enrollment is to occur immediately. If the first enrollment is to be delayed until a certain date, that date is entered here.
-
ReminderEnrollmentDate: This is set to 2 days prior to the date of the Session.
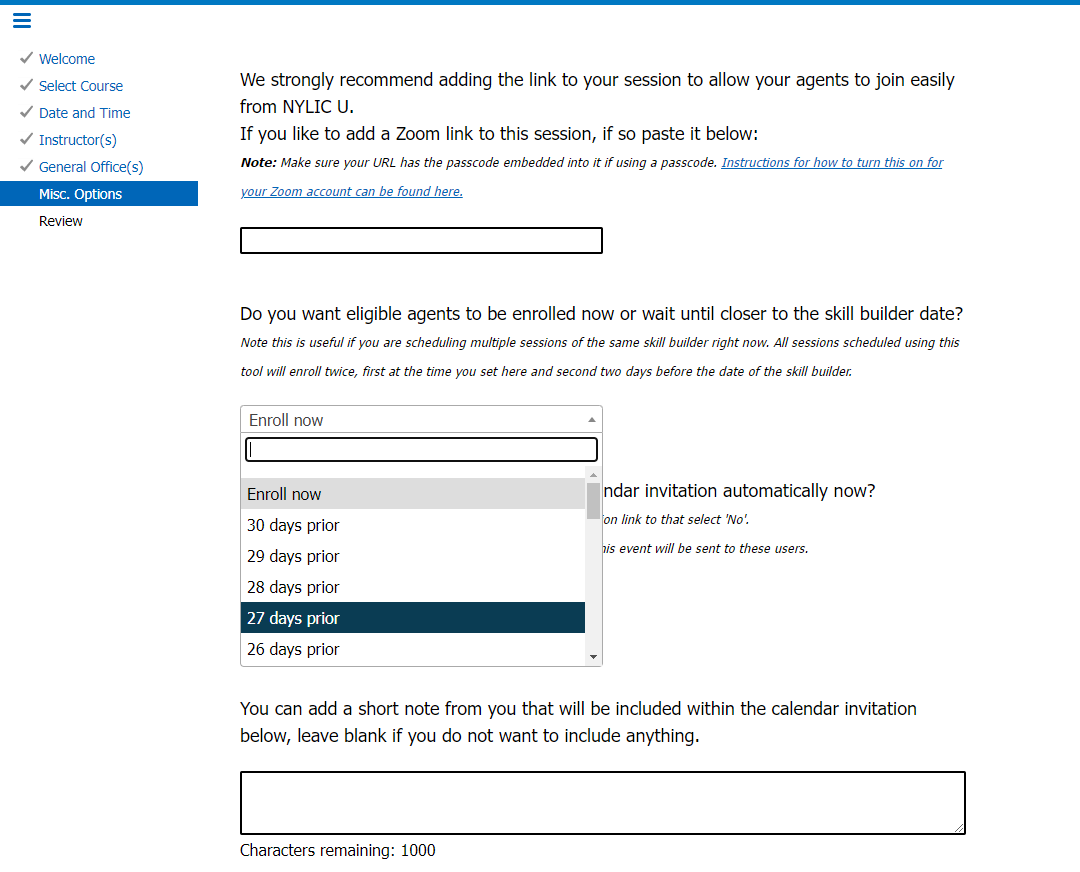
Now we can run a process every morning, as well as check for sessions that have either an initial enrollment date for today or a reminder enrollment date for today. This setup gives the managers maximum flexibility. They are now able to schedule a Session anytime, and there will always be a second enrollment close to the actual Session to catch any newly enrolled users. Additionally, on the scheduling wizard they trigger the delay of the initial enrollment by selecting 2-30 days prior to the event date. By making this a relative action, they are able to quickly schedule multiple identical Sessions without fear of the same users being enrolled in them all.
For instance, say you run a session for Class A every other Friday. You can simply say to delay the first enrollment to 13 days prior, which means those who attended the prior session and are marked complete will be removed from the next session’s enrollment—but the manager scheduled them at the same time, saving them a lot of time. Using this technique, several managers went from spending 30 minutes per day scheduling to scheduling their entire month’s classes in one 30 minute session. Pretty awesome!

Find Sessions to Enroll
The daily action discussed above is pretty simple. Each morning, we need to identify which sessions either need to be enrolled for the first time or into their catch-up enrollment two days prior to the session. Since the actual process to enroll was built in a way that it could accept triggers from multiple processes, we simply need to identify the sessions and trigger that enrollment flow.
-
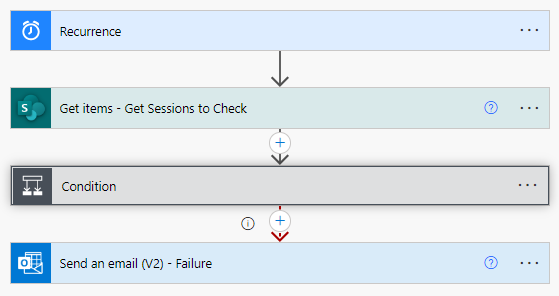
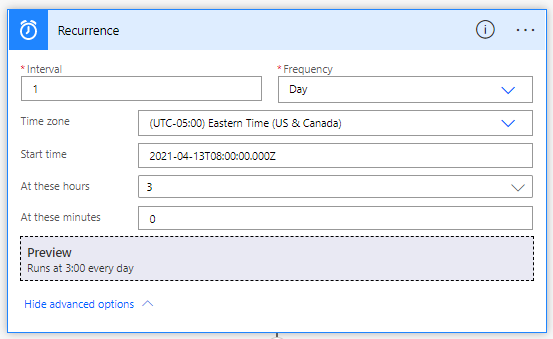
Create a new Power Automate flow that is time based. The trigger should be a recurrence element.
-
Configure the recurrence to run every day and choose an appropriate time. (We do early in the morning so that it is all taken care of by the time folks are awake and at work.)
-
Create a ‘Get Items – SharePoint’ action.
-
Fill in the following information:
-
Site Address: Where your list of Sessions lives.
-
List Name: The name of your list that has all of the Sessions on it.
-
Filter Query: InitialEnrollmentDate eq '@{formatDateTime(utcNow(),'yyyy-MM-dd')}
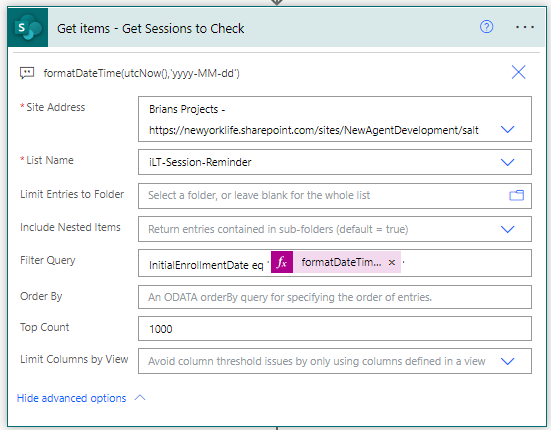
Note: The ‘InitialEnrollmentDate’ is the name of the column where the enrollment date is stored, change to your column name.
-
-
Create a new ‘Condition’ action.
-
Set it to ‘body('Get_items_-_Get_Sessions_to_Check')?['body']’ contains ‘"value":[]

Note: We are making sure some results were returned to avoid errors later. You can do this a few ways, this is my favorite.
-
In the ‘No’ section of the condition, add a new ‘Apply to each’ action.
-
In the ‘Select an output from previous steps’ put the ‘body/value’ from the previous SharePoint step.

-
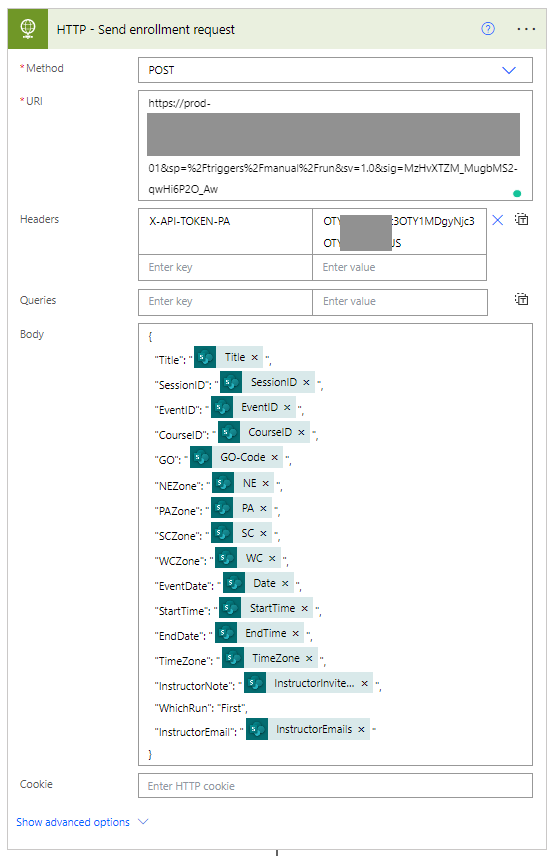
Inside the loop, create a ‘HTTP’ action and configure the following:
-
Method: POST
-
URI: The URL for the trigger of the enrollment process. (We will cover this later.)
-
Body: Build a proper formatted JSON object in the format your enrollment is expecting. Use the dynamic elements from the SharePoint list to build this.
-
-
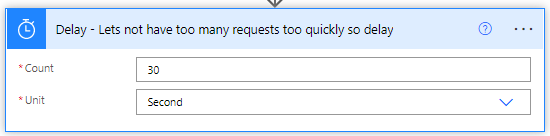
Inside the loop, create a ‘Delay’ element and put a short time like 30 seconds on it. This is just to put a gap between sessions being sent for enrollment. This is optional but can help prevent some issues.
That’s it! Now every morning, all the sessions that have that day’s date in the ‘InitialEnrollmentDate’ will be sent for enrollment. You can copy the same flow, change the SharePoint filter to a different column, and perform more enrollments (like the second one 2 days prior to the session).
Tracking Who to Enroll
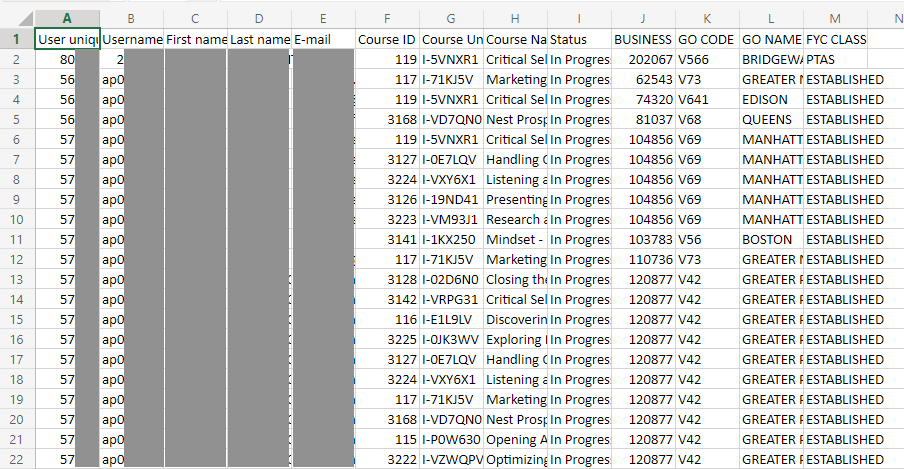
Before we can jump to actually enrolling learners, we need to discuss how to know who to enroll. You could technically do this via API, but I had performance and quota limit concerns about doing that. Since the enrollments were going to be run in the early morning hours anyways, we decided to leverage reports. By having a daily set of reports of who is enrolled but not completed the courses yet, we can call this list, then filter by branches and course type to find the users who should be enrolled.

Note: Make sure the reports are scheduled to run after when most classes would run/have attendance marked and before you scheduled the processes. This way, the enrollments are using the latest information.
Tip: We broke the reports into 4 parts, one for each of our geographic regions (our top level branches), just to keep the reports at a reasonable size each. Rarely are users from multiple regions required to enroll in the same session.
Enrollments
As you can probably guess, our enrollment process gets a tad complex because of customizations for our unique needs. Yours most likely will (and should) do the same. Due to this, I am going to walk through the core concept/pieces generally required here.
-
Create a new Power Automate Flow with a ‘When a HTTP request is received’ trigger.
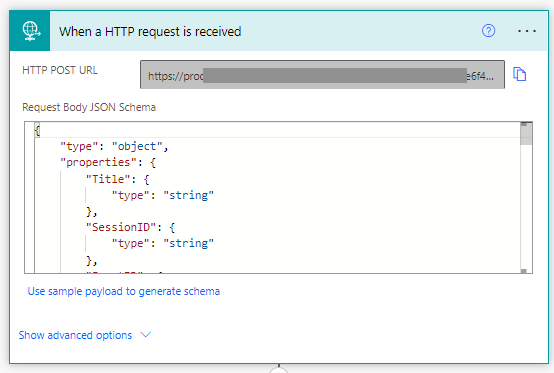
Note: Once you save the first time, this will generate the HTTP POST URL address you enter into the URI field in the enrollment date processes previously discussed. By building the flow in this way, we can trigger the same enrollment process from a variety of actions instead of repeating the build over and over.
-
Configure the ‘Request Body JSON Schema’ to the format you are planning to send. This allows you to use the trigger data as dynamic data throughout the process.
-
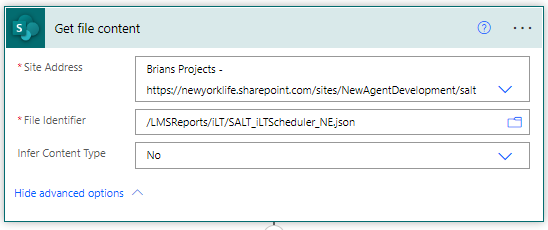
Get the report data for enrollments. In our case this is a ‘Get file content – SharePoint’ item as the Docebo reports are saved there each morning at about 2 a.m. Eastern time.
-
Convert the CSV data into a JSON array so that it can be filtered and used throughout the rest of the process.
-
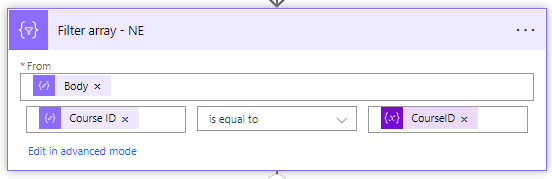
Filter the JSON array of potential users to only those that contain the Course ID you are looking for.
-
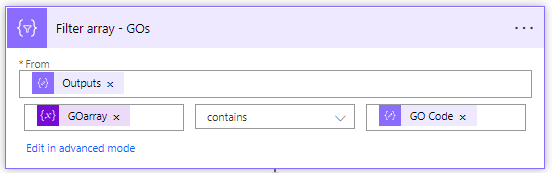
Filter the remaining JSON array of potential users to only those that contain the Branch IDs you are looking for.
-
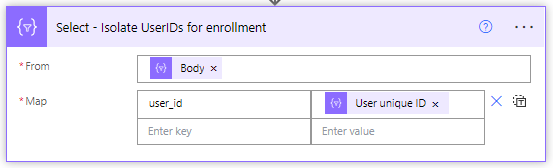
Create a ‘Select’ element.
-
In the ‘From’ field put the ‘body’ of the filtered JSON array of users to be enrolled. (At this point there should only be those remaining whom you wish to actually enroll.)
-
On the ‘Map’ field put one entry: user_id: ‘User Unique ID’
-
-
Make sure there are users to enroll. Create a ‘Condition’ element and use the length of the output of the selection form the previous step (i.e. length(body('Select_-_Isolate_UserIDs_for_enrollment')) to see if it is equal to 0.
If it is, stop the flow as Docebo will return an error if you try to enroll an empty group of users.
-
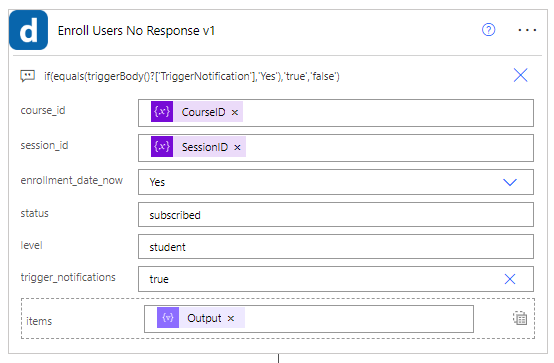
Use the Docebo Custom Connector item ‘Enroll Users’
Note: If you have not built this yet, make sure to add the API POST - /learn/v1/enrollment/batch to your custom connector. Make sure to have the user_id, course_id, enrollment_date_now, level, session_id, status, and trigger_notifications options configured.
-
In the Enroll Users item, put the following information:
-
Course ID: Use the course ID brought in from the trigger
-
Session ID: Use the session ID brought in from the trigger
-
Enrollment Date Now: Set to ‘Yes’
-
Status: Set to ‘subscribed’
-
Level: Set to ‘student’
-
Trigger Notifications: Set to ‘true’
-
Users: Switch it to the array mode and insert the output of the filtered array of enrolled users.
-
Those are the basics for enrolling, but there are a lot of possibilities you can use to enhance the enrollment process. Let’s take a look at them next.
Outlook Calendar Invites
In the previous section, we looked at simple enrollments based on a daily report and filtered by branch and course types. That is great, but since we are managing these enrollments, why not take things a step further. Instead of using the built in email notifications with iCal attachments, we can instead build real Outlook calendar invites fairly easily using the existing enrollment setup.
Before doing this, know that it relies on having a calendar you have access to where all the invites will be added. I like to have a shared ‘donotreply’ type inbox established for this, and it comes in handy for sending other notifications too.
Alright, here are the couple of steps you need to make a true Outlook Invite:
-
In the previous enrollment process, go back to the ‘Enroll User’ custom connector. In the ‘Trigger Notifications’ field, change it to a value of ‘false’.
Note: This will turn off all notifications related to this enrollment on this course, so you will need to manage any notifications you may have configured.
-
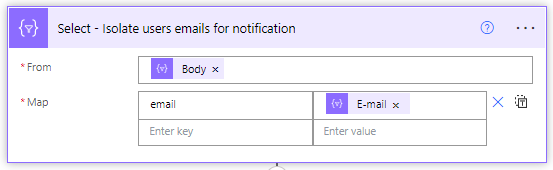
Create another ‘Select’ item and configure it similar to the previous one where you isolated the ‘User Unique ID’. This time, set the mapping to: email: E-mail
-
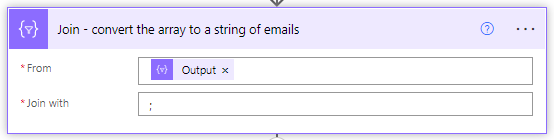
Create a ‘Join’ action and place the output of the previous ‘Select’ action in the ‘From’ field. Put a semicolon (;) in the ‘Join with’ field. This will convert the JSON array of emails into a string of emails separated by a semicolon, which is the format used in To/CC/BCC fields on emails/calendar invites.
-
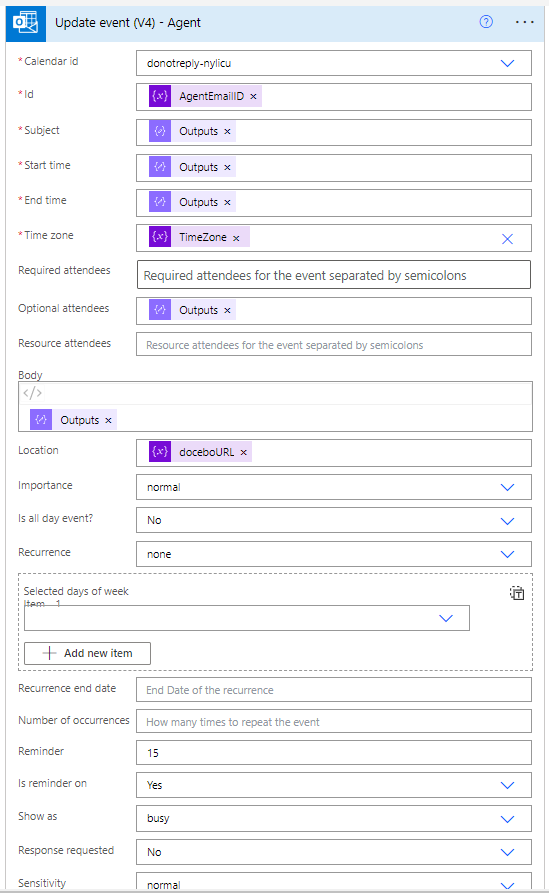
Create a new item ‘Create Event – Outlook’. Configure the following:
-
Calendar ID: Select the calendar you want the event to be placed on.
-
Subject: Insert what you would like the subject to be, making sure to leverage the content from the trigger information. We do a format of ‘Session name + Time + Branches Enrolled’
-
Start Time: Use the Start Time from the trigger element.
-
End Time: Use the End Time from the trigger element.
-
Time Zone: Use the time zone from the trigger event if you deal with multiple time zones, otherwise set it to your preferred time zone.
-
Required/Optional Attendees: Place the output of the ‘Join’ action from above in one of these. (We use ‘Optional’ since they may or may not come to this Session.)
-
Body: Put relevant information in here. We like to put a copy of the subject, links to any materials to be reviewed before the Session or needed during, the deeplink to the Session in Docebo for joining, and allow the Instructor to add a custom note to the attendees they enter using the scheduling wizard. Get creative, make it useful, but keep it simple.
Tip: I like to make sure the Session ID is referenced somewhere in the body, even if just part of the deeplink, as it is a unique ID that can be used to search and update the calendar event if needed.
Location: I suggest putting the deeplink to the Session in Docebo, but you can put any relevant information you wish.
-
Importance: Normal
-
Reminder: 15
-
Is reminder on: Yes
-
Show as: Busy
-
Response requested: Yes (gives an idea of who is coming or not).
-
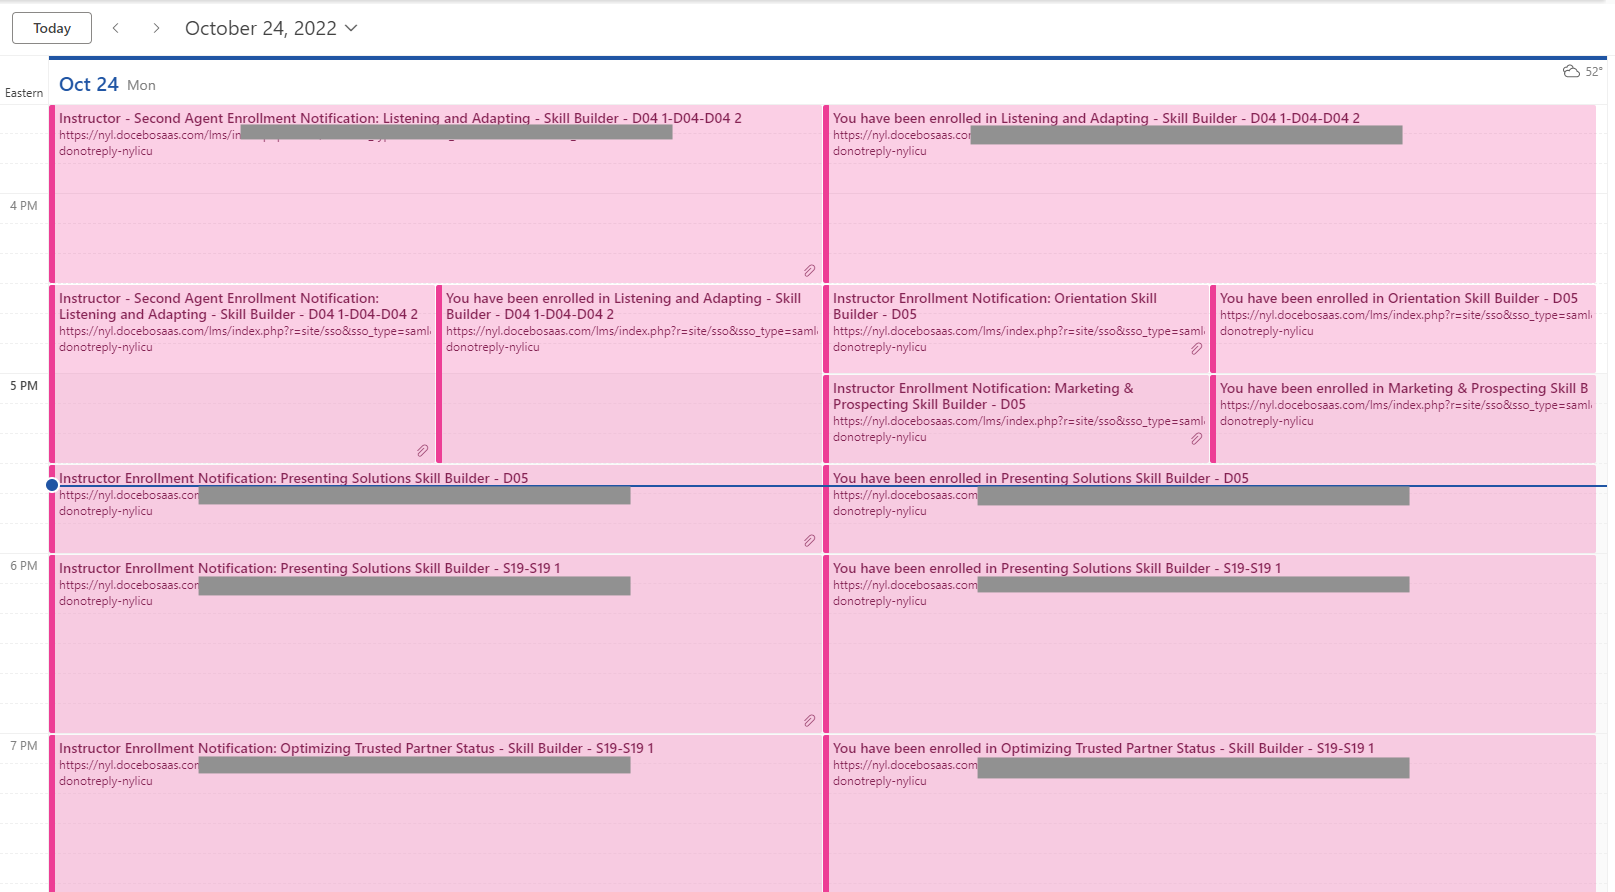
That’s it, configure the calendar invite as much or as little as you want, but now after the users are enrolled, they are also sent an Outlook Calendar invite.
Instructor Invite (Adding a QR Code)

You might have noticed that in the previous section, we just added the users to the calendar invite. What about the instructors?
I left them out as I have found it useful to keep them on a separate invite from the users. In this way we can provide a lot of information the instructor might need or use to run or prepare the session to them directly. A couple of things we add to this invite are:
-
A CSV file of the users currently enrolled in the Session
-
Links to the facilitator files for the course
-
A QR code that can be used during class to have users scan and get attendance marked for attending

The core of this invite is the same as above, except using the Instructor emails from the trigger instead of the user emails as the attendees. We also tack on ‘Instructor – ‘ to the front of the subject to keep the invites clear, as there will now be 2 per event:
I wanted to keep the QR code simple. Essentially it is just a QR representation of the deeplink to the session. This way, users in the room can scan it, log into Docebo, click the join button and be marked complete (as we used the setting ‘Mark users complete on join’).
If you want to get fancy, you could have the QR code be a form embedded on a custom Docebo page and pass the Course and Session ID to the form through the URL. Have the user confirm the information is correct, confirm they have indeed attended this event, and submit. This would then run a flow that marks the user complete via API. (I have not built this yet, but it would work well in theory.)
To generate the QR code, I want to do that ‘on the fly’ and not need to manage images. To do that, I leverage a great service called QR Code Generator, which has an API to generate codes easily (documentation on this can be found here).
Using this service, we can create a QR code to add to the body of the Outlook calendar invite by using concatenation to build the URL properly:
concat('https://api.qrserver.com/v1/create-qr-code/?data=',<INSERT DOCEBO URL HERE>,'&color=fff&bgcolor=0079c2&qzone=4')
You can configure the colors used by updating the above to match your branding. You can then use the above as either a link to open in a browser to show the QR code, or you can insert it as the source of an image in body of the invite and have the QR code appear directly in the calendar invite.
Adjusting Power User Resources Based on Session Enrollments
As I explained earlier, one of the main reasons we moved forward with our scheduling wizard (and additional processes related to it) was to help handle users enrolling in Sessions being facilitated by managers that they do not report to. Since the reporting structure is mirrored in our branch structure, this often meant the managers could not mark attendance or message all the users within their Session. Even controlling the enrollments did not fix this completely, as many offices frequently work together to teach Sessions. These offices were then having to mark attendance for each office that was involved, another sinkhole of time.
To get around this, we went back to our bag of tricks and combined several techniques we have already used in this guide series. It was decided that we would add all enrolled users to all assigned instructors for a temporary period (the day of the Session through 7 days after).
To manage this, we used the same technique used for managing the multiple enrollments. On the SharePoint list for each Session, a new column was created, ‘RemovePUAccess’. In this column, a date 7 days after the Session date is calculated when the Session/Event is created.
Two processes run each day now:
-
Remove PU Access: The SharePoint list is filtered for sessions that have today’s date in the ‘RemovePUAccess’ column. For each Session, all Instructors are retrieved and all those enrolled are retrieved. Then the users are removed as user resources from each Instructor.
-
Add PU Access: The SharePoint list is filtered for sessions that have today’s date in the Session date column. For each Session, all the Instructors are retrieved and all those enrolled are retrieved. Then the users are added as user resources to each Instructor.
Note: These are daily scheduled actions. It is important that the removals happen first and are completed prior to the additions. This accounts for users who are in multiple sessions with the same instructor. If they are set to be removed due to Session A’s date, they are removed, but then added back when Session B’s additions are run.
To accomplish these automations, the following APIs must be configured in the custom connector:
-
To find the Instructors: GET - /course/v1/sessions/{session_id}
-
To find the users: GET - /course/v1/sessions/{Session-ID}/enrollments
-
To Add Users to a Power User Profile: PUT - /poweruser/v1/powerusers/{user_id}/users/batch
-
To Remove Users from a Power User Profile: DELETE /poweruser/v1/powerusers/{pu_user_id}/users/batch
As each Session date arrives, all the instructors are granted access to all users for a short period of time that morning. This also works as an incentive to ensure attendance is marked as close to the event as possible, as if they wait too long, it is considerably harder for them to complete.

What’s Next?
I hope you can see the potential in taking the time to build out a scheduling wizard. Not only can it help with the actual task of scheduling, but it gives you a base to solve more problems or simplify processes related to the full life cycle of an in person or virtual class. Let me know in the comments if there are other ideas that might help your particular setup.

The next and final installment in this series will take a look back at all the techniques and processes we have learned about. We can’t conclude the series without taking some time to talk about monitoring and maintenance techniques. After all, if you enjoy using these techniques like I do, you will quickly find you have built countless solutions to fill gaps and make your lives easier. This is great, but adds risk to the management of your system. It is just as important to build intentionally and make sure you know when something is no longer working or needs an update. I have found a few techniques to be particularly effective to do just that.
Guide Series:
The Art of Being Lazy: Leveraging the API to Take Care of Repetitive Tasks & Fill Feature Gaps
Getting Started: Building Out Your Toolbox [Part 1] and [Part 2]
Reports: Sending, modifying, and more!
In the Room When it Happens: Act On Events with Webhooks
Bulk Scheduling ILT Sessions with a CSV File
Tag, You’re It!: Tracking and Managing Content Tags
Let Others Do It: The Power of Forms in a Workflow
And We're Back: How to Let Users have a Form as a Wizard Scheduling Tool
