

After much anticipation, this guide is the fifth in a series of new guides brought to you by
Who here likes scheduling? *CRICKETS* ...Let’s make it easier!

When it comes to managing our platforms, everyone has the task that they look forward to least. For me, it is scheduling classroom sessions. Judging by chats with others in the community, I do not seem to be alone in this. To give a short background for why I bothered with this particular process, our group has a centralized group of instructors responsible for running virtual courses every day for users around the country to sign up and take throughout the curriculum. This national group of instructors have other commitments as well and need to facilitate around 150 sessions of 20 class types in 4 languages across 6 time zones (with a month to meet demand). This means that “scheduling classes” is really two steps:
-
Deciding what class, on what day, at what time and who will teach it. This is a process that has countless variables, balancing the needs of the users and the schedules, abilities, and knowledge of the instructors. This part of the process really needed to be handled centrally as a result, and the groups manager developed a way to easily do so.
- Taking the schedule from step 1 and creating it within Docebo. Creating the sessions, creating the events, and assigning the instructors, which is a lot of clicks per class. (We also create custom Outlook invites—more on that below).
When discussing how best to connect step 1 and 2 above, it became clear that having the manager’s program send out a CSV file would be easiest. This would allow the manager to easily tell the automation process being built below what to do. This would also let them have a way to schedule ad hoc sessions or sessions outside of the scope of the program—all by creating a properly formatted CSV file.
Guide Table of Contents
Process Overview
Let’s walk through a high level of how the process will work.
Note: I will be using Office365 tools to do this, but the concepts work for other automation systems as well.
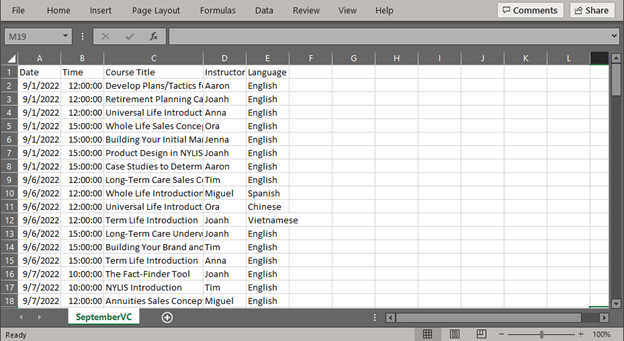
- Define the CSV file with the required information: For us this was 5 things:
- Which class type
- Date
- Time
- Instructor
- Language
You might need different items that I’ve included here. We will talk about this in detail in the next section about what information you need to provide.
-
Load the CSV file for processing: I make a new SharePoint library for each automation process, all within a ‘Docebo Automation’ SharePoint site. This gives a place for the manager to simply drop a CSV file into once it is uploaded. This triggers the automation to begin processing the file.
- Parse the CSV file: By turning the CSV lines into a JSON array of data, we can loop through them and carry out actions easily, such as creating sessions.
- Create the Session and Event in Docebo: Using the Docebo API, first a session can be created. Then, since the new session ID is returned immediately, we can make the event with all the required settings. (This is the main reason why I chose this process over the built-in CSV upload. It lets the full Session/Event relationship be built immediately and automatically)
- Carry out any extra processes: There is a lot of ability to do things once the sessions are created. For example, you can record all the details including session and event ID in a central list for reference or send the instructor an official Outlook calendar invite with join links and other information.
Designing the CSV File
As has been discussed, the CSV file is the core aspect to this process. A major advantage is that just about anyone can make it.
First you have to decide what information is needed. My general approach is to limit this to as little information as possible. You could easily include every variable as a column in your file, but then there is a larger potential for human error when creating the file. Further, it is a tedious and time-consuming task to create the file. If you are using an automation setup, look for ways to offload data. I keep two SharePoint lists as ‘lookup tables’ in my file.
As an example, let’s use the file I described above. In this file I only ask for the name of the course (since the manager was using a program to generate the list, I provided him with a list of acceptable names). During the automation I can use this name to look it up on a SharePoint list and find out other information such as Docebo course ID, session length, which Learning Plan it belongs to, Docebo Tool ID (useful if using multiple Virtual Class tools), values to use with other systems, links to training documents, etc.
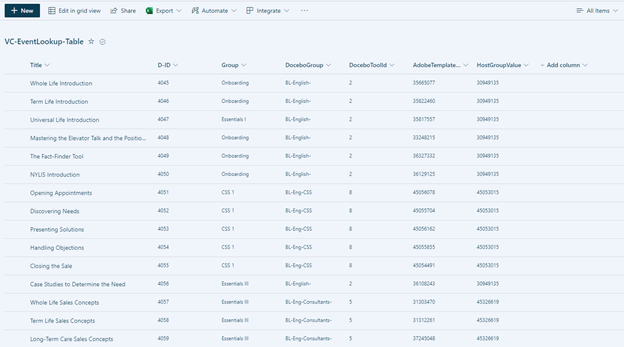
Now a single column of information can give me infinite information and, more importantly, the values in the look up table are centrally managed. This way, the knowledge bar for ‘scheduling’ can be lowered and others can handle the day to day.
Sit down and write out a list of all the variable information you may need. Look at each one carefully and think through how that information can be gained. Will it change for every session? Will it only be different for each course and stay consistent for a long period of time (i.e. only update a few times a year or less)? Remember the goal is to have as few columns as possible.
Updating the Custom Connector
In order for this to work, we need to make sure the Power Automate Docebo Custom Connector (that we built back in the second article of this series) has several API’s defined within it. Make sure you have the following:
-
POST - /course/v1/courses/{course_id}/sessions – This will be used to create the Session. Only the Course Docebo ID is required to run this, however I recommend having the following settings available. You may require others depending upon your exact needs:
-
Instructors
-
Name
-
Description
-
Min Enroll
-
Max Enroll
-
Enrollment Deadline
-
Custom Deadline Days
-
Evaluation Type
-
Min Attended Dates for Completion
-
-
POST - /course/v1/sessions/{session-id}/events – This will be used to create the Event within the Session. The only required aspect here is the Session ID to create the Event under. This is usually the tricky step of using the built in CSV upload tool. The value will be returned to us though to use when we create the Session. I recommend having the following settings available, though you may need others depending on your use case:
-
Name
-
Day
-
Description
-
Time Begin
-
Time End
-
Allow Join Completion
-
Join In Advance Time User/Teacher
-
Allow Completion Percentage
-
Required Completion Percentage
-
Timezone
-
Custom URL
-
Any fields related to collaboration or webinar tools you are using
-
Building the Process
Ok, we’ve covered all the pre-work and concepts. Those who want to build—here we go!
-
Create a new ‘Automated Cloud Flow’ in Power Automate.
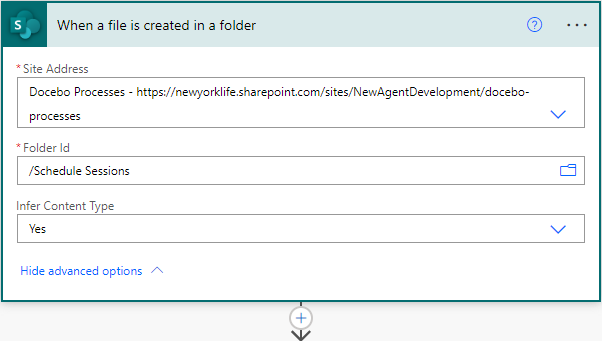
- Set the trigger as ‘When a file is created in a folder – SharePoint’. Fill in the proper Site Address and navigate to the library you created for this project:
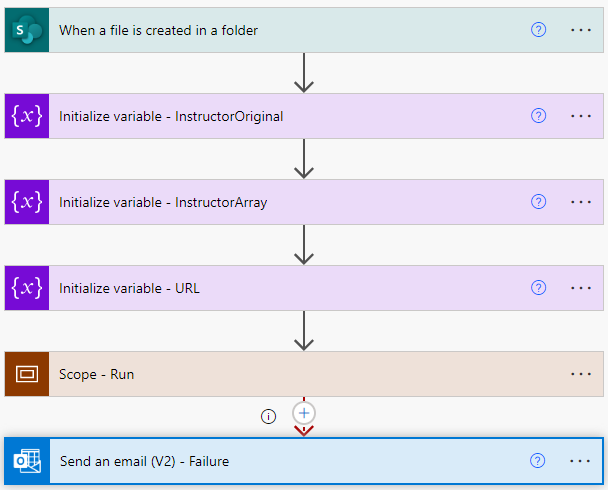
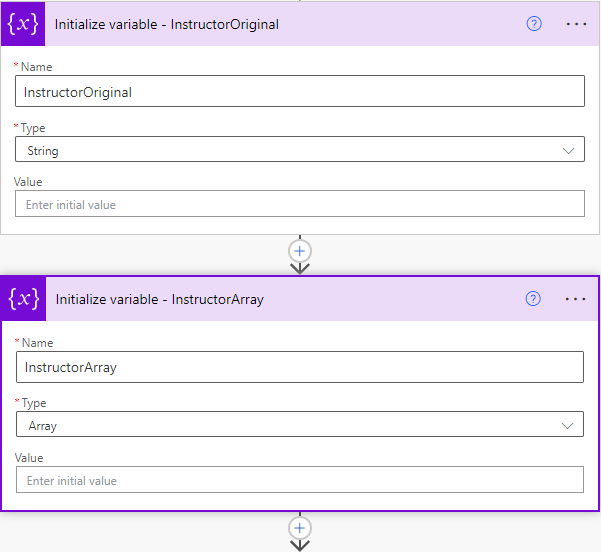
- I will need two variables in order to look up and build an array of the Docebo ID of the Instructor(s) for the session, They need to be initialized first, so create them and configure:
- InstructorOriginal – String
- InstructorArray – Array
- Create a ‘Scope’ element. We will put all the following actions inside the scope so that we can easily add a failure state later.
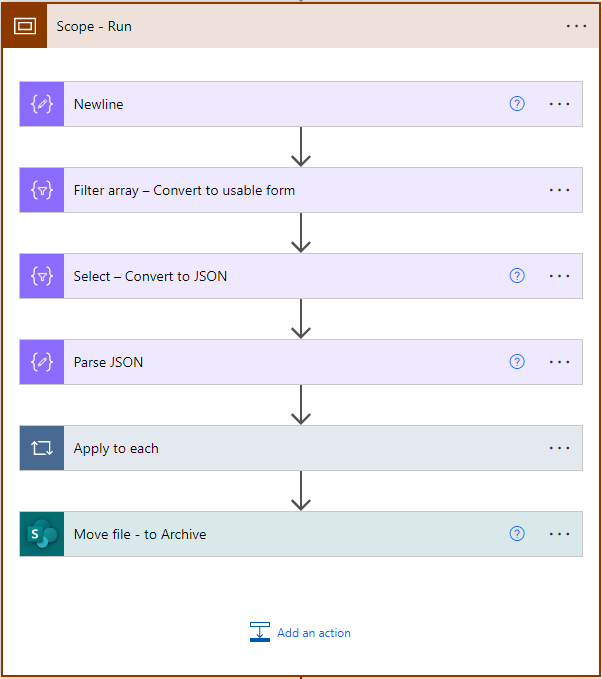
- Convert the CSV to a JSON Array:
Note: Yes there are premium connectors and services that you can use to ‘Parse CSV’, if you have access to those, feel free to use. This step outlines how I accomplish it without any external service.
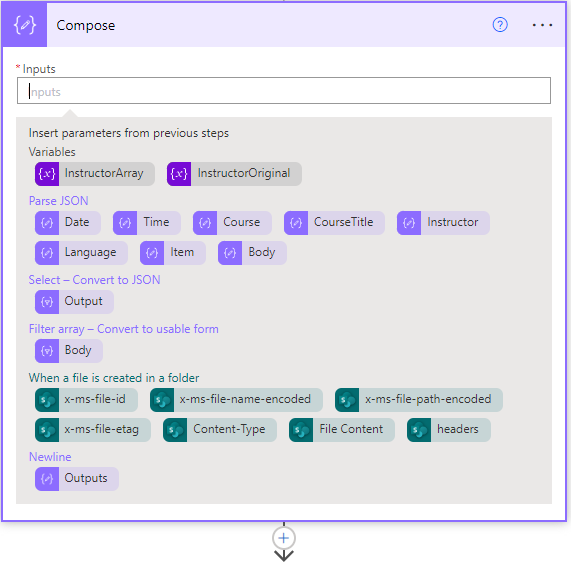
- Create a ‘Compose’ element and in the ‘Input’ field simple hit the enter key once:
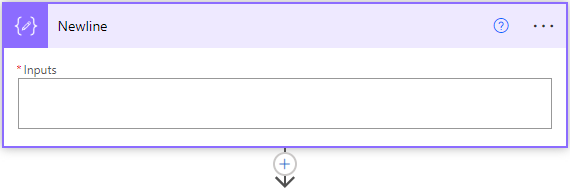
Note: This is a workaround for Power Automate, we need the return character later and typical formula methods do not work.
-
Create a ‘Filter array’ element. We want to break the file up into an array of lines based on the return at the end of each row, and then filter out any blank rows:
-
In the ‘From’ field put the following in using the formula insert box:
split(replace(replace(triggerOutputs()?['body'],'"',''), ',', ';'),outputs('Newline')) -
Set the filter to being: item() is not equal to blank:

-
-
Create a ‘Select’ element. We want to build the JSON array. This step also lets you organize things if you wish:
-
In the ‘From’ put the following in using the formula insert box:
skip(body('Filter_array'), 1) -
In the mapping, give the left hand column unique names that you will use to reference throughout the automation. In the right hand column for each add the following:
split(item(),';')[0]
-
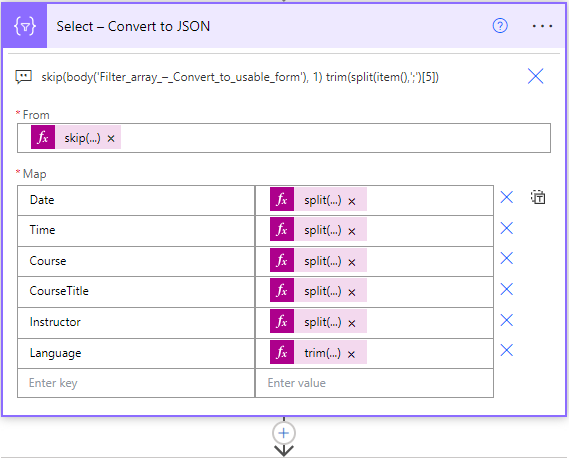
Note: Update the 0 above to correspond to the column number of the CSV. The counting is 0 indexed though, so if you think about it in excel, A=0, B=1, C=2, etc.
.
-
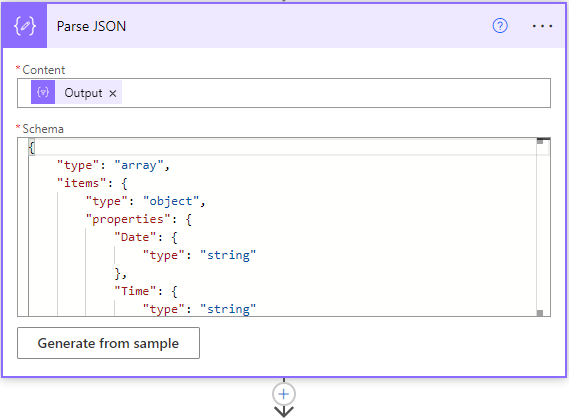
Create a ‘Parse JSON’ element.
-
In the ‘Content’ field put the Output from the previous Select step.
-
In the ‘Schema’ field, update the following to have your columns in the properties area:
-
{
    "type": "array",
    "items": {
        "type": "object",
        "properties": {
            "Date": {
                "type": "string"
            },
            "Time": {
                "type": "string"
            },
            "Course": {
                "type": "string"
            },
            "CourseTitle": {
                "type": "string"
            },
            "Instructor": {
                "type": "string"
            },
            "Language": {
                "type": "string"
            }
        }
    }
}
-
Now the CSV elements can be called as variables throughout the process and each line of the file looped through to create each session.
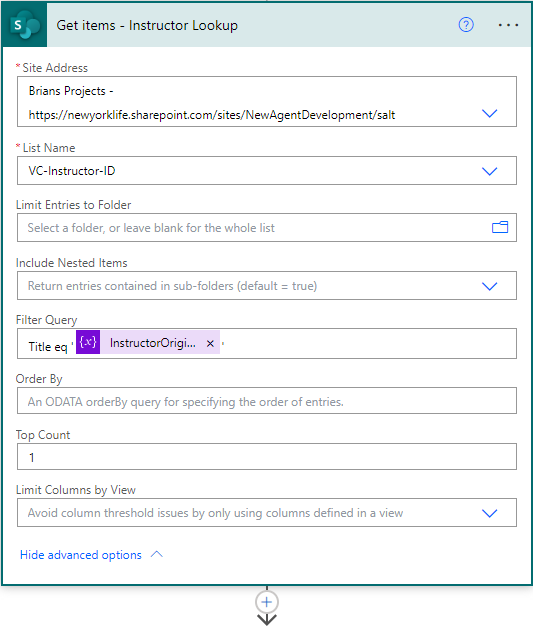
- I only receive the name of the primary instructor from the CSV. The API is looking for an array of Docebo user ID’s to assign Instructors. To handle this I made an ‘Instructor’ SharePoint list which I can lookup the Instructor’s name and gain their ID:
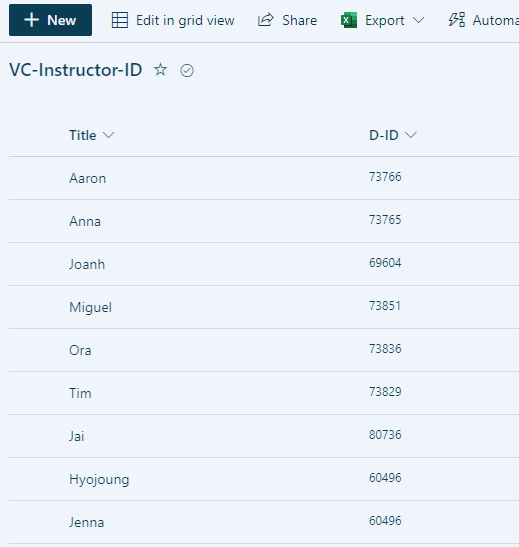
This is not the only way! You could collect the ID directly in the CSV or use the Docebo API to lookup the user and find it. Do what is best for your situation here:
-
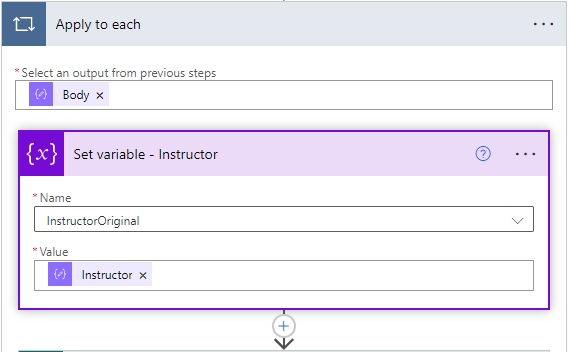
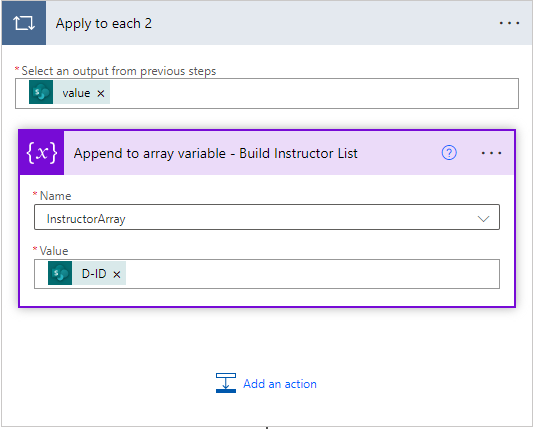
Create a ‘set variable’ element. Select ‘instructorOriginal’ and place the ‘instructor’ variable from the Parse JSON step in the ‘Value’ field. (This will automatically generate an ‘Apply to each’ loop which will carry these actions out for each line in the CSV.)
- Create a ‘Get items – SharePoint’ element. Fill in the site address and list name where your lookup table is. In the ‘Filter Query’ filter, use the ‘InstructorOriginal’ variable that was just set.
- Create an ‘Append to array variable’ element. Select the ‘InstructorArray’ variable, and use the Docebo ID value returned in the previous step as the ‘Value’.
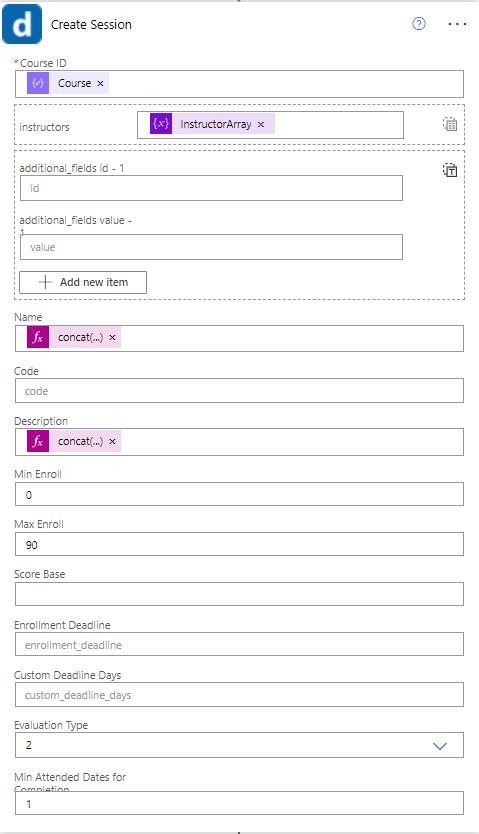
- Create a ‘Create Session’ element using the Docebo Custom Connector. Use the information you’ve gathered to fill in the details. Here are some, and places where formulas got used to edit the data:
-
Course ID: Add the Course ID from either the CSV or your lookup table.
-
Instructors: Put the ‘InstructorArray’ variable.
-
Name: Form a proper name for the session. In our case there’s a format to it using several elements with a condition based on which language it is taught in, so using a concatenation this can be achieved:
concat(if(equals(items('Apply_to_each')['Language'],'English'),'',concat(items('Apply_to_each')['Language'],' - ')),replace(items('Apply_to_each')['CourseTitle'],' Virtual Classroom','')) -
Description: Add any description details, we typically just put the title again here as it has a lot of description within it.
-
Min Enroll: This is always 0 for us, feel free to set to your desired amount.
-
Max Enroll: This is always 90 for us, feel free to set to your desired amount.
-
Evaluation Type: We use Attendance based, which is option 2 in the API, but you can set to the other options:
-
0 – Manual
-
1 – Evaluation Based
-
2 – Attendance Based
-
3 – Training Material
-
-
Min. Attended Dates for Completion: 1
-
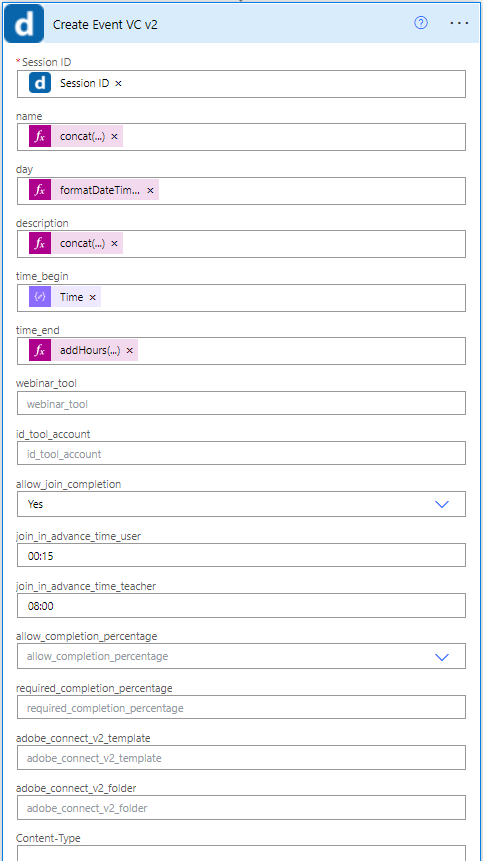
Create a ‘Create Event’ element using the Docebo Custom Connector. Use the information you’ve gathered to fill in the details. Here are some, and places where formulas got used to edit the data:
-
Session ID: Use the ‘Session ID’ variable returned from the previous step.
-
Name: We use the same as the Session name from above, but put in what you want here.
-
Day: Make sure the format is yyyy-MM-dd, to make sure of this instead of just putting the date from the CSV, wrap it in a formatDateTime formula:
formatDateTime(items('Apply_to_each')['Date'],'yyyy-MM-dd')
-
Time Begin: Time variable from the CSV file (Needs to be in the format HH:mm:ss)
-
Time End: This is calculated from the begin variable. These particular sessions are all one hour so can do this with the formula:
addHours(items('Apply_to_each')['Time'],1,'HH:mm:ss')
-
Timezone: Since these are national, they are all scheduled in Eastern Time, but you can have them scheduled in a set timezone instead. Here they are all ‘America/New_York’.
-
Join in Advance Time User: This is how long before the session start time the ‘Join’ button will show to the users. We default this to 15 minutes before, so place ’00:15’ in the field.
-
Join in Advance Time Teacher: This is how long before the session start time the ‘Join’ button will show to the Instructor. We default this to 8 hours before, so place ’08:00’ in the field.
-
Depending on which webinar tool, location, etc. You may use any combination of other fields. In this example to keep things simple, we will use the custom URL setup and mark complete on Join.
-
Set the Allow Join Completion to ‘Yes’.
-
Insert the URL to the custom tool in the ‘Custom URL’ field.
-
-
- Now it is time to clean a few things up.
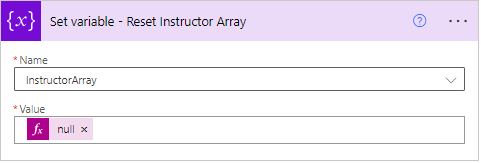
- Create a ‘Set Variable’ element. Set it to ‘InstructorArray’ and set the value to null.
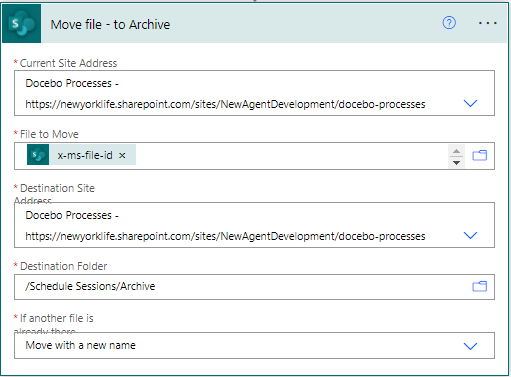
- Outside of the ‘Apply to Each’ loop, create a ‘Move file – SharePoint’ element. This will let us move the CSV file to an ‘Archive’ folder once it has been completed processing, keeping the ‘drop folder’ clean.
- Create a ‘Set Variable’ element. Set it to ‘InstructorArray’ and set the value to null.
That’s it!

Now when a CSV file with the proper columns is dropped into the SharePoint directory, it will be processed, and all of your Docebo ViLT Sessions and Events will be created automatically while you work on other things. Pretty great, right?
Bonus: Do More Stuff!
One advantage of managing your sessions this way is that during the automation run, all the information related to it is available to you. Use this to your advantage. With this in mind, let’s do two quick additions that often come up. We’ll go over how to send a real Outlook Calendar invite to the instructors, as well as how to log all the information into a list for record keeping and to use later.
Send an Outlook invite
Make sure you are within the ‘Apply to each’ loop still, as you want this to happen for each Session.
Note: To do this you will need to put the account on a calendar. I like to create a ‘do not reply’ type account to have for only sending/receiving/calendaring these types of automations, but talk to your IT group about what is available to you.
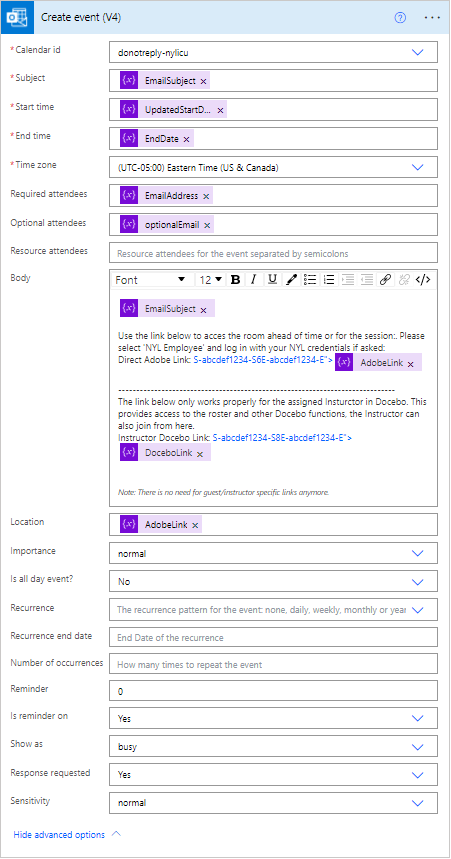
Create a ‘Create event – Office 365 Outlook’ element:
-
Calendar ID: Select the calendar you would like the event to exist on.
-
Subject: Create an appropriate subject, remember you can use the dynamic information here!
-
Start Time/End Time: You can use the calculated ones from earlier, but they must be in a new format: yyyy-MM-ddTHH:mm:ss
If you need to, simply use a ‘formatDateTime’ function to set them correctly.
Tip: Add -30 minutes to the start date/time so that the Instructors calendar is blocked a half hour before the start of the session for them to prep.
- Time Zone: If they are always the same, just select it, if not you can create a condition or a dynamic piece of content to select.
-
Required Attendees: Insert the instructors email address.
-
Body: Fill in any information you want the instructor to receive in the invite. This could use any of the dynamic content, and if you wish to give the session link, simply concatenate the base URL, Course ID, and Session ID to get the following format:
https://<YOUR_SUBDOMAIN>.docebosaas.com/lms/index.php?r=site/sso&sso_type=saml&id_course=<COURSE_ID>&session_id=<SESSION_ID>
-
Location: I would put the Docebo link from above again here, however I know many also put the direct link to Adobe Connect, Zoom, Webex, etc. as a backup here.
-
Importance: Set this to normal.
-
Reminder: We set this to 0 as the start time has a built-in buffer for the instructor, but you can set it to any number of minutes you want for the Outlook reminder to trigger.
-
Is Reminder On: If you want a reminder set this to ‘Yes’, if not then set it to ‘No’.
-
Show as: Set this to ‘Busy’.
-
Sensitivity: Set this to ‘Normal’.
And that’s it!
You can tweak it as much or as little as you want, but now whoever you put in the Attendee fields will receive a calendar invite from the account you selected. (In my case, I use a Do Not Reply account.)
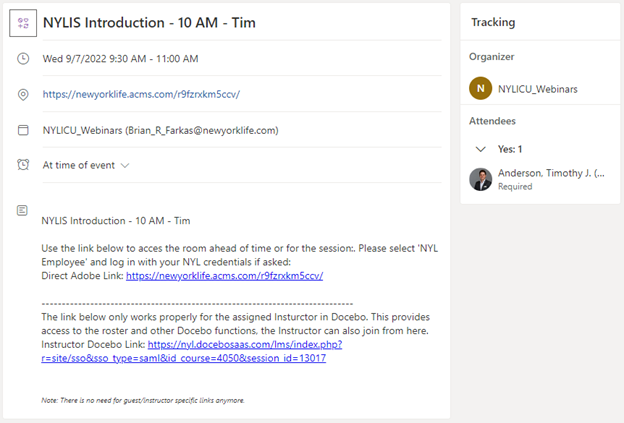
Now, when the flow automation runs, each Session will create a new Outlook invite too for the instructors.
Record the Session Information to a Central Log
There is a lot of value in keeping a list of all the session information, especially if you are using multiple platforms for your sessions. It comes in handy for some reporting, but also for carrying out actions later too.
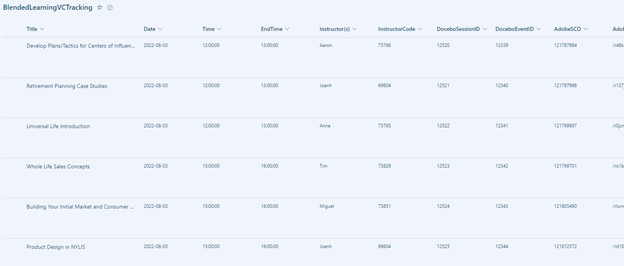
In my case, I like to make a SharePoint list with a column for each piece of data (i.e. Course name, Date, Start Time, End Time, Instructors, Instructors Docebo ID, Docebo Course ID, Docebo Session ID, Docebo Event ID, Docebo URL, Zoom URL, etc.). I use a SharePoint list as it is easier to use in other automations but could always add to an Excel or Google Sheet as well. Just make sure the location is created first.
Make sure you are within the ‘Apply to each’ loop still, as you want this to happen for each Session:
-
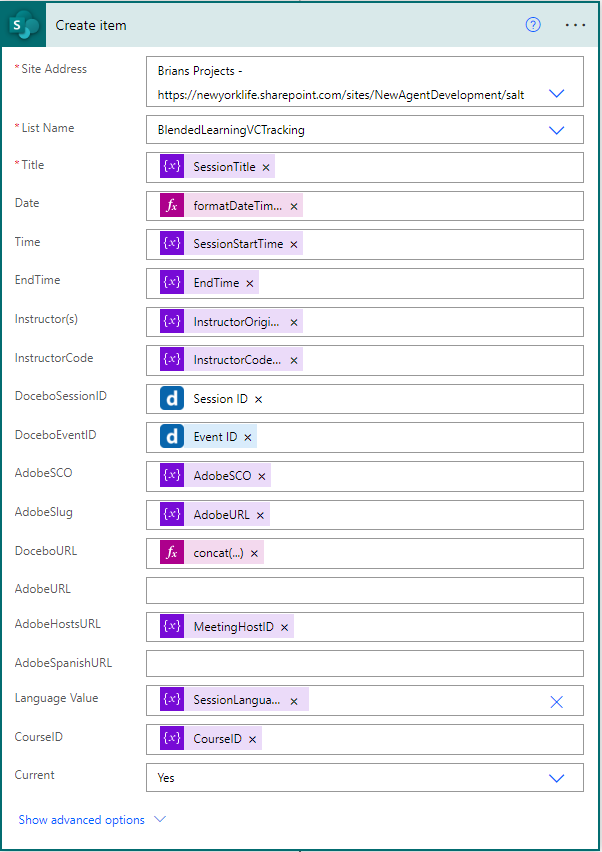
Create ‘Create Item – SharePoint’ element:
-
Site Address: Select the address where your list lives.
-
List Name: Select the list.
-
Fill in all the columns using your dynamic content from the process.
-
That’s it.
Now as each session is created, all the information is captured centrally for later use—simple and convenient!
What’s Next?
Even if you cannot build this exact automation, I hope you can see how working this way can help save you time, avoid human error, tailor to your needs, and more importantly avoid the boring repetitive task of scheduling!
In the next installment of this series, we are going to look at how you can work with the automated content tags, removing those you don’t want, while keeping those you do, which should help improve your platform search results.
Guide Series:
The Art of Being Lazy: Leveraging the API to Take Care of Repetitive Tasks & Fill Feature Gaps
Getting Started: Building Out Your Toolbox [Part 1] and [Part 2]
Reports: Sending, modifying, and more!
In the Room When it Happens: Act On Events with Webhooks
Tag, You’re It!: Tracking and Managing Content Tags
Let Others Do It: The Power of Forms in a Workflow
And We're Back: How to Let Users have a Form as a Wizard Scheduling Tool
You Built It, They Came, Now What?: Scheduling ILT Wizard Bonus Activities
