This guide is the seventh in a series of new guides brought to you by
As you may remember, I started this series off by talking about how I approach these workflows and automations as a way to extend my laziness. So far, the topics have generally looked at ways to simplify or automate processes that an admin should be responsible for. However, there are many times when administrators get stuck doing tasks that others could do simply because it requires elevated rights to do it. This should not be.
This is where my favorite technique comes in. I can create a form as a front-end interface to let other users fill it in/trigger a process. Then on the backend I can use an account with full API access to carry out tasks for the user.

We will walk through a few simple examples of this technique in this article, but I cannot emphasize enough how powerful and flexible a tool this can be for solving problems and processes.
Guide Table of Contents
The Form Types I Use
I mainly use a combination of either Office365 Forms or Qualtrics, but Google Forms/Surveys will work for many of these too. Generally, I use the Office365/Google Forms for lightweight work that is still within the administrator purview.
Anything that will be end user facing or has more complex needs, I move right over to Qualtrics which is a very powerful platform. The examples below will demonstrate one of each.
Tip: Make sure to ask around your organization, as many times different survey/form platforms might have been deployed and the entire organization may not be aware. There are many advantages to advanced platforms being integrated into your organization’s systems.
Management Form: Simple User Lookup – Office365 Forms
This example is very specific to our workflow, but will give you a general idea to how effective this technique can be. To understand, I must give some background on our use case.
We have a vendor who builds out a dashboard for our management. Reports from Docebo are sent on all assigned courses and completion statuses of courses for all users every hour to this vendor to update their dataset. As you can imagine, these reports are quite large. To help manage this, the reports are restricted to the past 60 days for completions. For a standard user coming through, this is generally not a problem. However, if a user leaves and then returns, or the instructor for in person classes does not do their attendance quickly, the user can be marked complete in Docebo but not on the management dashboard... AKA a major problem.

The process to fix this previously was for one administrator to run a manual report on all the completions for that one user, filter it for specific courses, email it to the vendor, and they would eventually update it. It could take weeks, and there was a per file charge for this as each file took manual work.
As I discussed in the guide on Reports, we have built a few automations to save Docebo reports to different cloud locations. This is one of them, as we needed to transform the file a bit for the vendor to accept it. Since that process was already running, this idea came up: Can we simply insert specific users’ full learning history into this file automatically?
Yes. Yes we can!
Working backwards, we already knew all the information needed for completions with the exception of the user’s Docebo ID. This was the one piece of information that needed to be retrieved manually.
Requests like this would typically hit a shared support box that was monitored by lower-level support staff noting anything for administrators to review. Ideally, if all members of the support staff could have a simple way to identify users in order to sync their full learning history, this would save time, money, and stress. Enter a form:
Building the Form
In this example, end users would not be interacting. Rather, our help desk would use this. Additionally, only one piece of information will need to be submitted. This lends itself to a fast build using an Office365 Form.
- Create a new form and name it something appropriate.
- Select ‘Add New’ and select ‘Text’.
- Name the question ‘Enter Docebo Username’ and make it a required field.
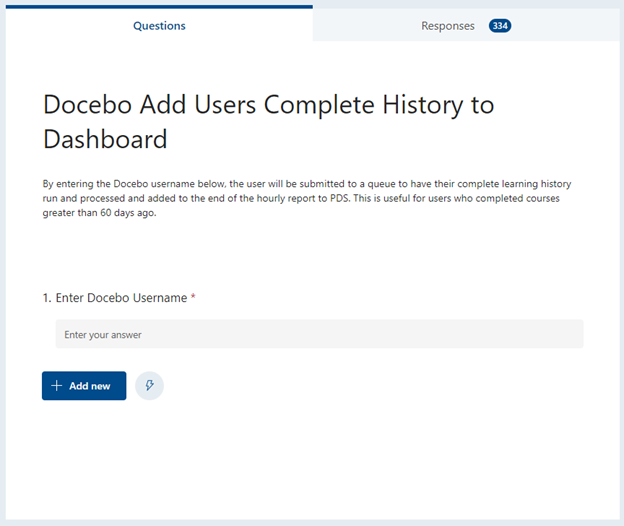
That’s it. That’s all that was needed. Since this was going to be used by the support staff, it was added as a tab within the Team’s site that they use. Now they simply move to that tab, enter the problem account’s Docebo username, and click submit. From there, everything happens in the background.
Building the User Look Up Process
Now that we have the Docebo username, we can lookup other information about the user—specifically their Docebo User ID.
- Create a new ‘Automated’ Power Automate flow.
- Select ‘When a new response is submitted – Forms’. Set the ‘Form ID’ to the form you created above.
- Create a ‘Get response details – Forms’ item. Set the ‘Form ID’ to the form you created above and the ‘Response ID’ to the ‘Response ID’ variable from the previous trigger step.
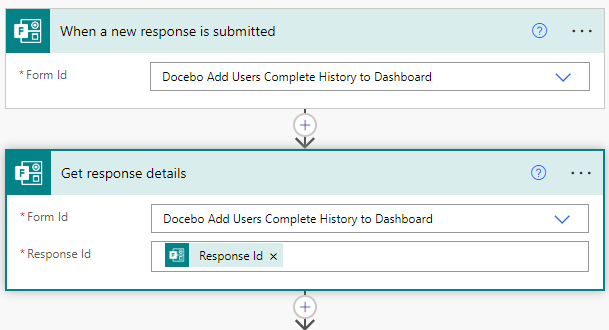
- Because the form field is a simple text field, I wanted to clean any extra spaces or characters. To do this, create an ‘Initialize Variable’:
- Name: UsernameCleaned
- Type: String
- Value: trim(outputs('Get_response_details')?['body/r2a353eb9afef42f8abb19bd9ecd8ec0a'])
Note: The body text above will be different for you. It is the ‘Enter Docebo Username’ variable from the response details.
- Create an ‘Initialize Variable’ and set the following:
- Name: CountofResults
- Type: Integer
- Value: Blank for now
- Create a ‘Look Up User Information’ from your custom connector. Set the following settings:
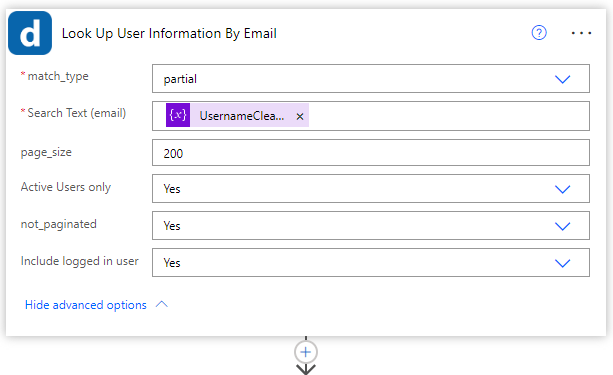
- Match_type: partial
- Search Text: UsernameCleaned variable
- Page_size: 200
- Active Users only: Yes
- Not paginated: Yes
- Include logged in user: Yes
Note: I am using this technique so that support can technically use the user’s email address as well as the Docebo username, although I encourage them to use the username.
- For the prior ‘Look Up User Information’ call, I do not have the output defined yet, so I had to parse the JSON of the body that is returned. If you setup your custom connector properly, you will not need this.
- Create a ‘Set Variable’ item, choose the ‘CountofResults’, and set its value to ‘Count’ from the returned lookup. There are three scenarios we want to account for.
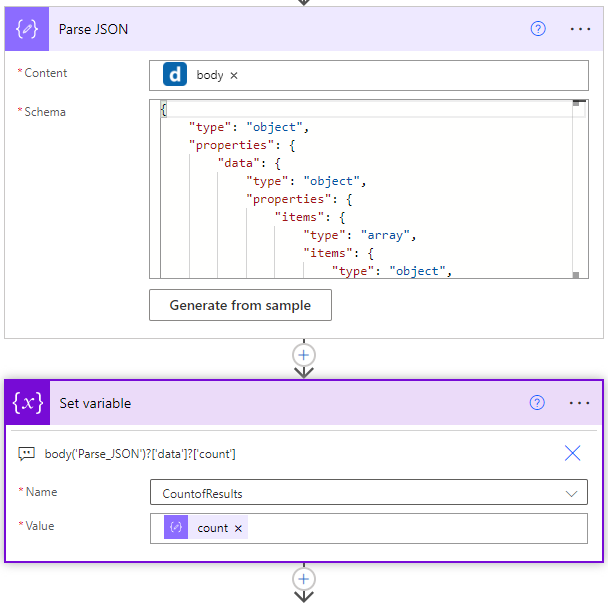
- Create a ‘Switch’ and set the ‘On’ to the variable ‘CountofResults’. Create the following cases:
- Equals 1: This means exactly one user was found. Add this user’s information, i.e. Username and Docebo ID, to a SharePoint list of users to sync their learning history. Then send an email to the form submitter letting them know the request has been received and was successfully processed.
- Equals 0: Email the form submitter, show them what they submitted and let them know the user could not be found. Most likely this was a bad copy/paste or a typo. They can resubmit the form to submit successfully.
- Default: This will be if multiple users are returned. In this case also email the form submitter, show them what they submitted and let them know multiple users were returned and so it was not processed.
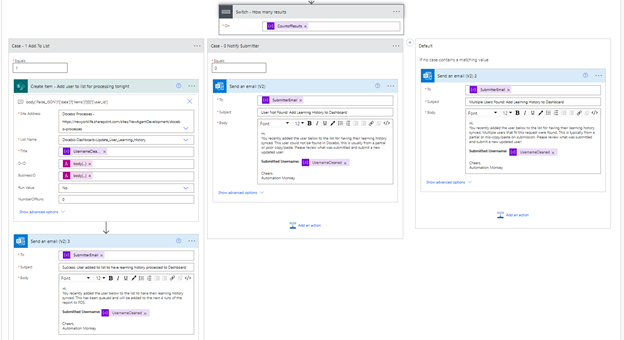
Now, when the report process to transfer the report data from Docebo to the vendor runs, the SharePoint list is checked to see if there are any users on it.

If there are, their complete learning history is pulled and appended to the report data automatically:
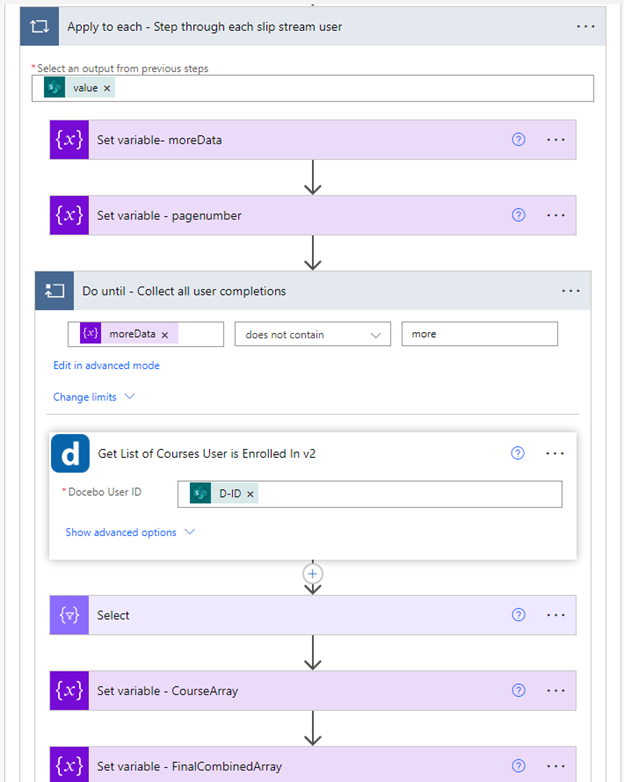
In theory, someone reports the issue, the form is submitted, and the report data fixes the issue within 60 minutes start to finish—and for free! This is a vast improvement, and anyone from the support level or higher can handle it.
End User Form: Embedded Support and Feedback – Qualtrics
The use case for this form was to have a single form collecting information on feedback for every course, as well as provide an avenue to reach out to and receive support specific to a course. Having this data all collected in one place allows easy analysis, but it also allows workflows to be built based on answers for immediate follow up from the correct group.
This setup gets a little more complex, but has one of my favorite Docebo tricks within it. Since this form will be used by all users, I want it to be right inline within Docebo and not need to collect information that we already know about a logged in user. After all, how annoying is it when a form asks you for your name or email address when you are logged in?

The good news is, using a little Docebo magic and with a form that can accept URL parameters, this is easily accomplished. I am going to cover the technique first, as the form itself is not as crucial. (In my case it will be a simple support form.)
Setting Up OAuth2 App for iframe Embedding
- Log in and select the Admin Menu (Gear icon top right corner).
- Select ‘Manage’ under the ‘API and SSO’ area.
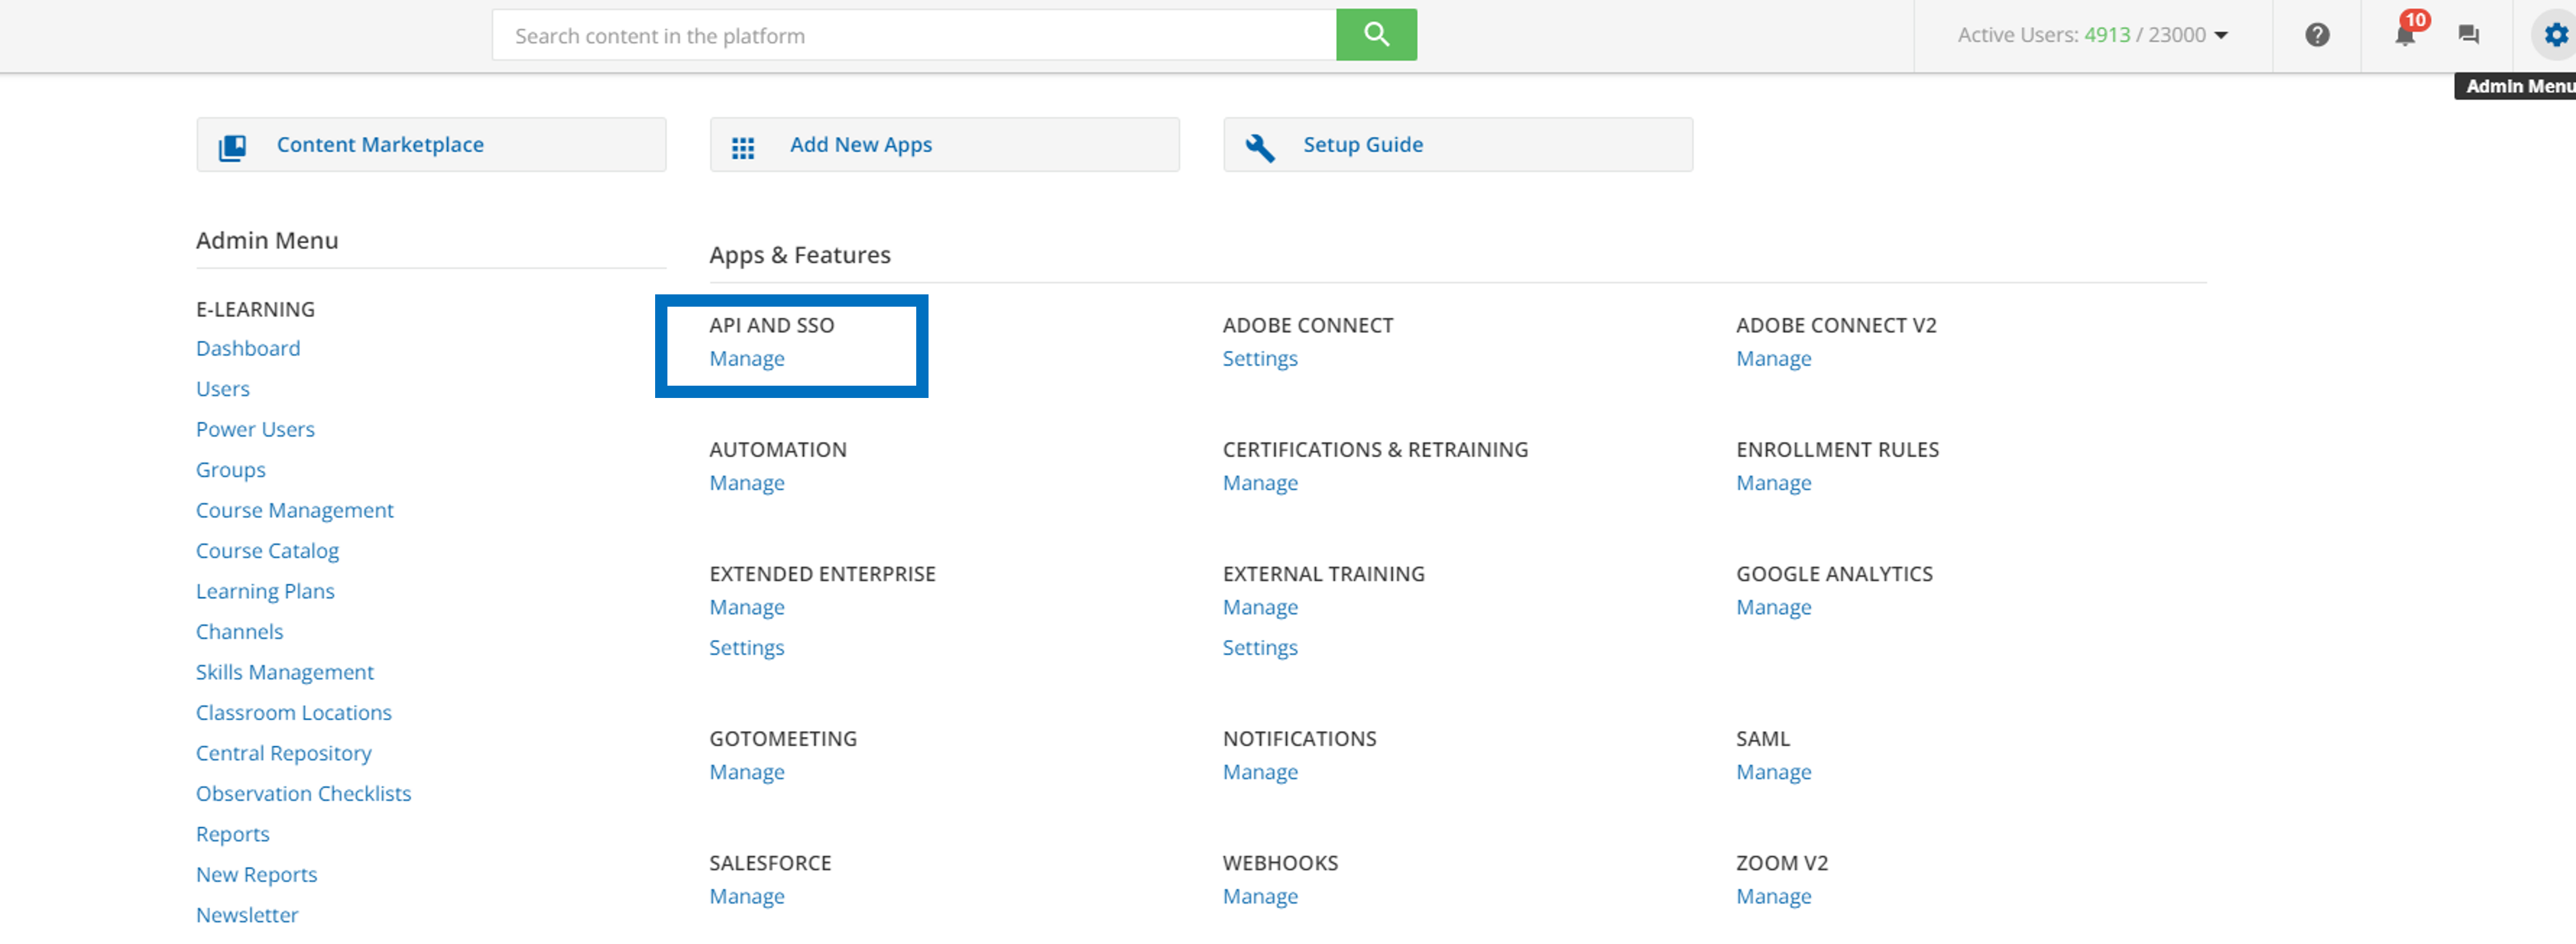
- Select ‘API Credentials’.
- Select ‘Add OAuth2 App’.
- Fill in the required information:
- App Name: Give the app a distinctive and descriptive name so you can differentiate it from others.
- App Description: Important to detail the purpose of the app so that other admins are clear what each is for.
- Client ID: Think of this like a username, make it unique and make sense for the account.
- Client Secret: This will be generated automatically, think of it like the accounts password. You will need it later, so make a note of this, but protect it.
- Redirect URL: Each application you use will have a unique one of these, it tells the applications how to talk to each other, in this case it will not really be used so I typically use a placeholder of: <YOURSUBDOMAIN>.docebosaas.com
- Select the ‘Show advanced settings’ check box and make sure the ‘Authorization code + implicit Grant’ checkbox is selected.
Note: Yes you can use other types, this is the route I recommend for beginners to stay safe.
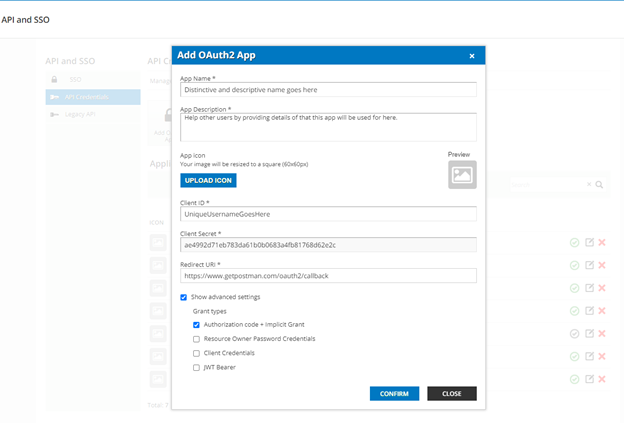
- Select ‘Confirm’.
Ok, now that you have an OAuth2 app, let’s take a look at an iframe widget. The process is roughly the same if you want to do it on a page or in a course directly.
- Add an iframe widget to the page.
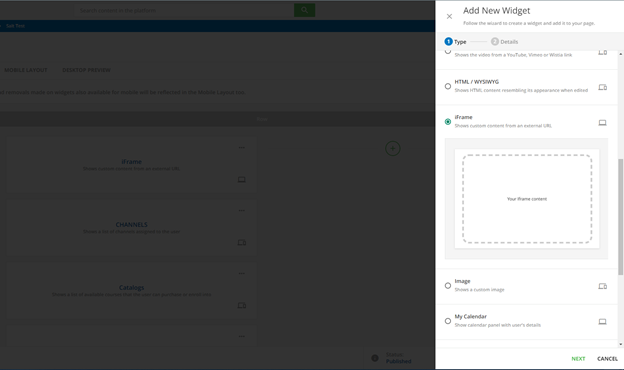
Note: On the course page, you will need to go to the gear and select settings to continue.
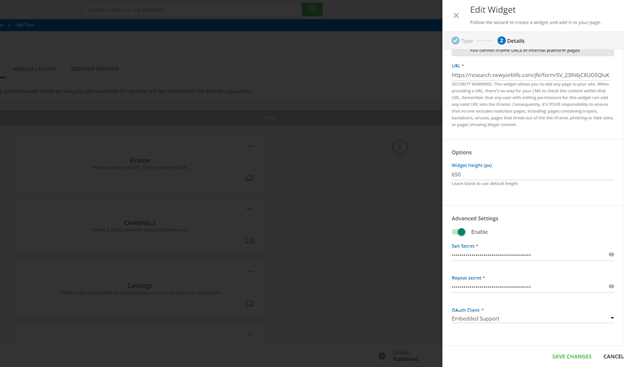
- Enter the URL for the form you wish to embed in the URL to Display field.
- On a page widget, toggle the ‘Advanced Settings’ option.
- On the ‘OAuth Client’ dropdown, select the name of the one you just created.
- Enter the Salt Secret (from the previous OAuth2 app steps) twice to confirm it.
- Select ‘Add Widget’ or ‘Save Changes’ depending where you are.
At this point, you should see your form displaying natively inside Docebo when you look at the course page.
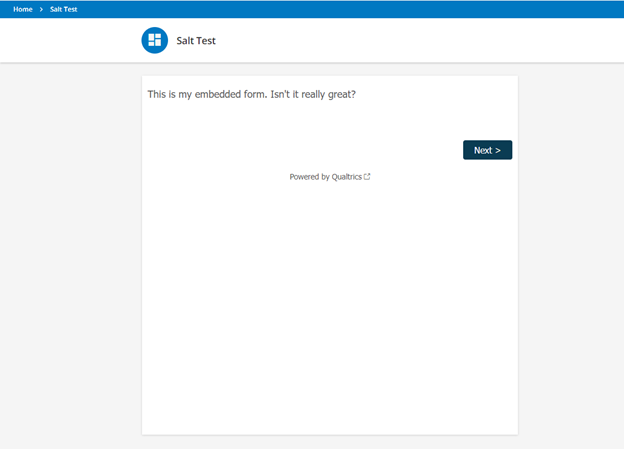
Now you might be saying, but that’s how all iframes work. Why did we bother with the OAuth2 setup? Let’s look at an example to see why:
Example: URL Parameters
My form’s URL is https://research.newyorklife.com/jfe/form/SV_23lN6jC8UO5QluK
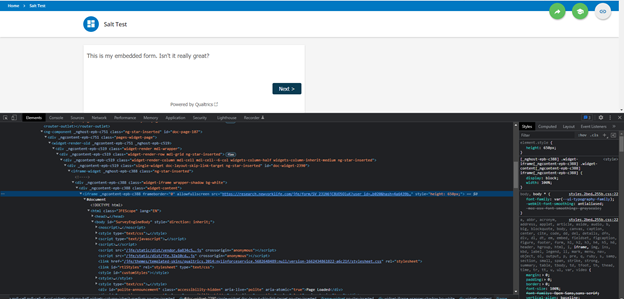
If I use developer tools and inspect the page I embedded the form on above, I get the following iframe code:
<iframe width="100%" allowfullscreen="" height="650" src=" https://research.newyorklife.com/jfe/form/SV_23lN6jC8UO5QluK?access_token=5f226fc550c4ff203e82265af26738b0d8d2a273&course_id=4176&course_code=SALT-T3E&user_id=73854&username=ap00p030jib08ne7&auth_code=f1d0ca02af4fdd1c589a3564bc04d7ed9782402a&hash=9d0f9478fa0f56a43ab60c756bd967d6b6182172d686bbd8745f242942eee75c" class="ng-star-inserted"></iframe>
Looking closely, the following has been added to the end of my form’s URL:
?access_token=5f226fc550c4ff203e82265af26738b0d8d2a273&course_id=4176&course_code=SALT-T3E&user_id=73854&username=ap00p030jib08ne7&auth_code=f1d0ca02af4fdd1c589a3564bc04d7ed9782402a&hash=9d0f9478fa0f56a43ab60c756bd967d6b6182172d686bbd8745f242942eee75c
These items are being added:
- user_id: This is the unique Docebo user ID of the currently logged in user viewing the form.
- username: This is the username of the currently logged in user viewing the form.
- auth_code: This is a temporary authentication code that is valid for a very short period of time (under a minute) and can be used to exchange for a valid OAuth2 token. We can use this within Qualtrics to do direct API queries and gain more information.
- course_id: This will only show on a course page and is the Docebo course ID of the course the user is currently on. This is incredibly helpful for a support form, since we don’t need to ask the user which course they are having issues on, we know already.
- course_code: This will only show on a course page and is the Docebo course code of the course the user is currently on.
If you want to keep things simple, you can simply add the above information via URL parameters to the data your form is collecting. You can now know the user and course without asking the user! Nice, right?
Tip: If you are going to be adding this type of form to all course pages, you can add your own URL variables to help distinguish more. For instance, I added a ‘course_type’ and gave them values of eLearn, GID, or VC which correspond to our course types. This lets me branch the form later to questions relative to the course type.
API Calls from the Form
If you wanted to take it a step further and you have access to a form system that can do web queries (like Qualtrics), you could use the auth_code being passed to get a proper token, then do API calls directly. Additionally, the user does not need to be a Superadmin.
Since this example is adding a support and feedback form to the courses, it might be nice to personalize the form a bit. Sure, we can generalize the question as “What can we help you with today?”...
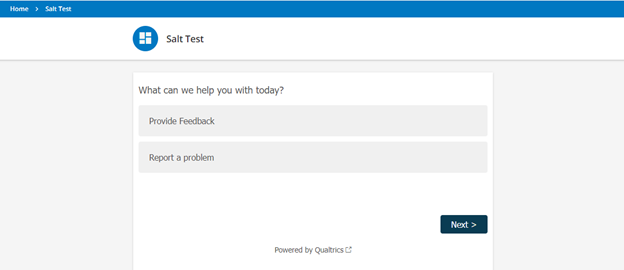
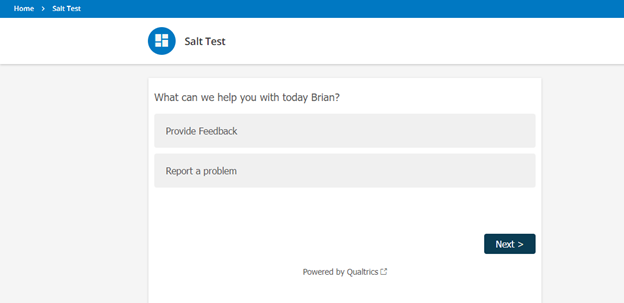
..but is it not a bit nicer to say “What can we help you with today, Brian?” I think so.
Let’s do that:
- Build your basic form in Qualtrics.
- On the ‘Survey Flow’ tab, add a ‘Set Embedded Data’ block and move it to the top.
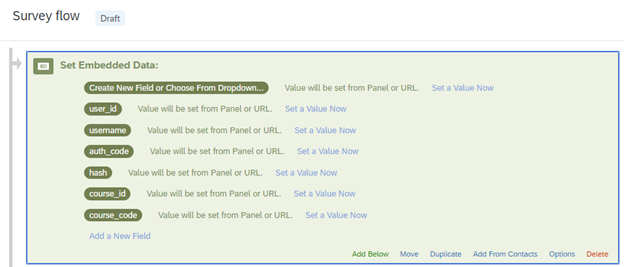
- Add the following fields to be pulled in for use later:
- user_id
- username
- auth_code
- hash
- course_id
- course_code
- Add a ‘Web Service’ element, and set the following:
- URL: https://<yoursubdomain.docebosaas.com>/oauth2/token
- Method: POST
- Body Parameters: application/json
- code = String - ${e://Field/auth_code}
- client_id = String – The OAuth2 App Client ID you configured earlier.
- client_secret = String – The OAuth2 App Client Secret you configured earlier.
- grant_type = String – authorization_code
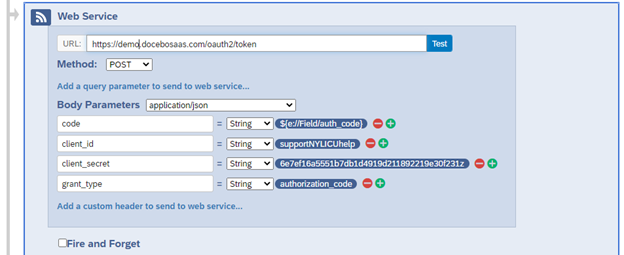
- This is a tricky step, but I find it useful in general.
- Open a tab that shows the iframe being rendered and open the dev tools so that you can find the auth_code quickly.
- You are going to refresh the page, copy the auth_code, paste it into the auth_code embed code in Qualtrics and then select the ‘Test’ option in the Web Service call.
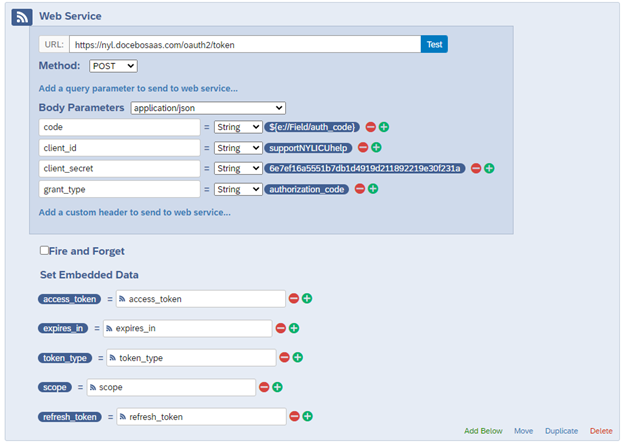
- If you do this quick enough so that the auth_code is still valid, you will get the results returned with a sample body. You can then select items to add to Embedded Data. You want to add the access_token, expires_in, token_type, scope, and refresh_token. Now you have this data to use later.
- Add a second Web Service element to the flow, so that we can get the user’s information. Set the following:
- URL: https://<yoursubdomain.docebosaas.com>/manage/v1/user/${e://Field/user_id}
- Method: GET
- Add a custom header: Authorization = Bearer ${e://Field/access_token}

Note: There are piped text variables being used in the above—one in the URL to get the current user’s Docebo ID in order to look up their information, and one for the access token you received in the previous step. If you named your data differently, you will need to change the names here too.
- Again, you will want to run a test on this call in order to add the field data. This time is a bit easier, as you can use any valid authentication token to do it. I typically just go to the API Browser, authenticate and then copy the token from the left side of the screen. You can temporarily replace the ‘${e://Field/access_token}’ in the header call and select ‘Test’. If it goes well, you will see fields of data to select from like below:
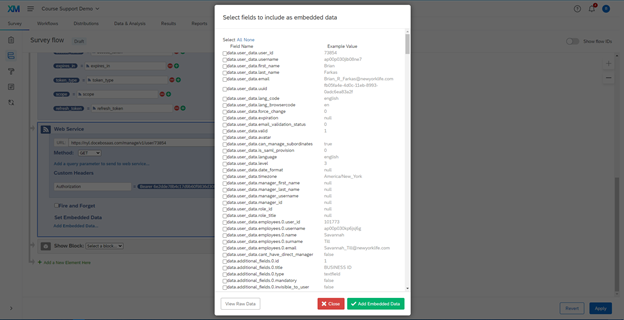
Use the checkboxes to add the fields you would like to record and use. In my case, I want names and emails:
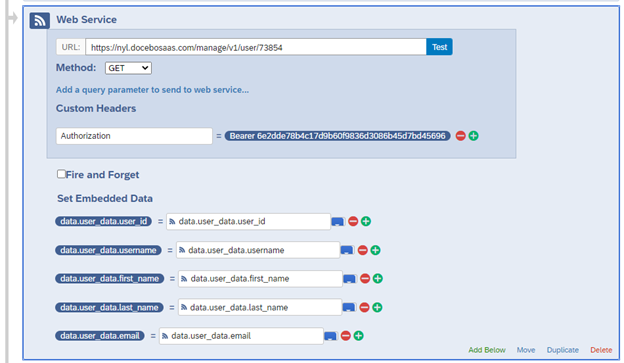
- You now have all these new data options to use throughout the form. You can add these as piped text, make branching decisions based on values, just simply have it recorded in one place, and more. I have added the ‘data.user_data.first_name’ to my first question to personalize it:

A Note on API Form Usage
If you are like me, you want to run off and make tons of forms and API calls. But before you do, think it through.
While this technique is very useful, it is a tad cumbersome to setup and maintain. Think about working on each API call independently. What I generally do is an evaluation, and it goes something like this:
- Can I just use the additional URL parameters?
Remember, by turning the iframe OAuth2 app on, you automatically get the basic user information (and if on a course page, the course information as well). If that is all you need, great! Skip setting up the API further, record those items as embedded content, and move on. I often do this with known users, then use some javascript in the form to make other choices for them.
- Do you need information you can get with 1 API call? If you need a handful more of content and can get them from one or two calls, go right ahead and do the above setup. It is probably worth it and will save you time.
- Are you going to trigger other processes anyways? What I like to do often is leverage Qualtrics abilities to send a web service call upon form submission. I can use this to have a separate process (Power Automate, Workato, etc.) triggered, which can securely request the information from Qualtrics and use my Power Automate custom connection to carry out more API calls, manipulating the data much more easily than doing so within Qualtrics directly.
Overall, I love having the ability to flexibly shift between the three techniques above, and I hope you see the value in it too. They let you quickly add new mini applications embedded directly into your Docebo environment which help to fill gaps or customize the user experience.
As an example, in the case of the user support form we were able to automatically record:
- User’s name and ID
- User’s email address
- Course ID and type that user is on
- Browser/device information (from a Qualtrics feature)
This information being recorded accurately not only keeps the end user from being frustrated from asking for it, but helps us better track for trends, investigate reported issues, and provide quick and quality support as a result.
What’s Next?
I hope you see the power of embedding forms as a front-end user experience. Next time, combining it with several other techniques we have discussed in the series so far, we’ll look at another way to help manage the scheduling of ILT/VILT sessions.
Guide Series:
The Art of Being Lazy: Leveraging the API to Take Care of Repetitive Tasks & Fill Feature Gaps
Getting Started: Building Out Your Toolbox [Part 1] and [Part 2]
Reports: Sending, modifying, and more!
In the Room When it Happens: Act On Events with Webhooks
Bulk Scheduling ILT Sessions with a CSV File
Tag, You’re It!: Tracking and Managing Content Tags
And We're Back: How to Let Users have a Form as a Wizard Scheduling Tool
You Built It, They Came, Now What?: Scheduling ILT Wizard Bonus Activities


