

This guide is the second in a series of new guides brought to you by
Welcome back!
If you haven’t already, I encourage you to read the official kick off guide for this new series to get some insight into my goals, method, and thinking when approaching this guide series as a whole.
Alright, let’s begin with Part 1.

Before setting out on any type of journey, we must do a little prep work. Without it, we simply won’t get very far. When it comes to the work we will be doing, this prep has to do with understanding how the Docebo API works, setting up a few tools so we can easily interact with it, and organizing ourselves to keep track of our work. In this type of work, the more tools at your disposal, the better.
In this guide, we will be covering the following:
-
The Docebo API Browser: What is it? How to use it? When to use it?
-
Postman: A free desktop application that lets you easily explore the API.
-
Power Automate: If you have Office 365, let’s talk about building a custom Docebo connector to let you quickly build powerful workflows.
-
API Usage Monitoring: There are restrictions when working with an API. Let’s cover a few techniques on how to manage those.
Guide Table of Contents
The Docebo API Browser
Overview
I will not be going into heavy duty API documentation, as Docebo’s help section already does a great job at that. Here are some useful links that I suggest reading through or at least being familiar with while doing this type of work:
Once you are all set up to work, one of the best resources at your disposal is the API Browser. This is the definitive source of which API endpoints are available and how to use them. Additionally, it lets you try them out right from within your browser. This is great for testing, doing a quick call to get a piece of information, or researching which endpoint will be best to use for a purpose.
Access and Navigate the API Browser
To access your API Browser, simply open a web browser and navigate to: https://<[yoursubdomain].docebosaas.com>/api-browser/
You should be brought to a page that looks similar to the image below:

Now, let’s orient ourselves to the page:
| Services Menu | Use this to switch to the right area of APIs you are looking to use. Most commonly, you will use learn and manage.
It may not be obvious where the endpoint you're looking for is located. The best way to get your bearings is to take a look around! |
|---|---|
| Token | If you have already gotten an authentication token from some other method, paste it here and it will be used to authenticate and use the endpoints within the browser. I do not typically use this. An easier way to do this inside the browser will be covered later, but it does come in handy to be able to test tokens this way. |
| API Reference | List of endpoints categorized. Scroll through this list to find what you are looking for.
Remember this page is just a webpage. You can use ctrl/cmd + f and then search for words on the page if you are not sure where the endpoint might be. |
| Endpoint Information Pane | When you select an endpoint, information about it will be displayed here. This includes which type it is, the URL, and fields that require data for the endpoint to work. |
| Try Button | If you fill in all the required fields, and have a proper authentication token loaded, you can click this button to actually run the API.
WARNING: Be careful, this is not a test or example, it will actually run the API. In general, I tell people to stick with only the ‘GET’ types until they are comfortable with them (as you can’t break anything). |
| OAUTH Button | This lets you log into your instance of Docebo and authenticate for a valid authentication token. Do this before you use the Try button. This should load the token automatically into the Token field in the top left.
You must be a Superadmin in Docebo in order to interact with the API at this time. (There is an exception to this using embed codes, but we’ll cover that later in a different article.) |
| Response Sample Pane | This gives a sample payload schema of what to expect from successful use of the endpoint. This comes in handy when designing things and for knowing what information will be provided to you. |
Example: Using the API Browser to Get User Information
Ok, now that you know how to access the API Browser and understand how to move around it, let’s have some fun and use the API!
Let’s walk through a simple but useful example; I want to look up a specific user’s information.
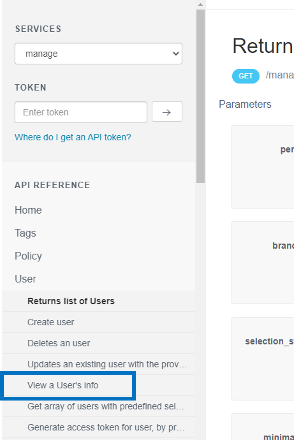
First, I navigate to the API Browser, and look for an appropriate endpoint. In this case, I see there is a ‘User’ category under the ‘manage’ service. Scrolling down, I see several choices close to what I am looking for:
-
Return list of users: I could probably use this. A list of one is still a list right? Let’s keep looking though.
-
Create user: I don’t want to make a new user; I want to look at an existing user. Not right.
-
View a user’s info: PERFECT! This is what I want.
Now that I have selected ‘View a user’s info’, the information related to it has loaded into the middle. The only required information is the user’s ID. Alright, I need to look that up. This is the unique Docebo User ID. I can get this from reports, or by doing a CSV export from the user management area (for more on finding IDs for items around the system, check out this great community article.)
Once I have found the user ID, I can load it into the required field.
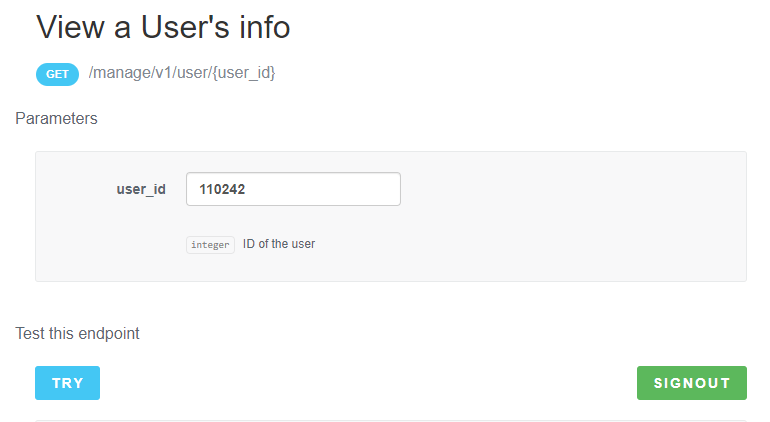
Ready? Here’s the fun part. Make sure you have a valid token loaded and click the Try button!
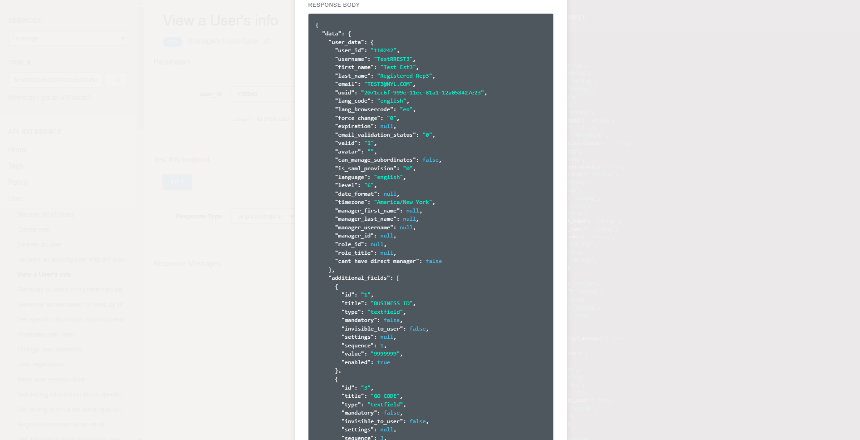
💥 BAM! I got a successful call, and here is all the information about the user I was curious about. You can see how great this can be to find some quick information, an ID, or the like that may not be available to you from the front end interface of Docebo.
Let’s take it a step further. Say I don’t know the exact user. Let’s return to the ‘Return a list of users’ endpoint. Upon selecting it, you may notice that there are far more options available to fill in compared to our previous example. That is because this endpoint has no required parameters. You can just run it empty and simply get a list of all users set to the default settings. Let’s try an edited one though.
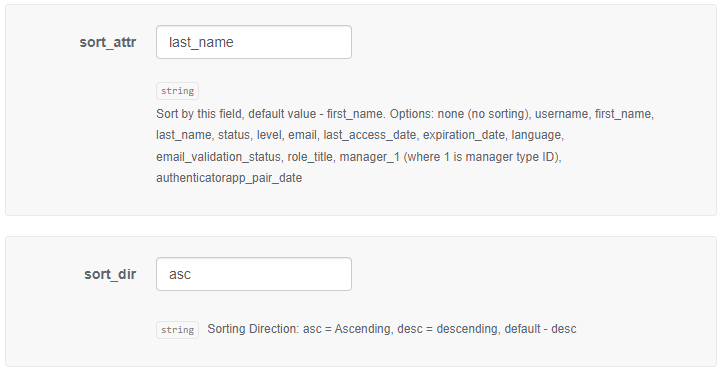
I want to find all of my test accounts. To do this, I can simply go to the ‘search_text’ parameter and enter ‘test’ since I use that for all their last names.

Now, I only want standard test users, no Superadmins or Power Users, so I scroll down and find a parameter that does just that and simply put a 1 in it.

Just for fun, let’s order the list. Set the ‘sort_attr’ to ‘last_name’ and ‘sort_dir’ to ‘asc’, and you’ll have a nice, alphabetical list.
Hit that Try button again.

And just like that, I have the list of users I need and all their information for use. That wasn’t so bad, right? Try out a few more simple requests (stick to the ‘GET’ requests for a while to be safe), and you are on your way to being an API pro in no time!
Postman: Like the API Browser but with Memory!
Now that you are able to have some fun using the API browser, you might find the joy of it working quickly fades… What once was a mystery is now second nature, and you begin to get frustrated by its limitations. I am going to bet the first frustration you will have is that there are certain calls you like to use over and over, and it gets annoying to fill in all the fields the same way each time, as the API browser does not remember what you did last time.
Good news! We can easily solve this frustration. Enter Postman.
Install Postman
Postman is a great tool to have at your disposal when beginning to do API work. It allows you to set up and interact with various application’s APIs. Your work will be saved, and it allows you to easily duplicate and modify individual calls. It is incredibly powerful. I will show you how to set it up to work with the Docebo API similarly to the API Browser, but I want to emphasize there is a ton more you can do here. If curious, go check out YouTube for some great tutorials.
You can download the latest version of Postman for your computer here: https://www.postman.com/downloads/
While on the website, I encourage you to sign up for a free account. The benefit of this is that you can sync your work to this account and between computers, allowing you to move computers without needing to start over from scratch.
Setup OAUTH 2.0 App in Docebo
In order to use the Docebo API, you need to create and configure an OAUTH 2.0 app within the API admin area.
- Log in and select the Admin Menu (Gear icon top right corner).
- Select ‘Manage’ under the ‘API and SSO’ area.
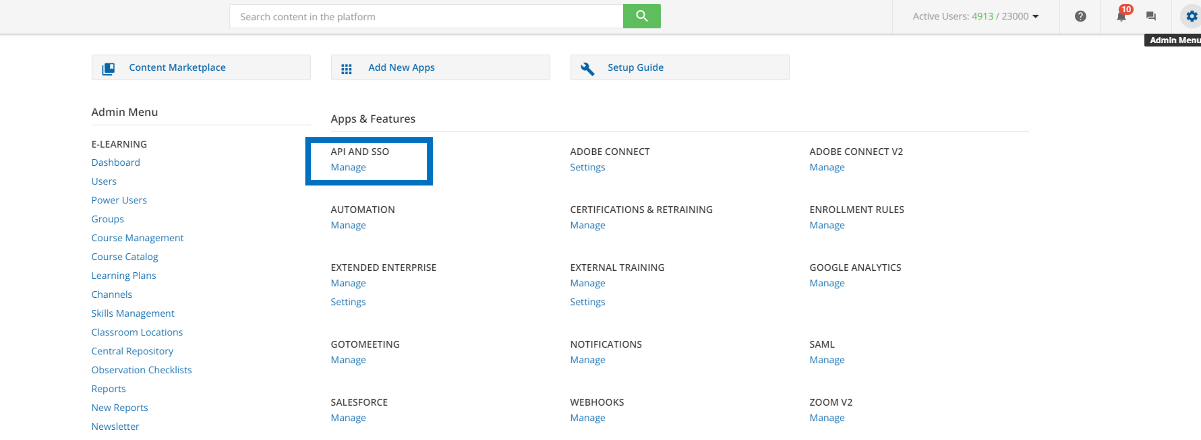
- Select ‘API Credentials’.
- Select ‘Add OAuth2 App’.
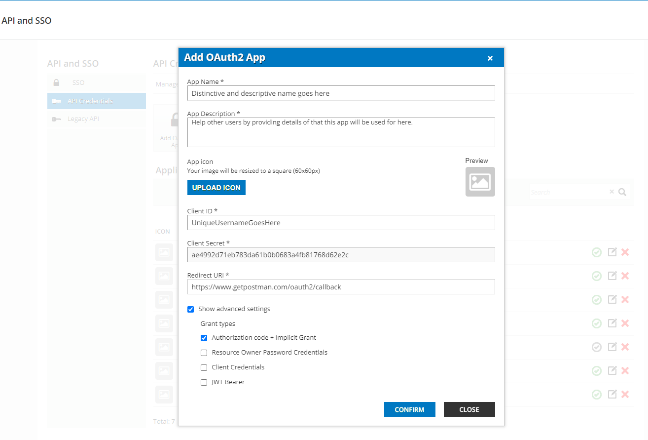
- Fill in the required information:
- App Name: Give the app a distinctive and descriptive name so you can differentiate it from others.
- App Description: Important to detail the purpose of the app so that other admins are clear what each is for.
- Client ID: Think of this like a username. Make it unique and make sense for the account.
- Client Secret: This will be generated automatically, and you can think of it like the account’s password. You will need it later, so make a note of this, but protect it.
- Redirect URL: Each application you use will have a unique one of these. It tells the applications how to talk to each other. For Postman, use this: https://www.getpostman.com/oauth2/callback
- Select ‘Show advanced settings’ check box and make sure the ‘Authorization code + implicit Grant’ checkbox is selected. (Yes, you can use other types, but this is the route I recommend for beginners to stay safe.)
- Select ‘Confirm’.
Configure Postman for Authentication with Docebo
Ok, now that you have Postman installed and a Docebo OAuth2 app configured, let’s create a new workspace and set it up to authenticate properly with Docebo to use the API.
- Open Postman
- If it is your first time, you should be prompted for what you wish to do. Select the ‘Collection’ option. If this window does not open for you, look for the ‘New’ button and select ‘Collection’.
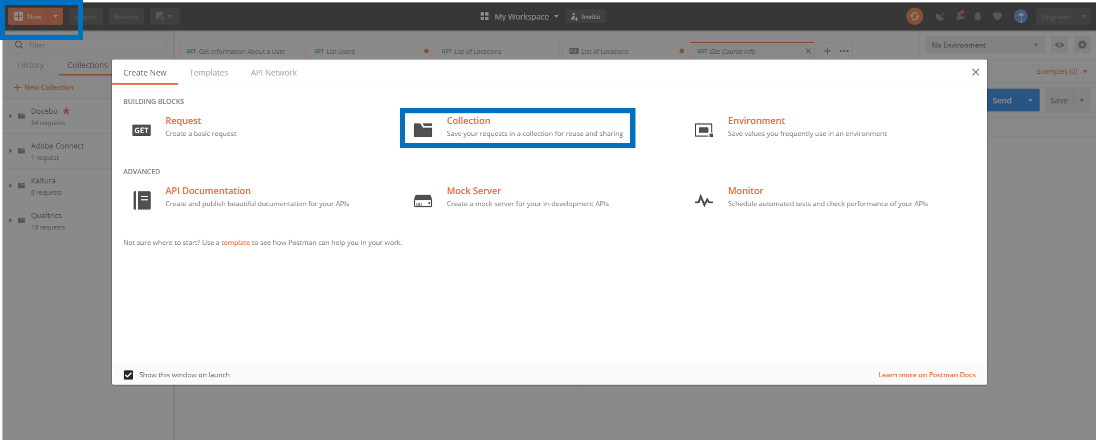
- Name the Collection something distinctive and descriptive. Feel free to give it a description.
- Select the ‘Authorization’ tab
- Under type, switch to ‘OAuth 2.0’
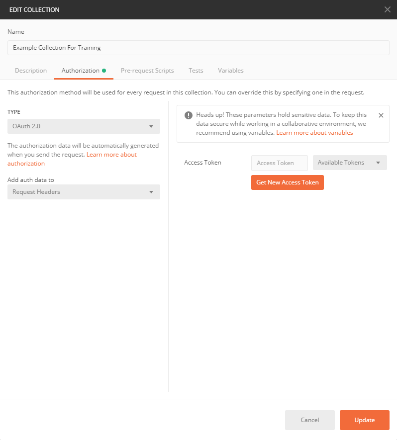
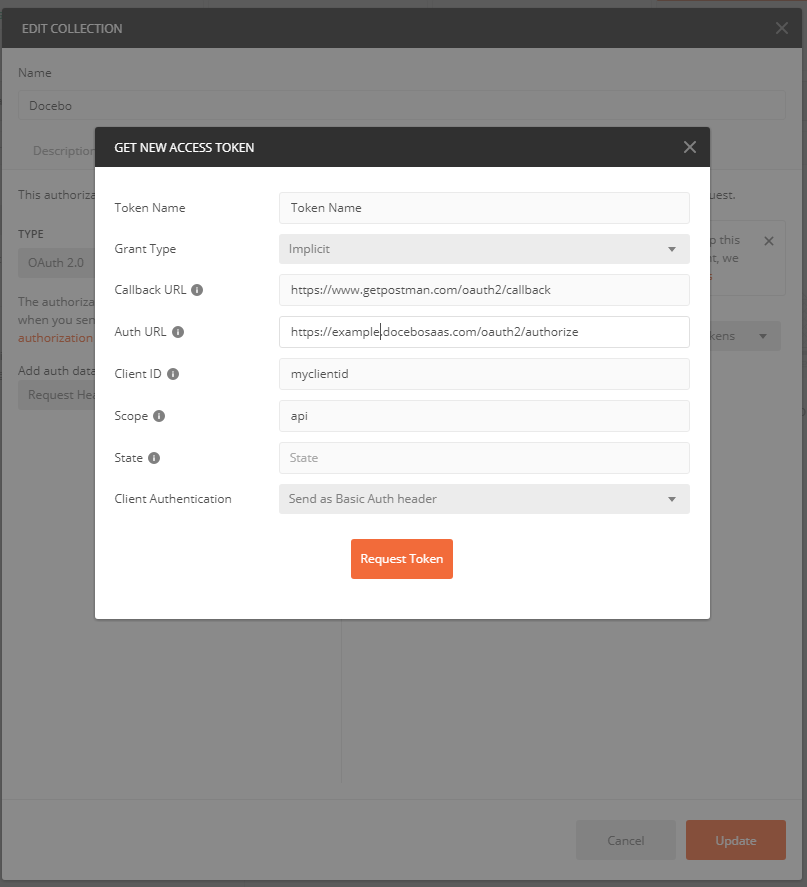
- Select the ‘Get New Access Token’ button to launch the configuration panel, then configure the following:
- Token Name: If you are using multiple systems/applications/integrations, you may wish to give this a descriptive name. You will see them all together in the token management window. Even if only using Docebo, you still might want to keep sandbox vs. production named differently.
- Grant Type: Implicit
- Callback URL: https://www.getpostman.com/oauth2/callback
- Auth URL: https://<[yoursubdomain].docebosaas.com>/oauth2/authorize
- Client ID: Enter the value you created when setting up the Oauth 2.0 App in Docebo
- Scope: api
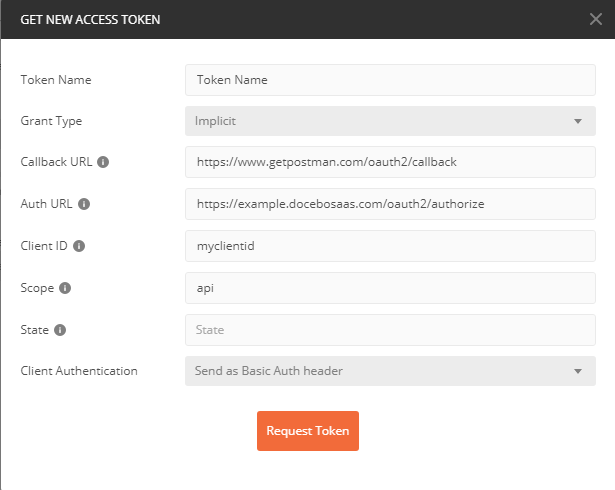
- Select ‘Request Token’.
- You should have a pop-up window asking you to authorize. Use your Docebo username and password to get through this window.
If you have SSO enabled, you need to use the local username and password for Docebo, which may not be your SSO username and password.
- You should see the ‘Manage Access Tokens’ screen giving you the information about your new token.
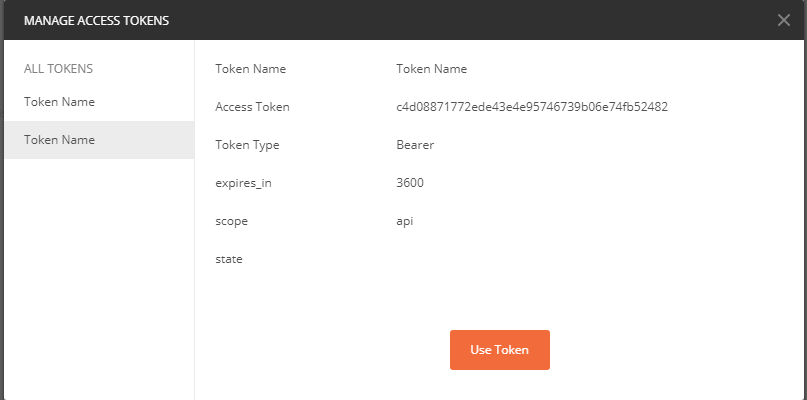
- Select the ‘Use Token’ button.
Please note: the token is only good for one hour. At that time, you will need to return to the Auth tab of the collection and generate a new token.
Now you are all set for some fun!
Build a Docebo Request
Now that we have configured how to authenticate to Docebo, let’s build out some requests. The easiest way to follow this is through an example, so let’s redo the same two calls we did in the API Browser section. First up, look up information about a user:
- Select ‘Request’ from the new menu.
- Give it a distinctive and descriptive name. In this case, I’ve titled it ‘Get Information About a User’.
- Make sure the collection you just made is selected (or if you have multiple collections, that the right one is picked).

- Select ‘Save’.
- The type will default to ‘GET’ which is what we need, but if you are doing a different type of request, you can change this using the dropdown.
Under the request URL bar there is a tab ‘Auth’, and it defaults to ‘Inherit auth from parent’. I recommend leaving this setting across your requests so that you manage the authentication token at the folder/collection level. This will just save you time.
- In the ‘Enter request URL’ field, add the URL for the API endpoint from the API Browser. In this case, it is this URL: https://<[yoursubdomain].docebosaas.com>/manage/v1/user/{user_id}

In this call’s case, there is a placeholder, {user_id}, which lets you replace that with the Docebo ID of the user to look up.
- Select ‘Save’. This will keep your calls in between program sessions, unlike in the API Browser.
- Select ‘Send’.
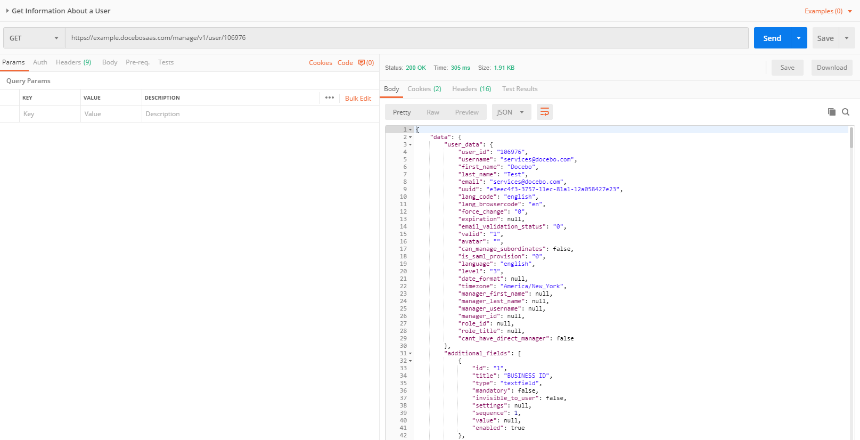
- The response will load in the window either below or to the right side depending on your settings. All of the information in the selected user’s profile is displayed.
Ready for another example?
Let’s use the second example from the API Browser to look at how we can add parameters to the calls.
- Select ‘Request’ from the new menu.
- Give it a distinctive and descriptive name. In this case I’ve titled it ‘Get List of Users’.
- Make sure the collection you just made is selected (or if you have multiple collections, that the right one is picked).
- Select ‘Save’.
- The type will default to ‘GET’ which is what we need, but if you are doing a different type of request, you can change this using the dropdown.
- In the ‘Enter request URL’ field, add the URL for the API endpoint from the API Browser. In this case it is this URL: https://<[yoursubdomain].docebosaas.com>/manage/v1/user
- Select ‘Save’.
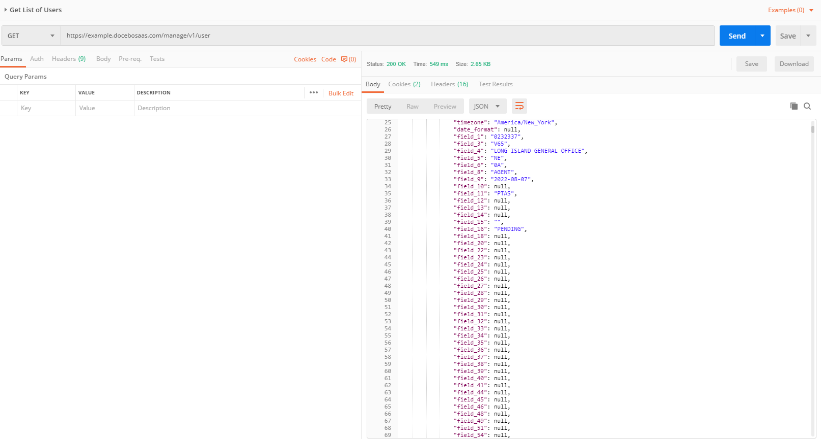
Adding Parameters
Remember in the API Browser how we could run the call just like this? You can do the same now, but that is most likely not useful. Look underneath the request URL bar, and you will see a tab called ‘Params’ that has a table of Key, Value, and Description. This table will let us add the other settings from the API Browser.
- In the first Key spot put: sort_attr
- In the first Value spot put: last_name
You can add a description if you wish to remember more about this parameter. I sometimes put other choices/options here so I do not need to look them up again.
- In the next Key spot put: sort_dir
- In the next Value spot put: asc
- Select ‘Send’.

The results shown should match the same list you received in the API Browser. As an extra step, notice there is a checkbox to the left of each parameter. If you want to remove a parameter but remember the value for later, simply uncheck it and it will be excluded from the call. This is a great way to keep multiple common parameters and toggle which you want to use each time.
You can add as many calls as you want, organize them into folders, and sync between computers. You can do a lot more with Postman, so as you get more comfortable, make sure to search for some advanced lessons.
That’s it, you have successfully configured Postman to continue your API explorations, enjoy!
Guide Series:
The Art of Being Lazy: Leveraging the API to Take Care of Repetitive Tasks & Fill Feature Gaps
Getting Started: Building Out Your Toolbox [Part 2]
Reports: Sending, modifying, and more!
In the Room When it Happens: Act On Events with Webhooks
Bulk Scheduling ILT Sessions with a CSV File
Tag, You’re It!: Tracking and Managing Content Tags
Let Others Do It: The Power of Forms in a Workflow
And We're Back: How to Let Users have a Form as a Wizard Scheduling Tool
You Built It, They Came, Now What?: Scheduling ILT Wizard Bonus Activities