


This guide is the sixth in a series of new guides brought to you by

One of the earliest issues we ran into when deploying the Docebo platform was a frustration with the way the search performed. After looking into it further, it seemed directly connected to the auto-tagging that no one was really paying attention to when uploading content. For those who do not know, tags on content have the largest weight for search considerations, I highly recommend reading this great support article for more information if you are interested.
While we could do an initial purge of the content list to remove essentially all the existing tags (or just those which are not relevant), this would not prevent bad tags from being added in the future. Reading community threads like this one or this one tells me I am not alone.
Guide Table of Contents
Overall Approach
Before diving into some specifics, I wanted to map out how I approached the problem.
First, we did a dedicated exercise of cleaning up existing tags. This involved pulling a list of all existing tags via API using the API Browser, reviewing it, deciding which to remove, and then deleting those tags (also via the API Browser)
Tip: You will find the relevant APIs under the Manage > Tags area of the API Browser.
This step was major and got us to a new status quo. We immediately started seeing better search results. In order to keep things clean moving forward, our goal was to look out for any new tags created and let an administrator know for review.
To accomplish this, we took advantage of the fact that tags within Docebo are assigned a unique ID that increments upward. If this value could be tracked, we could identify if more tags had been added, and which ones.
To accomplish this, a combination of tools were used. Many other combinations could be used in this case, but the choices were made for our particular comfort with certain workflows, I strongly encourage you to think about these processes and what will work for you when setting them up.
Updating the Custom Connector
In order for this to work, the Power Automate Docebo Custom Connector that we built back in the second article of this series might need to have several API’s defined within it:
-
GET /manage/v1/tags – This will get a list of all the existing tags within your instance of Docebo. No parameters are actually needed, however I recommend having the following settings available. Keep in mind, you may need others depending upon your exact needs.
-
sort_attr
-
search_tag
-
sort_dir
-
page
-
page_size
-
-
DELETE /manage/v1/tags/(id_tag) – This will delete the tag specified by the tag ID. There are no additional parameters for this—only the Tag ID is needed.
Building the Process
There were a couple of processes for this as we wanted to review new tags before they were removed. I am going to go over them as two pieces, but you could also combine them if you wanted to.
Identifying New Tags
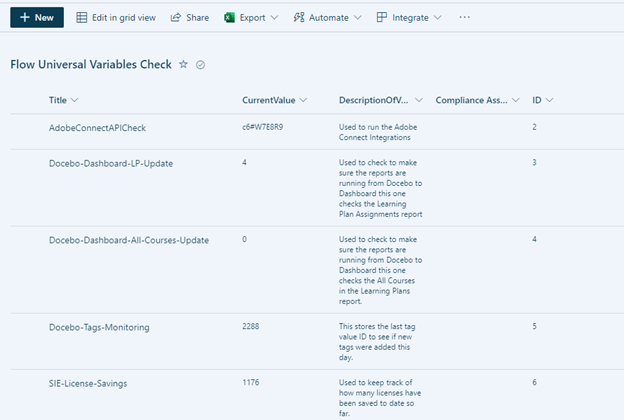
In order for this to work, you need a way to store and recall the newest tag each day. This way you know what tags have been added recently. I do this using a SharePoint List that I call Universal Variables, which I keep in a central site for managing all the automations I build. It lets me add a new item with a name, a unique ID, and a value (in this case, Docebo-Tags-Monitoring):
Alright, now that all the pre-work is done, let’s work through building a process that will look up any new tags in the past week and email them to an administrator to review.
-
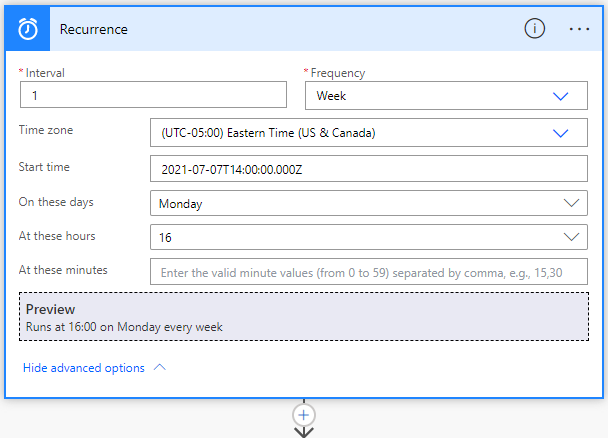
Create a ‘Scheduled cloud flow’ in Power Automate and set the recurrence to a date/time pattern you wish. In my case, it runs Monday afternoons.
-
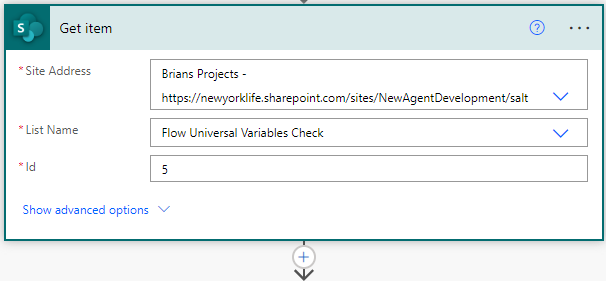
Create a ‘Get Item – SharePoint’ item. Input the site address, list name, and ID of the variable you created above that will be keeping track of the tag IDs.
-
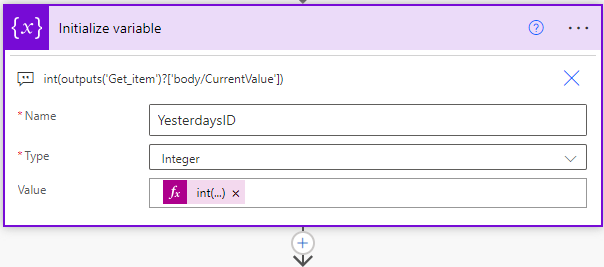
Create a ‘Initialize variable’ item and give it the following settings:
-
Name: YesterdaysID
-
Type: Integer
-
Value: int(outputs('Get_item')?['body/CurrentValue'])
-
Note: This takes the current SharePoint list value and converts it into an integer so we can use it in math expressions later.
- Create a ‘Look Up Tags’ item using the custom connector and set the following values:

-
Page: 1
-
Page_size: 1
-
Sort_attr: id
-
Sort_dir: desc
-
Note: The goal is to find the newest Tag that has been created, so the highest ID number.
- Create a ‘Initialize variable’ item and give it the following settings:
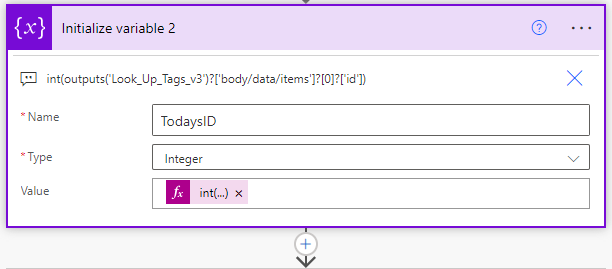
- Name: TodaysID
-
Type: Integer
-
Value: int(outputs('Look_Up_Tags')?['body/data/items']?[0]?['id'])
Note: This takes the current highest Docebo Tag ID and converts it into an integer so we can use it in math expressions later.
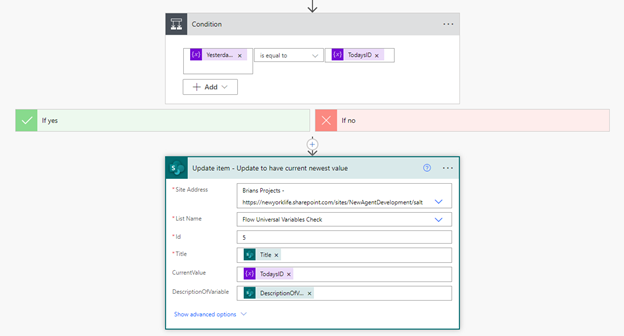
- Create a ‘Condition’ item. Put ‘YesterdaysID’ is equal to ‘TodaysID’.
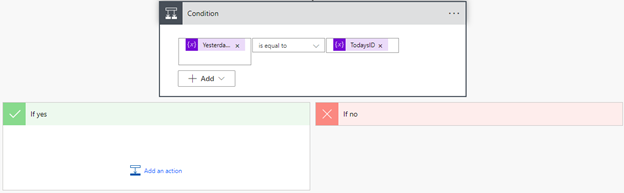
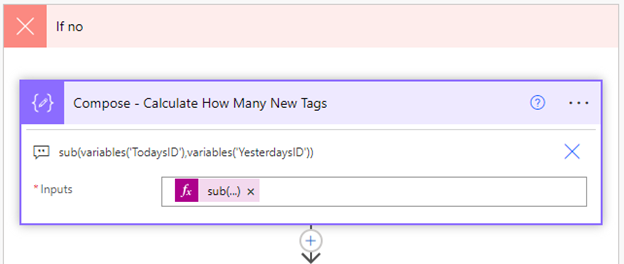
- In the Condition, ‘If yes’ put nothing. In the ‘If no’ put the following:
- Create a ‘Compose’ item and put the following formula: sub(variables('TodaysID'),variables('YesterdaysID'))
- Create a ‘Look Up Tags’ item using the custom connector and set the following values:
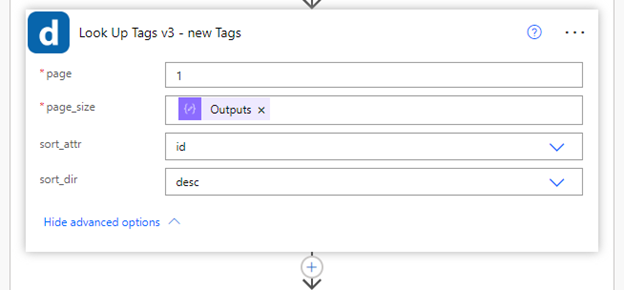
- Page: 1
- Page_size: Output of the compose step above.
- Sort_attr: id
- Sort_dir: desc
- Note: If you get a lot of new tags a day, you may need to adjust this to accommodate multiple pages worth of tags. We never came near 200 new tags a day, so this was not relevant in our case.
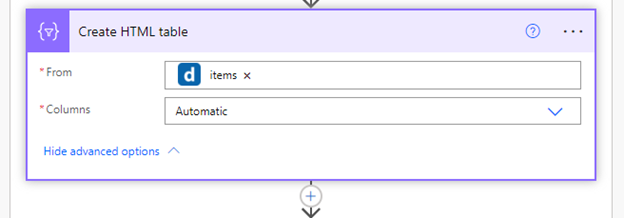
- Create a ‘Create HTML table’ item. In the ‘From’ field put the ‘items’ from the previous ‘Look Up Tags’.
- Create a ‘Send an email’ item. You can get as fancy as you want here, but all you need to do is put the email of the person who will be reviewing, and in the body of the email put the ‘Output’ of the ‘Create HTML table’ step.

- Create a ‘Compose’ item and put the following formula: sub(variables('TodaysID'),variables('YesterdaysID'))
-
Make sure you are outside of the condition step area and create an ‘Update item – SharePoint’ item. Fill in the following information:
-
Site Address and List Name: Where you variable lives.
-
ID: The Id of your variable in the SharePoint list.
-
Title: Put the title from the original ‘Get Item’ lookup earlier.
-
CurrentValue: Set to the ‘TodaysID’ variable.
-
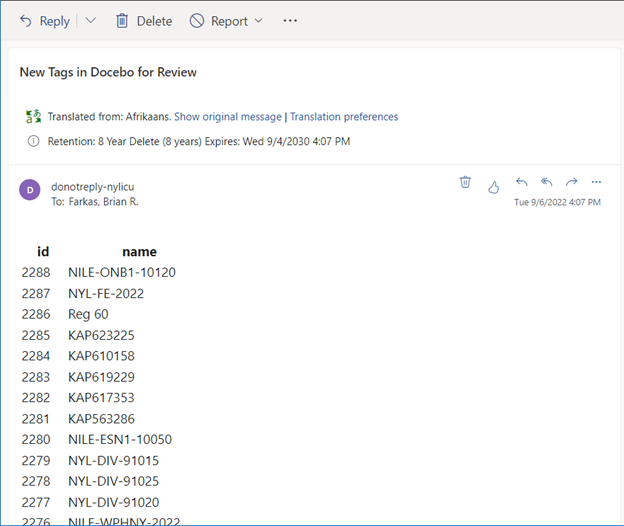
Now, every week, a platform admin will receive an email with a list of new tags that have been added:
Using this the administrator can review them and choose which tags to delete. We conscientiously decided to segment these processes to make sure something needed wasn’t removed.
IF you were ok with removing all new tags, you could add a ‘Delete Tag’ step above before the ‘Create HTML table’ and insert the ‘id’ from the ‘Look Up Tags’ step, which will make it loop through and delete all the values. I do not recommend this route, but you could.
Deleting New Tags
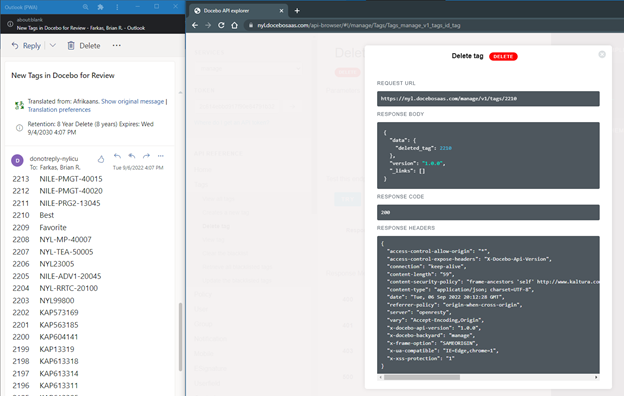
Hopefully, once you do the first round of large cleanup, the weekly maintenance will not be so bad. With this in mind (and in the interest of delegating the deletion responsibilities to someone else), I found it easiest to either use Postman or the API Browser to delete tags.
In both cases, what I like to do is to set the email list on one half of my screen and either Postman or the API Browser on the other half of the screen.
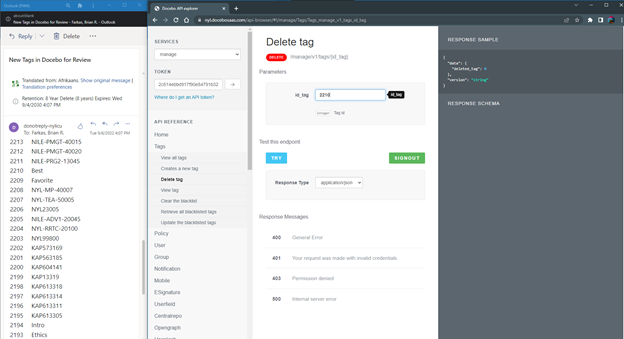
In both cases, if you are authenticated, you simply have to update the ID of the tag and either select ‘Send’ (Postman) or ‘Try’ (API Browser). This lets you quickly swap and delete them.
Tip: You can make a list of ID’s you want to remove and use the Runner feature in Postman to do this faster. For more information on how to do this, check out this support article.
What’s Next?
Now you will be able to keep an eye on the tags in your system, remove those that are unnecessary or causing search issues, and (hopefully) keep search working optimally for you!
In the next installment, we will be looking at one of my absolute favorite techniques—using a form to allow others to carry out tasks.
By using a form as a tailored front end, combined with the power of Docebo pages and widgets, you can give end users the ability to use Docebo’s exposed API endpoints without them even knowing it!
Guide Series:
The Art of Being Lazy: Leveraging the API to Take Care of Repetitive Tasks & Fill Feature Gaps
Getting Started: Building Out Your Toolbox [Part 1] and [Part 2]
Reports: Sending, modifying, and more!
In the Room When it Happens: Act On Events with Webhooks
Bulk Scheduling ILT Sessions with a CSV File
Let Others Do It: The Power of Forms in a Workflow
And We're Back: How to Let Users have a Form as a Wizard Scheduling Tool
You Built It, They Came, Now What?: Scheduling ILT Wizard Bonus Activities


